Scheduled Maintenance Guide 6th Printing
Page 9
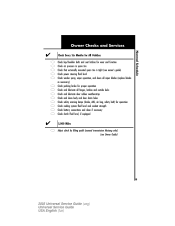
... and door drain holes Check safety warning lamps (brake, ABS, air bag, safety belt) for operation Check cooling system fluid level and coolant strength Check battery connections and clean if necessary Check clutch fluid level, if equipped 5,000 Miles Adjust clutch by lifting pedal (manual transmission Mustang only) (see Owner Guide...
... and door drain holes Check safety warning lamps (brake, ABS, air bag, safety belt) for operation Check cooling system fluid level and coolant strength Check battery connections and clean if necessary Check clutch fluid level, if equipped 5,000 Miles Adjust clutch by lifting pedal (manual transmission Mustang only) (see Owner Guide...
Scheduled Maintenance Guide 6th Printing
Page 37
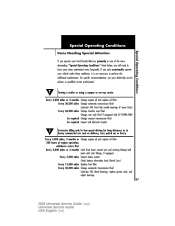
Special Operating Conditions Special Operating Conditions Items Needing Special Attention If you operate your Ford/Lincoln/Mercury primarily in one of engine operation, whichever occurs first Every 3,000 miles or 3 months Lube front lower control arm and steering ...60,000 miles Change transfer case fluid Change rear axle fluid if equipped with zerk fittings, if equipped Every 5,000 miles Inspect brake system Check battery electrolyte level (Patrol Cars) Every 15,000 miles Replace fuel filter Every 30,000 miles Change automatic transmission fluid Lubricate 4X2 wheel bearings, replace...
Special Operating Conditions Special Operating Conditions Items Needing Special Attention If you operate your Ford/Lincoln/Mercury primarily in one of engine operation, whichever occurs first Every 3,000 miles or 3 months Lube front lower control arm and steering ...60,000 miles Change transfer case fluid Change rear axle fluid if equipped with zerk fittings, if equipped Every 5,000 miles Inspect brake system Check battery electrolyte level (Patrol Cars) Every 15,000 miles Replace fuel filter Every 30,000 miles Change automatic transmission fluid Lubricate 4X2 wheel bearings, replace...

Owner Guide 3rd Printing
Page 2
only) 146 154 Cleaning Maintenance and Specifications Engine compartment Engine oil Battery Fuel information Part numbers Refill capacities Lubricant specifications 155 161 163 166 169 176 195 196 197 2 Table of Contents Seating and Safety Restraints Seating ...
only) 146 154 Cleaning Maintenance and Specifications Engine compartment Engine oil Battery Fuel information Part numbers Refill capacities Lubricant specifications 155 161 163 166 169 176 195 196 197 2 Table of Contents Seating and Safety Restraints Seating ...
Owner Guide 3rd Printing
Page 9
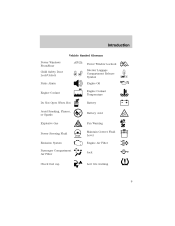
Introduction Vehicle Symbol Glossary Power Windows Front/Rear Child Safety Door Lock/Unlock Panic Alarm Engine Coolant Power Window Lockout Interior Luggage Compartment Release Symbol Engine Oil Engine Coolant Temperature Battery Do Not Open When Hot Avoid Smoking, Flames, or Sparks Explosive Gas Battery Acid Fan Warning Maintain Correct Fluid Level Engine Air Filter Jack MAX MIN Power Steering Fluid Emission System Passenger Compartment Air Filter Check fuel cap Low tire warning 9
Introduction Vehicle Symbol Glossary Power Windows Front/Rear Child Safety Door Lock/Unlock Panic Alarm Engine Coolant Power Window Lockout Interior Luggage Compartment Release Symbol Engine Oil Engine Coolant Temperature Battery Do Not Open When Hot Avoid Smoking, Flames, or Sparks Explosive Gas Battery Acid Fan Warning Maintain Correct Fluid Level Engine Air Filter Jack MAX MIN Power Steering Fluid Emission System Passenger Compartment Air Filter Check fuel cap Low tire warning 9

Owner Guide 3rd Printing
Page 11
...: Reminds you to flash, a malfunction has been detected, have the system serviced immediately. Instrument Cluster Brake system warning light: To ! Charging system: Illuminates when the battery is illuminated.
...: Reminds you to flash, a malfunction has been detected, have the system serviced immediately. Instrument Cluster Brake system warning light: To ! Charging system: Illuminates when the battery is illuminated.
Owner Guide 3rd Printing
Page 63
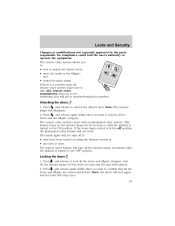
...; they were on using the dimmer control or • any door is open the trunk or the liftgate, and • sound the panic alarm. The battery saver feature will illuminate. This feature turns on the interior lamps for compliance could void the user's authority to operate the equipment. Note: The interior...
...; they were on using the dimmer control or • any door is open the trunk or the liftgate, and • sound the panic alarm. The battery saver feature will illuminate. This feature turns on the interior lamps for compliance could void the user's authority to operate the equipment. Note: The interior...

Owner Guide 3rd Printing
Page 64
... the ignition is approximately 10 meters (33 feet). DO NOT TAKE THE FRONT PART OF THE REMOTE ENTRY TRANSMITTER APART. 2. Insert the new battery. Snap the two halves back together. Note: The panic alarm will flash for your vehicle. Remove the old... battery. 3. Replacing the battery The remote entry transmitter uses one coin type three-volt lithium battery CR2032 or equivalent. Refer to timeout in 3 minutes. The remote transmitter should operate normally after battery replacement. 64 Locks and Security If any of the doors ...
... the ignition is approximately 10 meters (33 feet). DO NOT TAKE THE FRONT PART OF THE REMOTE ENTRY TRANSMITTER APART. 2. Insert the new battery. Snap the two halves back together. Note: The panic alarm will flash for your vehicle. Remove the old... battery. 3. Replacing the battery The remote entry transmitter uses one coin type three-volt lithium battery CR2032 or equivalent. Refer to timeout in 3 minutes. The remote transmitter should operate normally after battery replacement. 64 Locks and Security If any of the doors ...

Owner Guide 3rd Printing
Page 66
... not equipped with the dimmer control, or • any door is pressed, or • after the ignition has been turned to the OFF position. The battery saver will shut off the interior lamps 10 minutes after 25 seconds of illumination. Perimeter lamps illuminated entry The exterior lamps illuminate when the vehicle...
... not equipped with the dimmer control, or • any door is pressed, or • after the ignition has been turned to the OFF position. The battery saver will shut off the interior lamps 10 minutes after 25 seconds of illumination. Perimeter lamps illuminated entry The exterior lamps illuminate when the vehicle...
Owner Guide 3rd Printing
Page 119
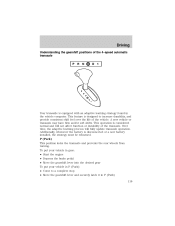
... and will fully update transaxle operation. P (Park) This position locks the transaxle and prevents the rear wheels from turning. This operation is disconnected or a new battery installed, the strategy must be relearned. A new vehicle or transaxle may have firm and/or soft shifts. Over time, the adaptive learning process will not...
... and will fully update transaxle operation. P (Park) This position locks the transaxle and prevents the rear wheels from turning. This operation is disconnected or a new battery installed, the strategy must be relearned. A new vehicle or transaxle may have firm and/or soft shifts. Over time, the adaptive learning process will not...

Owner Guide 3rd Printing
Page 128
...and rear direction signals will reimburse a reasonable amount. Use it when your Ford or Lincoln Mercury dealer. Note: With extended use, the flasher may purchase extended coverage prior to your battery. Canadian customers who require roadside assistance, call 1-800-241-3673; HAZARD ...FLASHER The hazard flasher is creating a safety hazard for yourself, Ford Motor Company will flash. Roadside Emergencies Canadian customers who need...
...and rear direction signals will reimburse a reasonable amount. Use it when your Ford or Lincoln Mercury dealer. Note: With extended use, the flasher may purchase extended coverage prior to your battery. Canadian customers who require roadside assistance, call 1-800-241-3673; HAZARD ...FLASHER The hazard flasher is creating a safety hazard for yourself, Ford Motor Company will flash. Roadside Emergencies Canadian customers who need...
Owner Guide 3rd Printing
Page 132
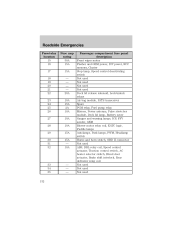
... release solenoid, Lock/unlock relays Air bag module, PATS transceiver Spare PCM relay, Fuel pump relay Mirrors, Power antenna, Pulse stretcher module, Deck lid lamp, Battery saver Gauges and warning lamps, ICP, FFV sender, GEM Blower motor relay coil, EATC logic, Puddle lamps Autolamps, Park lamps, PWM, Headlamp switch Horns and...
... release solenoid, Lock/unlock relays Air bag module, PATS transceiver Spare PCM relay, Fuel pump relay Mirrors, Power antenna, Pulse stretcher module, Deck lid lamp, Battery saver Gauges and warning lamps, ICP, FFV sender, GEM Blower motor relay coil, EATC logic, Puddle lamps Autolamps, Park lamps, PWM, Headlamp switch Horns and...

Owner Guide 3rd Printing
Page 133
... Not used Not used Power distribution box The power distribution box is located in the engine compartment. Always disconnect the battery before reconnecting the battery or refilling fluid reservoirs. If the battery has been disconnected and reconnected, refer to the Power Distribution Box before servicing high current fuses. Roadside Emergencies Fuse/relay... high-current fuses that protect your vehicle's main electrical systems from overloads. To reduce risk of electrical shock, always replace the cover to the Battery section of the Maintenance and specifications chapter. 133
... Not used Not used Power distribution box The power distribution box is located in the engine compartment. Always disconnect the battery before reconnecting the battery or refilling fluid reservoirs. If the battery has been disconnected and reconnected, refer to the Power Distribution Box before servicing high current fuses. Roadside Emergencies Fuse/relay... high-current fuses that protect your vehicle's main electrical systems from overloads. To reduce risk of electrical shock, always replace the cover to the Battery section of the Maintenance and specifications chapter. 133

Owner Guide 3rd Printing
Page 139
... VEHICLE The gases around the battery can burn skin, eyes and clothing, if contacted. An explosion could result in the order shown. 1 3 4 5 11. Automatic transmissions do not have push-start your vehicle When the battery is disconnected or a new battery is fastened so it does ...not rattle when you drive. 12. As a result, the transmission 139 Batteries contain sulfuric acid which can explode if exposed to their proper storage locations. ...
... VEHICLE The gases around the battery can burn skin, eyes and clothing, if contacted. An explosion could result in the order shown. 1 3 4 5 11. Automatic transmissions do not have push-start your vehicle When the battery is disconnected or a new battery is fastened so it does ...not rattle when you drive. 12. As a result, the transmission 139 Batteries contain sulfuric acid which can explode if exposed to their proper storage locations. ...
Owner Guide 3rd Printing
Page 140
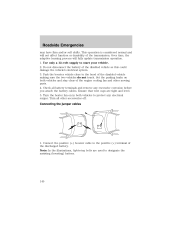
...firm and/or soft shifts. Connecting the jumper cables 1. Use only a 12-volt supply to the positive (+) terminal of the discharged battery. Park the booster vehicle close to the hood of the engine cooling fan and other accessories off. Set the parking brake on in...level. 5. Turn the heater fan on both vehicles to designate the assisting (boosting) battery. 140 - - + + This operation is considered normal and will fully update transmission operation. 1. Do not disconnect the battery of the transmission. Ensure that vent caps are used to protect any excessive corrosion ...
...firm and/or soft shifts. Connecting the jumper cables 1. Use only a 12-volt supply to the positive (+) terminal of the discharged battery. Park the booster vehicle close to the hood of the engine cooling fan and other accessories off. Set the parking brake on in...level. 5. Turn the heater fan on both vehicles to designate the assisting (boosting) battery. 140 - - + + This operation is considered normal and will fully update transmission operation. 1. Do not disconnect the battery of the transmission. Ensure that vent caps are used to protect any excessive corrosion ...

Owner Guide 3rd Printing
Page 141
Connect the negative (-) cable to the positive (+) terminal of the assisting battery. - - - + + - + + 141 Connect the other end of the positive (+) cable to the negative (-) terminal of the assisting battery. 3. Roadside Emergencies 2.
Connect the negative (-) cable to the positive (+) terminal of the assisting battery. - - - + + - + + 141 Connect the other end of the positive (+) cable to the negative (-) terminal of the assisting battery. 3. Roadside Emergencies 2.

Owner Guide 3rd Printing
Page 142
... before disconnecting the jumper cables. 142 - - + + Do not connect the end of the second cable to the negative (-) terminal of the battery to an exposed metal part of the booster vehicle and run both engines, or any fuel delivery system parts. Start the engine of the stalled... vehicle's engine, away from the battery and the carburetor/fuel injection system. Start the engine of the negative (-) cable. Make the final connection of the disabled vehicle. 3. Once the...
... before disconnecting the jumper cables. 142 - - + + Do not connect the end of the second cable to the negative (-) terminal of the battery to an exposed metal part of the booster vehicle and run both engines, or any fuel delivery system parts. Start the engine of the stalled... vehicle's engine, away from the battery and the carburetor/fuel injection system. Start the engine of the negative (-) cable. Make the final connection of the disabled vehicle. 3. Once the...

Owner Guide 3rd Printing
Page 143
Roadside Emergencies Removing the jumper cables Remove the jumper cables in the reverse order that they were connected. 1. Remove the jumper cable on the negative (-) connection of the booster vehicle's battery. - - - - + + + + 143 Remove the jumper cable from the ground metal surface. 2.
Roadside Emergencies Removing the jumper cables Remove the jumper cables in the reverse order that they were connected. 1. Remove the jumper cable on the negative (-) connection of the booster vehicle's battery. - - - - + + + + 143 Remove the jumper cable from the ground metal surface. 2.

Owner Guide 3rd Printing
Page 144
Remove the jumper cable from the positive (+) terminal of the disabled vehicle's battery. Remove the jumper cable from the positive (+) terminal of the booster vehicle's battery. 4. After the disabled vehicle has been started and the jumper cables removed, allow it to idle for several minutes so the engine computer can relearn its idle conditions. 144 - - - + + - + + Roadside Emergencies 3.
Remove the jumper cable from the positive (+) terminal of the disabled vehicle's battery. Remove the jumper cable from the positive (+) terminal of the booster vehicle's battery. 4. After the disabled vehicle has been started and the jumper cables removed, allow it to idle for several minutes so the engine computer can relearn its idle conditions. 144 - - - + + - + + Roadside Emergencies 3.
Owner Guide 3rd Printing
Page 161
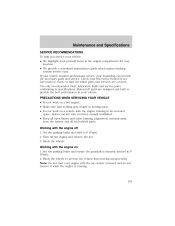
... with the air cleaner removed and do -it while the engine is securely latched in P (Park). 2. Block the wheels to prevent the vehicle from the battery and all fuel related parts. Motorcraft parts are covered. Turn off 1. Working with the engine on 1. If your vehicle requires professional service, your dealership can...
... with the air cleaner removed and do -it while the engine is securely latched in P (Park). 2. Block the wheels to prevent the vehicle from the battery and all fuel related parts. Motorcraft parts are covered. Turn off 1. Working with the engine on 1. If your vehicle requires professional service, your dealership can...

Owner Guide 3rd Printing
Page 163
Air filter assembly 4. Engine oil filler cap 6. Brake fluid reservoir 3. Automatic transmission fluid dipstick 2. Windshield washer fluid reservoir 163 Maintenance and Specifications IDENTIFYING COMPONENTS IN THE ENGINE COMPARTMENT 3.0L V6 Vulcan engine 9 1 2 8 7 6 5 4 3 1. Power steering fluid reservoir 8. Engine oil dipstick 7. Battery 5. Engine coolant reservoir 9.
Air filter assembly 4. Engine oil filler cap 6. Brake fluid reservoir 3. Automatic transmission fluid dipstick 2. Windshield washer fluid reservoir 163 Maintenance and Specifications IDENTIFYING COMPONENTS IN THE ENGINE COMPARTMENT 3.0L V6 Vulcan engine 9 1 2 8 7 6 5 4 3 1. Power steering fluid reservoir 8. Engine oil dipstick 7. Battery 5. Engine coolant reservoir 9.


