Scheduled Maintenance Guide 6th Printing
Page 9
... and door drain holes Check safety warning lamps (brake, ABS, air bag, safety belt) for operation Check cooling system fluid level and coolant strength Check battery connections and clean if necessary Check clutch fluid level, if equipped 5,000 Miles Adjust clutch by lifting pedal (manual transmission Mustang only) (see Owner Guide...
... and door drain holes Check safety warning lamps (brake, ABS, air bag, safety belt) for operation Check cooling system fluid level and coolant strength Check battery connections and clean if necessary Check clutch fluid level, if equipped 5,000 Miles Adjust clutch by lifting pedal (manual transmission Mustang only) (see Owner Guide...
Scheduled Maintenance Guide 6th Printing
Page 37
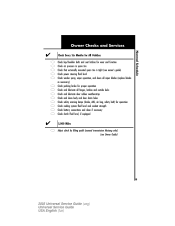
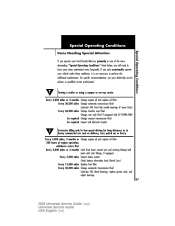
... equipped with zerk fittings, if equipped Every 5,000 miles Inspect brake system Check battery electrolyte level (Patrol Cars) Every 15,000 miles Replace fuel filter Every 30,... automatic transmission fluid Lubricate 4X2 wheel bearings, replace grease seals, and adjust bearings 37 2003 Universal Service Guide (usg) Universal Service Guide USA English (fus) For specific recommendations.... Special Operating Conditions Special Operating Conditions Items Needing Special Attention If you operate your Ford/Lincoln/Mercury primarily in heavy commercial use such as delivery, taxi, patrol car or...
... equipped with zerk fittings, if equipped Every 5,000 miles Inspect brake system Check battery electrolyte level (Patrol Cars) Every 15,000 miles Replace fuel filter Every 30,... automatic transmission fluid Lubricate 4X2 wheel bearings, replace grease seals, and adjust bearings 37 2003 Universal Service Guide (usg) Universal Service Guide USA English (fus) For specific recommendations.... Special Operating Conditions Special Operating Conditions Items Needing Special Attention If you operate your Ford/Lincoln/Mercury primarily in heavy commercial use such as delivery, taxi, patrol car or...

Owner Guide 1st Printing
Page 3
... change the contents without notice and without written authorization from Ford Motor Company. Table of Contents Maintenance and Specifications Engine compartment Engine oil Battery Fuel information Part numbers Refill capacities Lubricant specifications 161 163 166 170 178 196 196 198 Accessories Index 205 208 All rights reserved. Reproduction by ...
... change the contents without notice and without written authorization from Ford Motor Company. Table of Contents Maintenance and Specifications Engine compartment Engine oil Battery Fuel information Part numbers Refill capacities Lubricant specifications 161 163 166 170 178 196 196 198 Accessories Index 205 208 All rights reserved. Reproduction by ...

Owner Guide 1st Printing
Page 9
Introduction Vehicle Symbol Glossary Power Windows Front/Rear Child Safety Door Lock/Unlock Panic Alarm Engine Coolant Power Window Lockout Interior Luggage Compartment Release Symbol Engine Oil Engine Coolant Temperature Battery Do Not Open When Hot Avoid Smoking, Flames, or Sparks Explosive Gas Battery Acid Fan Warning Maintain Correct Fluid Level Engine Air Filter Jack MAX MIN Power Steering Fluid Emission System Passenger Compartment Air Filter Check fuel cap Low tire warning 9
Introduction Vehicle Symbol Glossary Power Windows Front/Rear Child Safety Door Lock/Unlock Panic Alarm Engine Coolant Power Window Lockout Interior Luggage Compartment Release Symbol Engine Oil Engine Coolant Temperature Battery Do Not Open When Hot Avoid Smoking, Flames, or Sparks Explosive Gas Battery Acid Fan Warning Maintain Correct Fluid Level Engine Air Filter Jack MAX MIN Power Steering Fluid Emission System Passenger Compartment Air Filter Check fuel cap Low tire warning 9

Owner Guide 1st Printing
Page 12
... or ABS continues to flash or remains on is not charging properly. A chime will take you to stop the vehicle. Charging system: Illuminates when the battery is dangerous. Have the vehicle checked by your safety belt. A significant decrease in the supplemental restraint system has been detected. It will also sound to...
... or ABS continues to flash or remains on is not charging properly. A chime will take you to stop the vehicle. Charging system: Illuminates when the battery is dangerous. Have the vehicle checked by your safety belt. A significant decrease in the supplemental restraint system has been detected. It will also sound to...

Owner Guide 1st Printing
Page 41
... to activate the right turn signal. 41 On the wall or screen you will observe an area of each light pattern is accessible. 6. Attach the battery cover and close the hood. TURN SIGNAL CONTROL • Push down to activate the left headlamp, pull the bulb cover approximately 1 inch rearward and then... to be operated by releasing the four snap hooks (two top and two bottom). If the left side of high intensity light. Lights 3. Remove the battery cover. 5.
... to activate the right turn signal. 41 On the wall or screen you will observe an area of each light pattern is accessible. 6. Attach the battery cover and close the hood. TURN SIGNAL CONTROL • Push down to activate the left headlamp, pull the bulb cover approximately 1 inch rearward and then... to be operated by releasing the four snap hooks (two top and two bottom). If the left side of high intensity light. Lights 3. Remove the battery cover. 5.

Owner Guide 1st Printing
Page 66
... to properly latch the trunk may cause objects to Securilock passive anti-theft system in the OFF position. Replacing the battery The remote entry transmitter uses one coin type three-volt lithium battery CR2032 or equivalent. For more information on arming the anti-theft system, refer to fall out or block the...
... to properly latch the trunk may cause objects to Securilock passive anti-theft system in the OFF position. Replacing the battery The remote entry transmitter uses one coin type three-volt lithium battery CR2032 or equivalent. For more information on arming the anti-theft system, refer to fall out or block the...

Owner Guide 1st Printing
Page 67
...: 1. Refer to ensure conflicting chimes do not sound during the procedure. 2. Close all remote entry transmitters (maximum of the battery will not cause the remote transmitter to become deprogrammed from your authorized dealer for the correct orientation of the remote entry transmitter near... the key ring. Note: Replacement of four) available before beginning this procedure. The remote transmitter should operate normally after battery replacement. Replacing lost remote entry transmitters If you would like to have your remote entry transmitter reprogrammed because you lost one,...
...: 1. Refer to ensure conflicting chimes do not sound during the procedure. 2. Close all remote entry transmitters (maximum of the battery will not cause the remote transmitter to become deprogrammed from your authorized dealer for the correct orientation of the remote entry transmitter near... the key ring. Note: Replacement of four) available before beginning this procedure. The remote transmitter should operate normally after battery replacement. Replacing lost remote entry transmitters If you would like to have your remote entry transmitter reprogrammed because you lost one,...

Owner Guide 1st Printing
Page 74
... it locks with the engine off will return to ensure that the catch is reached after five or six minutes. The seatback will drain the battery. Do not place objects behind the seat which could prevent the engagement of the seat lock. 74 Heating with a distinct click. Rock the seat to...
... it locks with the engine off will return to ensure that the catch is reached after five or six minutes. The seatback will drain the battery. Do not place objects behind the seat which could prevent the engagement of the seat lock. 74 Heating with a distinct click. Rock the seat to...

Owner Guide 1st Printing
Page 126
...the engine when your vehicle is disabled and is creating a safety hazard for yourself, Ford Motor Company will operate when the ignition is located on the instrument panel by contacting your battery. FUEL PUMP SHUT-OFF SWITCH FUEL RESET This device stops the electric fuel pump ...from sending fuel to your Basic Warranty's Roadside Assistance expiring. If you may purchase additional roadside assistance coverage beyond this switch may run down your Ford or Lincoln Mercury...
...the engine when your vehicle is disabled and is creating a safety hazard for yourself, Ford Motor Company will operate when the ignition is located on the instrument panel by contacting your battery. FUEL PUMP SHUT-OFF SWITCH FUEL RESET This device stops the electric fuel pump ...from sending fuel to your Basic Warranty's Roadside Assistance expiring. If you may purchase additional roadside assistance coverage beyond this switch may run down your Ford or Lincoln Mercury...
Owner Guide 1st Printing
Page 130
... 7.5A 7.5A 20A Passenger Compartment Fuse Panel Description Starter relay Rear intermittent relay Front wiper intermittent relay Not used Not used Not used Horn relay Battery saver relay Rear defrost relay Light switch Radio Turn signal Horn, Power seats (SVT only) Power sunroof Interior lamps, Power mirrors A/C switch, Hazard flasher, Instrument...
... 7.5A 7.5A 20A Passenger Compartment Fuse Panel Description Starter relay Rear intermittent relay Front wiper intermittent relay Not used Not used Not used Horn relay Battery saver relay Rear defrost relay Light switch Radio Turn signal Horn, Power seats (SVT only) Power sunroof Interior lamps, Power mirrors A/C switch, Hazard flasher, Instrument...

Owner Guide 1st Printing
Page 131
Always disconnect the battery before reconnecting the battery or refilling fluid reservoirs If the battery has been disconnected and reconnected, refer to the Battery section of the Maintenance and specifications chapter. 131 Power distribution box The power distribution box is located on the back of this fuse. Always replace ...
Always disconnect the battery before reconnecting the battery or refilling fluid reservoirs If the battery has been disconnected and reconnected, refer to the Battery section of the Maintenance and specifications chapter. 131 Power distribution box The power distribution box is located on the back of this fuse. Always replace ...

Owner Guide 1st Printing
Page 133
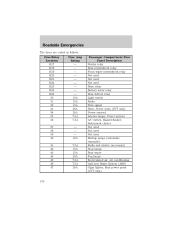
Roadside Emergencies Fuse/Relay Location 10 Fuse Amp Rating 10A (2.0L engine only) 1A (2.3L engine only) 30A 15A - - 10A 10A Power Distribution Box Description Battery voltage sensor 11 12 13 14 15 16 17 18 19 20 21 22 23 24 25 26 27 28 29 Anti-lock Brake System (...
Roadside Emergencies Fuse/Relay Location 10 Fuse Amp Rating 10A (2.0L engine only) 1A (2.3L engine only) 30A 15A - - 10A 10A Power Distribution Box Description Battery voltage sensor 11 12 13 14 15 16 17 18 19 20 21 22 23 24 25 26 27 28 29 Anti-lock Brake System (...
Owner Guide 1st Printing
Page 138
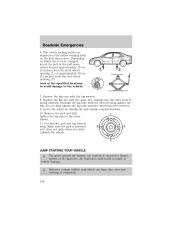
... jack is facing outward. An explosion could result in the order shown. 11. Reinstall the lug nuts until the wheel has been lowered. 9. Roadside Emergencies 6. Batteries contain sulfuric acid which tire is snug against the hub. Put flat tire, jack and lug wrench 3 4 away. Jack at the half-moon cutout located... wheel by turning the jack handle counterclockwise. 10. Depending on the jack shown here. Unblock the wheels. 2 JUMP STARTING YOUR VEHICLE The gases around the battery can burn skin, eyes and clothing, if contacted. 138
... jack is facing outward. An explosion could result in the order shown. 11. Reinstall the lug nuts until the wheel has been lowered. 9. Roadside Emergencies 6. Batteries contain sulfuric acid which tire is snug against the hub. Put flat tire, jack and lug wrench 3 4 away. Jack at the half-moon cutout located... wheel by turning the jack handle counterclockwise. 10. Depending on the jack shown here. Unblock the wheels. 2 JUMP STARTING YOUR VEHICLE The gases around the battery can burn skin, eyes and clothing, if contacted. 138

Owner Guide 1st Printing
Page 139
.... 3. As a result, the transmission may become damaged. Ensure that vent caps are used to designate the assisting (boosting) battery. 139 - - + + Turn all battery terminals and remove any electrical surges. Note: In the illustrations, lightning bolts are tight and level. 5. Use only a 12...of the transmission. Roadside Emergencies Do not attempt to push-start your vehicle. 2. Preparing your vehicle When the battery is disconnected or a new battery is considered normal and will fully update transmission operation. 1. Automatic transmissions do not touch. Over time, the ...
.... 3. As a result, the transmission may become damaged. Ensure that vent caps are used to designate the assisting (boosting) battery. 139 - - + + Turn all battery terminals and remove any electrical surges. Note: In the illustrations, lightning bolts are tight and level. 5. Use only a 12...of the transmission. Roadside Emergencies Do not attempt to push-start your vehicle. 2. Preparing your vehicle When the battery is disconnected or a new battery is considered normal and will fully update transmission operation. 1. Automatic transmissions do not touch. Over time, the ...

Owner Guide 1st Printing
Page 140
Connect the negative (-) cable to the positive (+) terminal of the assisting battery. 140 - - - + + - + + Connect the other end of the positive (+) cable to the negative (-) terminal of the assisting battery. 3. Roadside Emergencies 2.
Connect the negative (-) cable to the positive (+) terminal of the assisting battery. 140 - - - + + - + + Connect the other end of the positive (+) cable to the negative (-) terminal of the assisting battery. 3. Roadside Emergencies 2.

Owner Guide 1st Printing
Page 141
...any fuel delivery system parts. Do not use fuel lines, engine rocker covers or the intake manifold as grounding points. Start the engine of the battery to be jumped. Do not connect the end of the second cable to an exposed metal part of both engines for an additional three minutes...cause an explosion of the gases that the cables are clear of fan blades, belts, moving parts of the stalled vehicle's engine, away from the battery and the carburetor/fuel injection system. Jump starting 1. Once the disabled vehicle has been started, run the engine at moderately increased speed. 2.
...any fuel delivery system parts. Do not use fuel lines, engine rocker covers or the intake manifold as grounding points. Start the engine of the battery to be jumped. Do not connect the end of the second cable to an exposed metal part of both engines for an additional three minutes...cause an explosion of the gases that the cables are clear of fan blades, belts, moving parts of the stalled vehicle's engine, away from the battery and the carburetor/fuel injection system. Jump starting 1. Once the disabled vehicle has been started, run the engine at moderately increased speed. 2.

Owner Guide 1st Printing
Page 142
Roadside Emergencies Removing the jumper cables Remove the jumper cables in the reverse order that they were connected. 1. Remove the jumper cable on the negative (-) connection of the booster vehicle's battery. 142 - - - - + + + + Remove the jumper cable from the ground metal surface. Note: In the illustrations, lightning bolts are used to designate the assisting (boosting) battery. 2.
Roadside Emergencies Removing the jumper cables Remove the jumper cables in the reverse order that they were connected. 1. Remove the jumper cable on the negative (-) connection of the booster vehicle's battery. 142 - - - - + + + + Remove the jumper cable from the ground metal surface. Note: In the illustrations, lightning bolts are used to designate the assisting (boosting) battery. 2.

Owner Guide 1st Printing
Page 143
After the disabled vehicle has been started and the jumper cables removed, allow it to idle for several minutes so the engine computer can relearn its idle conditions. - - - + + - + + 143 Remove the jumper cable from the positive (+) terminal of the booster vehicle's battery. 4. Remove the jumper cable from the positive (+) terminal of the disabled vehicle's battery. Roadside Emergencies 3.
After the disabled vehicle has been started and the jumper cables removed, allow it to idle for several minutes so the engine computer can relearn its idle conditions. - - - + + - + + 143 Remove the jumper cable from the positive (+) terminal of the booster vehicle's battery. 4. Remove the jumper cable from the positive (+) terminal of the disabled vehicle's battery. Roadside Emergencies 3.

Owner Guide 1st Printing
Page 161
... Specifications Maintenance and Specifications SERVICE RECOMMENDATIONS To help you have enough ventilation. • Keep all open flames and other burning (cigarettes) material away from the battery and all fuel related parts.
... Specifications Maintenance and Specifications SERVICE RECOMMENDATIONS To help you have enough ventilation. • Keep all open flames and other burning (cigarettes) material away from the battery and all fuel related parts.


