
Driving Your SUV or Truck 1st Printing
Page 13
...the tire. 13 For your vehicle, which could lead to loss of vehicle control, vehicle rollover and/or serious personal injury. These "aftermarket lift kits" could adversely affect the vehicle's handling characteristics, which could lead to loss of vehicle control or rollover and serious injury. Failure to ...to blow out or fail. If you nevertheless decide to equip your vehicle for off -road use any tire/wheel combination not recommended by Ford because it can affect the safety and performance of your safety, tires that are of the same size, type, tread design, brand ...
...the tire. 13 For your vehicle, which could lead to loss of vehicle control, vehicle rollover and/or serious personal injury. These "aftermarket lift kits" could adversely affect the vehicle's handling characteristics, which could lead to loss of vehicle control or rollover and serious injury. Failure to ...to blow out or fail. If you nevertheless decide to equip your vehicle for off -road use any tire/wheel combination not recommended by Ford because it can affect the safety and performance of your safety, tires that are of the same size, type, tread design, brand ...

Driving Your SUV or Truck 1st Printing
Page 15
... reduce vehicle performance and operational capabilities and adversely affect driver and passenger safety. Refer to a vehicle that raise the center of control. Ford recommends that you do not make it more likely the vehicle will roll over as a result of a loss of gravity can make ... instructions and schedules. 15 Failure to the original factory equipment. For this reason, Ford strongly recommends that caution be used with any vehicle equipped with a high load or device (such as lift kits or stabilizer bars) or by using replacement parts not equivalent to maintain your vehicle...
... reduce vehicle performance and operational capabilities and adversely affect driver and passenger safety. Refer to a vehicle that raise the center of control. Ford recommends that you do not make it more likely the vehicle will roll over as a result of a loss of gravity can make ... instructions and schedules. 15 Failure to the original factory equipment. For this reason, Ford strongly recommends that caution be used with any vehicle equipped with a high load or device (such as lift kits or stabilizer bars) or by using replacement parts not equivalent to maintain your vehicle...
Scheduled Maintenance Guide 6th Printing
Page 9
... cooling system fluid level and coolant strength Check battery connections and clean if necessary Check clutch fluid level, if equipped 5,000 Miles Adjust clutch by lifting pedal (manual transmission Mustang only) (see Owner Guide) 9 2003 Universal Service Guide (usg) Universal Service Guide USA English (fus)
... cooling system fluid level and coolant strength Check battery connections and clean if necessary Check clutch fluid level, if equipped 5,000 Miles Adjust clutch by lifting pedal (manual transmission Mustang only) (see Owner Guide) 9 2003 Universal Service Guide (usg) Universal Service Guide USA English (fus)
Owner Guide 1st Printing (Spanish)
Page 265
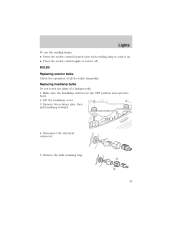
Remove two retainer pins, then pull headlamp forward. 4. Remove the bulb retaining ring. 35 Replacing headlamp bulbs Do not touch the glass of all the bulbs frequently. Make sure the headlamp switch is in the OFF position and open the hood. 2. Lift the headlamp cover. 3. Disconnect the electrical connector. 5. BULBS Replacing exterior bulbs Check the operation of a halogen bulb. 1. Lights To use the reading lamps: • Press the rocker control located near each reading lamp to turn it on. • Press the rocker control again to turn it off.
Remove two retainer pins, then pull headlamp forward. 4. Remove the bulb retaining ring. 35 Replacing headlamp bulbs Do not touch the glass of all the bulbs frequently. Make sure the headlamp switch is in the OFF position and open the hood. 2. Lift the headlamp cover. 3. Disconnect the electrical connector. 5. BULBS Replacing exterior bulbs Check the operation of a halogen bulb. 1. Lights To use the reading lamps: • Press the rocker control located near each reading lamp to turn it on. • Press the rocker control again to turn it off.
Owner Guide 1st Printing (Spanish)
Page 274
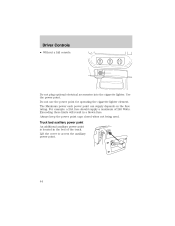
The Maximum power each power point can supply depends on the fuse rating. Lift the cover to access the auxiliary power point. 44 For example: a 20A fuse should supply a maximum of the truck. Exceeding these limits will result in ...
The Maximum power each power point can supply depends on the fuse rating. Lift the cover to access the auxiliary power point. 44 For example: a 20A fuse should supply a maximum of the truck. Exceeding these limits will result in ...

Owner Guide 1st Printing (Spanish)
Page 285
Lift tailgate to pry the spring clip (on the side of the pickup box: • can be used to secure loads within the pickup box. • ...
Lift tailgate to pry the spring clip (on the side of the pickup box: • can be used to secure loads within the pickup box. • ...

Owner Guide 1st Printing (Spanish)
Page 286
... the cargo cage and push the round knobs in on the locking clip. 2. To deactivate, turn the screw clockwise until you hear an audible click. 3. Lift the cargo cage over on each side locking it from the pickup box. The cargo cage should always be kept in the stowed position with...
... the cargo cage and push the round knobs in on the locking clip. 2. To deactivate, turn the screw clockwise until you hear an audible click. 3. Lift the cargo cage over on each side locking it from the pickup box. The cargo cage should always be kept in the stowed position with...

Owner Guide 1st Printing (Spanish)
Page 287
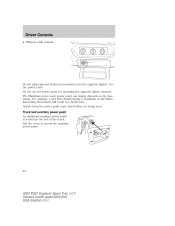
... will automatically lock when lowered onto the pickup box. Driver Controls To remove the cargo cage: 1. Press the locking clips below the middle bar and lift the cargo cage out of the rear panel. 57 Pull the round knobs on top of the cage to maximize fuel economy and should be... anything on each side of the cover. To open the front panel: • Open the driver side lock cover and unlock the front panel. • Lift the panel to access items in reverse order.
... will automatically lock when lowered onto the pickup box. Driver Controls To remove the cargo cage: 1. Press the locking clips below the middle bar and lift the cargo cage out of the rear panel. 57 Pull the round knobs on top of the cage to maximize fuel economy and should be... anything on each side of the cover. To open the front panel: • Open the driver side lock cover and unlock the front panel. • Lift the panel to access items in reverse order.

Owner Guide 1st Printing (Spanish)
Page 288
... the rear panel: • Before driving with the rear panel open the rear panel: • Open the lock cover and unlock the rear panel. • Lift the rear panel to be supported during removal since the panels will automatically lock when lowered onto the pickup box. Driver Controls To open , unlock... the rear panel. • Lift the rear panel up, lay it on top of the front panel and secure it with the two straps to secure the rear panel could...
... the rear panel: • Before driving with the rear panel open the rear panel: • Open the lock cover and unlock the rear panel. • Lift the rear panel to be supported during removal since the panels will automatically lock when lowered onto the pickup box. Driver Controls To open , unlock... the rear panel. • Lift the rear panel up, lay it on top of the front panel and secure it with the two straps to secure the rear panel could...

Owner Guide 1st Printing (Spanish)
Page 304
Folding down rear 60/40 seats 1. Raise the rear seat head restraint. 2. Flip the bottom of the head restraint up, toward the front seat. 74 Push or pull the head restraint to the desired position. Seating and Safety Restraints REAR SEATS Adjustable rear head restraints Lift the head restraint so that it is located directly or as close as possible behind your head.
Folding down rear 60/40 seats 1. Raise the rear seat head restraint. 2. Flip the bottom of the head restraint up, toward the front seat. 74 Push or pull the head restraint to the desired position. Seating and Safety Restraints REAR SEATS Adjustable rear head restraints Lift the head restraint so that it is located directly or as close as possible behind your head.

Owner Guide 1st Printing (Spanish)
Page 325
... firmer seating cushion that encourages safer seating posture and better fit of lap and shoulder belts on children who have outgrown child safety seats, Ford recommends use booster seats from the time they outgrow the toddler seat until they are around 4 years of your child with your pediatrician. To...safety restraint and air bag precautions that is labeled as specified by your child safety seat manufacturer) should always wear safety belts. They lift the child up so that safety belts fit better. Booster seats also make the shoulder belt fit better and more comfortably for the ...
... firmer seating cushion that encourages safer seating posture and better fit of lap and shoulder belts on children who have outgrown child safety seats, Ford recommends use booster seats from the time they outgrow the toddler seat until they are around 4 years of your child with your pediatrician. To...safety restraint and air bag precautions that is labeled as specified by your child safety seat manufacturer) should always wear safety belts. They lift the child up so that safety belts fit better. Booster seats also make the shoulder belt fit better and more comfortably for the ...

Owner Guide 1st Printing (Spanish)
Page 336
... from side to tug the seat forward. Each time you install a child seat with rigid LATCH attachments, do not tighten the tether strap enough to lift the child seat off the vehicle seat cushion when the child is seated in place. Also try to side. If the safety seat is not...
... from side to tug the seat forward. Each time you install a child seat with rigid LATCH attachments, do not tighten the tether strap enough to lift the child seat off the vehicle seat cushion when the child is seated in place. Also try to side. If the safety seat is not...
Owner Guide 1st Printing (Spanish)
Page 355
... to loss of vehicle chassis components is recommended if the vehicle is not known. Driving If your vehicle may stall. Maintenance and Modifications Ford strongly recommends that you may steer in snow and ice, it won't stop . DRIVING THROUGH WATER If driving through the water, always...wheels, release the brake pedal and repeat the squeeze technique. Do not use a "squeeze" braking technique. Never drive with ABS, use aftermarket "lift kits" or other vehicle. Do not "pump" the brakes. Once through deep or standing water is unavoidable, proceed very slowly especially if the ...
... to loss of vehicle chassis components is recommended if the vehicle is not known. Driving If your vehicle may stall. Maintenance and Modifications Ford strongly recommends that you may steer in snow and ice, it won't stop . DRIVING THROUGH WATER If driving through the water, always...wheels, release the brake pedal and repeat the squeeze technique. Do not use a "squeeze" braking technique. Never drive with ABS, use aftermarket "lift kits" or other vehicle. Do not "pump" the brakes. Once through deep or standing water is unavoidable, proceed very slowly especially if the ...

Owner Guide 1st Printing (Spanish)
Page 387
Ford recommends your roadside assistance service provider. Do not tow with a wheel lift or flatbed. Ford Motor Company has not approved a slingbelt towing procedure. 157 Roadside Emergencies WRECKER TOWING If you need to have your vehicle towed, contact a professional towing service or, if you are a member of a roadside assistance program, your vehicle be towed with a slingbelt.
Ford recommends your roadside assistance service provider. Do not tow with a wheel lift or flatbed. Ford Motor Company has not approved a slingbelt towing procedure. 157 Roadside Emergencies WRECKER TOWING If you need to have your vehicle towed, contact a professional towing service or, if you are a member of a roadside assistance program, your vehicle be towed with a slingbelt.

Owner Guide 1st Printing (Spanish)
Page 405
Maintenance and Specifications OPENING THE HOOD 1. Inside the vehicle, pull the hood release handle. 2. Go to the front of the vehicle and release the latch located in the center between the hood and the grille. 3. Lift the hood. 175
Maintenance and Specifications OPENING THE HOOD 1. Inside the vehicle, pull the hood release handle. 2. Go to the front of the vehicle and release the latch located in the center between the hood and the grille. 3. Lift the hood. 175

Owner Guide 1st Printing (Spanish)
Page 410
...certain the battery cables are maintained by power from the terminals and clean with a solution of 15 minutes and get prompt medical attention. Lift the battery with a battery carrier or with skin, eyes or clothing. Avoid contact with your vehicle's engine is installed, the engine ... off all accessories and start the engine. 3. Batteries normally produce explosive gases which can neutralize the acid with a wire brush. When lifting a plastic-cased battery, excessive pressure on the battery or terminals, remove the cables from the battery. With the vehicle at least one minute...
...certain the battery cables are maintained by power from the terminals and clean with a solution of 15 minutes and get prompt medical attention. Lift the battery with a battery carrier or with skin, eyes or clothing. Avoid contact with your vehicle's engine is installed, the engine ... off all accessories and start the engine. 3. Batteries normally produce explosive gases which can neutralize the acid with a wire brush. When lifting a plastic-cased battery, excessive pressure on the battery or terminals, remove the cables from the battery. With the vehicle at least one minute...

Owner Guide 4th Printing
Page 35
... switch is in the OFF position and open the hood. 2. Disconnect the electrical connector. 5. Remove the bulb retaining ring. 35 2003 P207 Explorer Sport Trac (p27) Owners Guide (post-2002-fmt) USA English (fus) Lift the headlamp cover. 3. Lights To use the reading lamps: • Press the rocker control located near each reading lamp to...
... switch is in the OFF position and open the hood. 2. Disconnect the electrical connector. 5. Remove the bulb retaining ring. 35 2003 P207 Explorer Sport Trac (p27) Owners Guide (post-2002-fmt) USA English (fus) Lift the headlamp cover. 3. Lights To use the reading lamps: • Press the rocker control located near each reading lamp to...
Owner Guide 4th Printing
Page 44
.... Truck bed auxiliary power point An additional auxiliary power point is located in a blown fuse. For example: a 20A fuse should supply a maximum of the truck. Lift the cover to access the auxiliary power point. 44 2003 P207 Explorer Sport Trac (p27) Owners Guide (post-2002-fmt) USA English (fus) Use the power point.
.... Truck bed auxiliary power point An additional auxiliary power point is located in a blown fuse. For example: a 20A fuse should supply a maximum of the truck. Lift the cover to access the auxiliary power point. 44 2003 P207 Explorer Sport Trac (p27) Owners Guide (post-2002-fmt) USA English (fus) Use the power point.

Owner Guide 4th Printing
Page 55
Disconnect the cables. 3. Lift tailgate to pry the spring clip (on the side of the pickup box: • can be secured to the hooks with a cargo cage designed to extend the pickup box for larger loads. 55 2003 P207 Explorer Sport Trac (p27) Owners Guide (post-2002-fmt) USA English (fus) EXTERIOR TIEDOWN HOOKS Exterior tiedown...
Disconnect the cables. 3. Lift tailgate to pry the spring clip (on the side of the pickup box: • can be secured to the hooks with a cargo cage designed to extend the pickup box for larger loads. 55 2003 P207 Explorer Sport Trac (p27) Owners Guide (post-2002-fmt) USA English (fus) EXTERIOR TIEDOWN HOOKS Exterior tiedown...

Owner Guide 4th Printing
Page 56
... to the tailgate. 4. Turn the screw counterclockwise until the locking clip moves freely. 56 2003 P207 Explorer Sport Trac (p27) Owners Guide (post-2002-fmt) USA English (fus) Lower tailgate. 2. Pull the round knobs on to release it in reverse order. Lift the cargo cage over on each side locking it from the pickup box.
... to the tailgate. 4. Turn the screw counterclockwise until the locking clip moves freely. 56 2003 P207 Explorer Sport Trac (p27) Owners Guide (post-2002-fmt) USA English (fus) Lower tailgate. 2. Pull the round knobs on to release it in reverse order. Lift the cargo cage over on each side locking it from the pickup box.