
Owner's Manual
Page 82
OVERHEAD CONSOLE The appearance of your option package. 82 ILLUMINATED VISOR MIRROR Lift the mirror cover to your vehicle's overhead console will vary according to turn on the visor mirror lamps. Hold the control while adjusting the wheel to the desired position, then release the control to move the steering wheel up or down. Never adjust the steering wheel when the vehicle is moving. Driver Controls TILT STEERING WHEEL Pull the tilt steering control toward you to lock the steering wheel in position.
OVERHEAD CONSOLE The appearance of your option package. 82 ILLUMINATED VISOR MIRROR Lift the mirror cover to your vehicle's overhead console will vary according to turn on the visor mirror lamps. Hold the control while adjusting the wheel to the desired position, then release the control to move the steering wheel up or down. Never adjust the steering wheel when the vehicle is moving. Driver Controls TILT STEERING WHEEL Pull the tilt steering control toward you to lock the steering wheel in position.

Owner's Manual
Page 104
... at both cross-bars are even. Press down on the roof can cause damage to the desired location. 3. Release the latch at the desired position. Lift the cross-bar and re-set it . 4. Driver Controls To adjust the cross-bar position: 1.
... at both cross-bars are even. Press down on the roof can cause damage to the desired location. 3. Release the latch at the desired position. Lift the cross-bar and re-set it . 4. Driver Controls To adjust the cross-bar position: 1.

Owner's Manual
Page 117
Ensure the seat is relatched into place. • Pull the seatback handle up to recline the seat. 117 Ensure that the seat is relatched into place. 60/40 split bench seat (if equipped) • Lift the release bar to move the seat forward or backward. Seating and Safety Restraints SEATING Full bench seat (if equipped) • Lift the track release bar to move the seat forward or backward.
Ensure the seat is relatched into place. • Pull the seatback handle up to recline the seat. 117 Ensure that the seat is relatched into place. 60/40 split bench seat (if equipped) • Lift the release bar to move the seat forward or backward. Seating and Safety Restraints SEATING Full bench seat (if equipped) • Lift the track release bar to move the seat forward or backward.

Owner's Manual
Page 118
Seating and Safety Restraints Captain's chair (if equipped) • Lift the track release bar to recline the seat. Press the SET control. Make sure that the seat is relatched into place. • Pull the seatback ...
Seating and Safety Restraints Captain's chair (if equipped) • Lift the track release bar to recline the seat. Press the SET control. Make sure that the seat is relatched into place. • Pull the seatback ...

Owner's Manual
Page 121
... properly adjust your head or as close to that position as possible. The purpose of these head restraints is located directly behind your head restraints, lift the head restraint so that it is to raise and lower the head restraints. The indicator light on the control will illuminate when activated.
... properly adjust your head or as close to that position as possible. The purpose of these head restraints is located directly behind your head restraints, lift the head restraint so that it is to raise and lower the head restraints. The indicator light on the control will illuminate when activated.

Owner's Manual
Page 122
.... 3. The headrest must be removed in front of the second row seats before folding them down and insure the seat is fully latched rearward. Lift strap to fold the seatback down. Seating and Safety Restraints Rear folding seats (if equipped) Folding down rear seats into load floor Ensure that no... objects such as books, purses or briefcases are on the seat side shield. 1. Lift seat cushion up on headrest simultaneously. 122 For assistance, refer to the label located on the floor in order to release seat cushion. 2.
.... 3. The headrest must be removed in front of the second row seats before folding them down and insure the seat is fully latched rearward. Lift strap to fold the seatback down. Seating and Safety Restraints Rear folding seats (if equipped) Folding down rear seats into load floor Ensure that no... objects such as books, purses or briefcases are on the seat side shield. 1. Lift seat cushion up on headrest simultaneously. 122 For assistance, refer to the label located on the floor in order to release seat cushion. 2.

Owner's Manual
Page 123
Stow headrest into the green caps found on the top of the seat cushion. 5. Lift the lower seat control and flip the seatback down. 123 Seating and Safety Restraints 4.
Stow headrest into the green caps found on the top of the seat cushion. 5. Lift the lower seat control and flip the seatback down. 123 Seating and Safety Restraints 4.

Owner's Manual
Page 124
Lift the lower seat control. 3. Returning the seat to upright Insure the seat is pulled back to closeout the space between the seatback and the floor. ... panel to the locked position, whether the seat is occupied or empty. For bench seats only, lift up on seatback to lift the seatback into the upright position. 124 Pull up flap on the seatback while lifting the handle to release closeout panel. 7. Seating and Safety Restraints 6. For bench seats, rotate the closeout...
Lift the lower seat control. 3. Returning the seat to upright Insure the seat is pulled back to closeout the space between the seatback and the floor. ... panel to the locked position, whether the seat is occupied or empty. For bench seats only, lift up on seatback to lift the seatback into the upright position. 124 Pull up flap on the seatback while lifting the handle to release closeout panel. 7. Seating and Safety Restraints 6. For bench seats, rotate the closeout...

Owner's Manual
Page 125
... occupant to the desired location. To reduce the risk of a collision. Refer to the warning label on the outboard side of the seat cushion and lift gently to allow the seatback to be adjusted to slide under the seat's safety belt, resulting in severe personal injuries in this chapter. Seating and...
... occupant to the desired location. To reduce the risk of a collision. Refer to the warning label on the outboard side of the seat cushion and lift gently to allow the seatback to be adjusted to slide under the seat's safety belt, resulting in severe personal injuries in this chapter. Seating and...

Owner's Manual
Page 127
With assistance, lift the seat out of the vehicle, with the liftgate open: 1. When reinstalling a rear seat in your vehicle it ... the floor, whether the seat is 10-13 cm (4-5 in its original position. While pulling up on the release bar, lift the seat up on the lower right side of the seatback while pushing the seatback down onto the seat cushion. • ... the vehicle seat to verify that the seat will properly latch into the rear of injury. With assistance, lift the seat into the floor. 2. Lift the seat release bar located at the center of debris. Push up and out of the seat. 127 ...
With assistance, lift the seat out of the vehicle, with the liftgate open: 1. When reinstalling a rear seat in your vehicle it ... the floor, whether the seat is 10-13 cm (4-5 in its original position. While pulling up on the release bar, lift the seat up on the lower right side of the seatback while pushing the seatback down onto the seat cushion. • ... the vehicle seat to verify that the seat will properly latch into the rear of injury. With assistance, lift the seat into the floor. 2. Lift the seat release bar located at the center of debris. Push up and out of the seat. 127 ...
Owner's Manual
Page 176
...cuts, bruises and other objects that may permit air leakage from the tire and make modifications such as adding or removing parts (such as lift kits or stabilizer bars) or by using replacement parts not equivalent to provide both reasonably safe, predictable performance whether loaded or empty and ... for highway driving because they are more likely to check pressure of vehicle control or roll over and serious injury. Do not exceed the Ford Motor Company recommended pressure even if it needs to be used with a tire gauge every few weeks (including spare). Each day before you...
...cuts, bruises and other objects that may permit air leakage from the tire and make modifications such as adding or removing parts (such as lift kits or stabilizer bars) or by using replacement parts not equivalent to provide both reasonably safe, predictable performance whether loaded or empty and ... for highway driving because they are more likely to check pressure of vehicle control or roll over and serious injury. Do not exceed the Ford Motor Company recommended pressure even if it needs to be used with a tire gauge every few weeks (including spare). Each day before you...

Owner's Manual
Page 202
... assistance center. Roadside Emergencies WRECKER TOWING If you are off the ground. However, a slingbelt with T-hooks and a wheel dolly can also be towed with a wheel lift or flatbed equipment with T-hooks. On 4x2 vehicles, it is acceptable to have your vehicle towed, contact a professional towing service or, if you need to... tow the vehicle with the front wheels on the ground and the rear wheels off the ground using a wheel lift or a slingbelt with all four wheels are a member, your vehicle be used if all the wheels off the ground. 202
... assistance center. Roadside Emergencies WRECKER TOWING If you are off the ground. However, a slingbelt with T-hooks and a wheel dolly can also be towed with a wheel lift or flatbed equipment with T-hooks. On 4x2 vehicles, it is acceptable to have your vehicle towed, contact a professional towing service or, if you need to... tow the vehicle with the front wheels on the ground and the rear wheels off the ground using a wheel lift or a slingbelt with all four wheels are a member, your vehicle be used if all the wheels off the ground. 202
Owner's Manual
Page 203
... your tow truck operator refer to Four wheel drive [4WD] Operation [if equipped] in the Driving chapter). • lift the rear wheels of the vehicle using a wheel lift or a sling belt with T-hooks. Ford Motor Company produces a towing manual for all authorized tow truck operators. If the vehicle is to: • put the...
... your tow truck operator refer to Four wheel drive [4WD] Operation [if equipped] in the Driving chapter). • lift the rear wheels of the vehicle using a wheel lift or a sling belt with T-hooks. Ford Motor Company produces a towing manual for all authorized tow truck operators. If the vehicle is to: • put the...

Owner's Manual
Page 220
Set the parking brake and ensure the gearshift is running. HOOD 2. Lift the hood until the lift cylinders hold it while the engine is securely latched in P (Park). 2. Block the wheels to release the auxiliary latch. 3. Inside the vehicle, pull the hood ...
Set the parking brake and ensure the gearshift is running. HOOD 2. Lift the hood until the lift cylinders hold it while the engine is securely latched in P (Park). 2. Block the wheels to release the auxiliary latch. 3. Inside the vehicle, pull the hood ...
Owner's Manual
Page 226
... swallowed, call a physician immediately. Turn the A/C on and allow the engine to idle for at least one minute. 6. Maintenance and Specifications When lifting a plastic-cased battery, excessive pressure on the end walls could cause acid to flow through the vent caps, resulting in personal injury and/or damage... to idle for at least one minute. 5. Lift the battery with a battery carrier or with skin, eyes or clothing. Avoid contact with your vehicle may be adversely affected until it reaches ...
... swallowed, call a physician immediately. Turn the A/C on and allow the engine to idle for at least one minute. 6. Maintenance and Specifications When lifting a plastic-cased battery, excessive pressure on the end walls could cause acid to flow through the vent caps, resulting in personal injury and/or damage... to idle for at least one minute. 5. Lift the battery with a battery carrier or with skin, eyes or clothing. Avoid contact with your vehicle may be adversely affected until it reaches ...
Driving Your SUV or Truck 1st Printing
Page 13
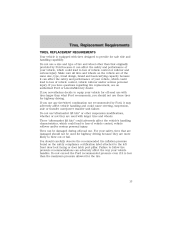
... and/or serious personal injury. These "aftermarket lift kits" could adversely affect the vehicle's handling characteristics, which could lead to loss of vehicle control, vehicle rollover and/or serious personal injury. Tires, Replacement Requirements TIRES, REPLACEMENT REQUIREMENTS Your vehicle is less than what Ford recommends, you nevertheless decide to equip your vehicle...
... and/or serious personal injury. These "aftermarket lift kits" could adversely affect the vehicle's handling characteristics, which could lead to loss of vehicle control, vehicle rollover and/or serious personal injury. Tires, Replacement Requirements TIRES, REPLACEMENT REQUIREMENTS Your vehicle is less than what Ford recommends, you nevertheless decide to equip your vehicle...

Driving Your SUV or Truck 1st Printing
Page 15
... and steering systems on your repair cost, reduce vehicle performance and operational capabilities and adversely affect driver and passenger safety. For this reason, Ford strongly recommends that you do not make it more likely the vehicle will roll over as a result of a loss of vehicle chassis and...or pickup box cover). Any modifications to a vehicle that caution be used with any vehicle equipped with a high load or device (such as lift kits or stabilizer bars) or by using replacement parts not equivalent to the "Owner's Guide" and "Service Guide" for proper maintenance instructions and ...
... and steering systems on your repair cost, reduce vehicle performance and operational capabilities and adversely affect driver and passenger safety. For this reason, Ford strongly recommends that you do not make it more likely the vehicle will roll over as a result of a loss of vehicle chassis and...or pickup box cover). Any modifications to a vehicle that caution be used with any vehicle equipped with a high load or device (such as lift kits or stabilizer bars) or by using replacement parts not equivalent to the "Owner's Guide" and "Service Guide" for proper maintenance instructions and ...
Scheduled Maintenance Guide 6th Printing
Page 9
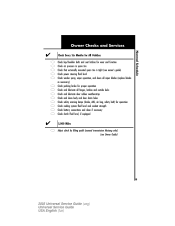
... cooling system fluid level and coolant strength Check battery connections and clean if necessary Check clutch fluid level, if equipped 5,000 Miles Adjust clutch by lifting pedal (manual transmission Mustang only) (see Owner Guide) 9 2003 Universal Service Guide (usg) Universal Service Guide USA English (fus)
... cooling system fluid level and coolant strength Check battery connections and clean if necessary Check clutch fluid level, if equipped 5,000 Miles Adjust clutch by lifting pedal (manual transmission Mustang only) (see Owner Guide) 9 2003 Universal Service Guide (usg) Universal Service Guide USA English (fus)

7.3L Diesel Supplement 3rd Printing
Page 28
... element and fuel filter o-ring. 4. Remove the engine appearance cover. 2. Remove the three bolts on the air cleaner assembly, then lift the air cleaner cover and remove the air cleaner(s). 4. Remove the fuel filter cap by turning counterclockwise. 3. E-Series 1. Carefully clean...then disconnect the air inlet tube from the vehicle. 28 General maintenance information CHANGING FUEL FILTER Removal - F-250/350/450/550 and Excursion 1. Release the four retaining clamps on the turbocharger heat shield, then the turbocharger heat shield. 6. Remove the engine appearance cover....
... element and fuel filter o-ring. 4. Remove the engine appearance cover. 2. Remove the three bolts on the air cleaner assembly, then lift the air cleaner cover and remove the air cleaner(s). 4. Remove the fuel filter cap by turning counterclockwise. 3. E-Series 1. Carefully clean...then disconnect the air inlet tube from the vehicle. 28 General maintenance information CHANGING FUEL FILTER Removal - F-250/350/450/550 and Excursion 1. Release the four retaining clamps on the turbocharger heat shield, then the turbocharger heat shield. 6. Remove the engine appearance cover....

Owner Guide 1st Printing (Spanish)
Page 332
.... OVERHEAD CONSOLE The appearance of your option package. The transmission will open slightly and can be used to turn on the gearshift. ILLUMINATED VISOR MIRROR Lift the mirror cover to secure sunglasses or a similar object. 58 The door will operate in all gears except overdrive. The OFF indicator light will illuminate...
.... OVERHEAD CONSOLE The appearance of your option package. The transmission will open slightly and can be used to turn on the gearshift. ILLUMINATED VISOR MIRROR Lift the mirror cover to secure sunglasses or a similar object. 58 The door will operate in all gears except overdrive. The OFF indicator light will illuminate...
