
Owner's Manual
Page 3
...Hood Engine compartment Engine oil Battery Fuel information Air filter(s) Part numbers Refill capacities Lubricant specifications Engine data Vehicle dimensions 219 220 221 222 225 233 248 254 254 257 259 260 Accessories Index 263 266 All rights reserved. Copyright © 2002 Ford Motor Company 3 Ford... may change the contents without notice and without written authorization from Ford Motor Company. Reproduction by any means, electronic or mechanical including photocopying, ...
...Hood Engine compartment Engine oil Battery Fuel information Air filter(s) Part numbers Refill capacities Lubricant specifications Engine data Vehicle dimensions 219 220 221 222 225 233 248 254 254 257 259 260 Accessories Index 263 266 All rights reserved. Copyright © 2002 Ford Motor Company 3 Ford... may change the contents without notice and without written authorization from Ford Motor Company. Reproduction by any means, electronic or mechanical including photocopying, ...
Owner's Manual
Page 59
... objects may fall down into the defroster outlets and block airflow, in any snow, ice or leaves from contamination of the windshield and underneath the hood). • Do not place objects over the defroster outlets. Direct the outer panel vents towards the side windows. 5. To aid in side window defogging/demisting...
... objects may fall down into the defroster outlets and block airflow, in any snow, ice or leaves from contamination of the windshield and underneath the hood). • Do not place objects over the defroster outlets. Direct the outer panel vents towards the side windows. 5. To aid in side window defogging/demisting...
Owner's Manual
Page 67
..., your vehicle's climate control system should be free from the air intake area at the area (at the bottom of the windshield and underneath the hood). • Do not place objects over the defroster outlets. This will interfere with the windows open. To aid in side window defogging/demisting in the...
..., your vehicle's climate control system should be free from the air intake area at the area (at the bottom of the windshield and underneath the hood). • Do not place objects over the defroster outlets. This will interfere with the windows open. To aid in side window defogging/demisting in the...

Owner's Manual
Page 76
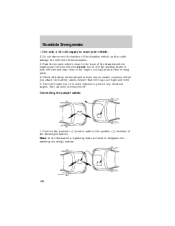
... Remove bulb retainer ring by its plastic base and do not touch the glass. Without turning, carefully pull bulb out of headlamp assembly. Open the hood. 3. Replacing headlamp bulbs 1. Install bulb retaining ring over the plastic base and lock the ring into the socket by pulling rearward. 4. Lights Interior bulbs Check...
... Remove bulb retainer ring by its plastic base and do not touch the glass. Without turning, carefully pull bulb out of headlamp assembly. Open the hood. 3. Replacing headlamp bulbs 1. Install bulb retaining ring over the plastic base and lock the ring into the socket by pulling rearward. 4. Lights Interior bulbs Check...

Owner's Manual
Page 77
Open the hood. 3. Install the bulb socket in the new bulb. 6. Rotate bulb socket counterclockwise about 1⁄4 turn signal assembly from lamp assembly. 5. Lights Replacing front parking/turn signal assembly. 77 Remove the two screws and carefully disengage parking lamp/turn and remove from the vehicle. 4. Install two screws on the vehicle. 8. Carefully pull bulb straight out of the socket and push in lamp assembly by turning clockwise. 7. Align the lamp assembly on parking lamp/turn signal bulbs 1. Make sure headlamp switch is in OFF position. 2.
Open the hood. 3. Install the bulb socket in the new bulb. 6. Rotate bulb socket counterclockwise about 1⁄4 turn signal assembly from lamp assembly. 5. Lights Replacing front parking/turn signal assembly. 77 Remove the two screws and carefully disengage parking lamp/turn and remove from the vehicle. 4. Install two screws on the vehicle. 8. Carefully pull bulb straight out of the socket and push in lamp assembly by turning clockwise. 7. Align the lamp assembly on parking lamp/turn signal bulbs 1. Make sure headlamp switch is in OFF position. 2.
Owner's Manual
Page 198
... bolts are tight and level. 5. Park the booster vehicle close to designate the assisting (boosting) battery. 198 - - - + - + + + Ensure that vent caps are used to the hood of the discharged battery. Connect the positive (+) booster cable to protect any excessive corrosion before you attach the battery cables. Roadside Emergencies 1. Do not disconnect...
... bolts are tight and level. 5. Park the booster vehicle close to designate the assisting (boosting) battery. 198 - - - + - + + + Ensure that vent caps are used to the hood of the discharged battery. Connect the positive (+) booster cable to protect any excessive corrosion before you attach the battery cables. Roadside Emergencies 1. Do not disconnect...

Owner's Manual
Page 220
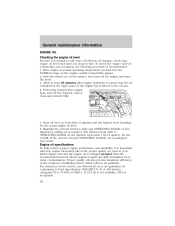
...the instrument panel. Slide the handle to the front of the vehicle and release the auxiliary latch located under the bottom left corner of the hood. Note: Do not start your engine with the engine on 1. Maintenance and Specifications Working with the air cleaner removed and do not remove ...it open. 220 Go to release the auxiliary latch. 3. Block the wheels to prevent the vehicle from moving unexpectedly. Lift the hood until the lift cylinders hold it while the engine is securely latched in P (Park). 2. Set the parking brake and ensure the gearshift is running...
...the instrument panel. Slide the handle to the front of the vehicle and release the auxiliary latch located under the bottom left corner of the hood. Note: Do not start your engine with the engine on 1. Maintenance and Specifications Working with the air cleaner removed and do not remove ...it open. 220 Go to release the auxiliary latch. 3. Block the wheels to prevent the vehicle from moving unexpectedly. Lift the hood until the lift cylinders hold it while the engine is securely latched in P (Park). 2. Set the parking brake and ensure the gearshift is running...

Owner's Manual
Page 222
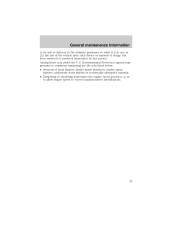
...washer fluid for the liftgate Washer fluid for the oil to the scheduled maintenance guide for the appropriate intervals for fuel. Open the hood. Washer fluids containing non-methanol antifreeze agents should be used only if they provide cold weather protection without damaging the vehicle's paint ...sure the vehicle is low, add enough fluid to Lubricant specifications in the cooling system may restrict the use a washer fluid that meets Ford specification ESR-M17P5-A. ENGINE OIL Checking the engine oil Refer to drain into the oil pan. 3. The reservoir is securely latched in ...
...washer fluid for the liftgate Washer fluid for the oil to the scheduled maintenance guide for the appropriate intervals for fuel. Open the hood. Washer fluids containing non-methanol antifreeze agents should be used only if they provide cold weather protection without damaging the vehicle's paint ...sure the vehicle is low, add enough fluid to Lubricant specifications in the cooling system may restrict the use a washer fluid that meets Ford specification ESR-M17P5-A. ENGINE OIL Checking the engine oil Refer to drain into the oil pan. 3. The reservoir is securely latched in ...
Owner's Manual
Page 265
..., garage door openers and other transmitters with outputs of five watts or less will not ordinarily affect your vehicle's operation.) • Ford cannot assume responsibility for automotive use or are equipped with FCC or CRTC regulations and should be installed only by a qualified service technician...any adverse effects or damage that are not properly installed. such as indicated on the Safety compliance certification label). Accessories Hood deflectors Locking gas cap Lubricants and oils Molded splash guards Molded vinyl floor mats Rear air deflectors Side window air deflectors...
..., garage door openers and other transmitters with outputs of five watts or less will not ordinarily affect your vehicle's operation.) • Ford cannot assume responsibility for automotive use or are equipped with FCC or CRTC regulations and should be installed only by a qualified service technician...any adverse effects or damage that are not properly installed. such as indicated on the Safety compliance certification label). Accessories Hood deflectors Locking gas cap Lubricants and oils Molded splash guards Molded vinyl floor mats Rear air deflectors Side window air deflectors...
Owner's Manual
Page 269
... on and off ...71 warning chime ...14 Heating heating and air conditioning system ...57, 60 HomeLink universal transceiver (see Garage door opener) ...97-98, 100 Hood ...220 I Ignition ...152, 259-260 Infant seats (see Safety seats) ...145 Inspection/maintenance (I/M) testing ...242 Instrument panel cleaning ...216 cluster ...10 lighting up panel and...
... on and off ...71 warning chime ...14 Heating heating and air conditioning system ...57, 60 HomeLink universal transceiver (see Garage door opener) ...97-98, 100 Hood ...220 I Ignition ...152, 259-260 Infant seats (see Safety seats) ...145 Inspection/maintenance (I/M) testing ...242 Instrument panel cleaning ...216 cluster ...10 lighting up panel and...

7.3L Diesel Supplement 3rd Printing
Page 6
Check the air filter restriction gauge whenever the hood is reached. After servicing the air filter element, reset the restriction gauge by pressing the button on the gauge reaches the CHANGE FILTER mark. Refer to F-250/350/450/550, Excursion in Service Points chapter. Engine performance and fuel...gauge reaches the CHANGE FILTER mark. AIR FILTER GAUGE E FI CHANG LTER CHANGE FILTER Air filter restriction gauge, F-250/350/450/550 & Excursion The restriction gauge, located on the instrument cluster when the air filter element is 100% clogged. Second, the gauge contains an electrical switch...
Check the air filter restriction gauge whenever the hood is reached. After servicing the air filter element, reset the restriction gauge by pressing the button on the gauge reaches the CHANGE FILTER mark. Refer to F-250/350/450/550, Excursion in Service Points chapter. Engine performance and fuel...gauge reaches the CHANGE FILTER mark. AIR FILTER GAUGE E FI CHANG LTER CHANGE FILTER Air filter restriction gauge, F-250/350/450/550 & Excursion The restriction gauge, located on the instrument cluster when the air filter element is 100% clogged. Second, the gauge contains an electrical switch...

7.3L Diesel Supplement 3rd Printing
Page 30
... o-ring onto fuel filter element. 3. Install the turbocharger heat shield, then the three bolts on a level surface, then turn off the engine and open the hood. 3. Park the vehicle on the turbocharger heat shield. 7. General maintenance information 1. Install new fuel filter and o-ring into the fuel filter element. Apply a coating of...
... o-ring onto fuel filter element. 3. Install the turbocharger heat shield, then the three bolts on a level surface, then turn off the engine and open the hood. 3. Park the vehicle on the turbocharger heat shield. 7. General maintenance information 1. Install new fuel filter and o-ring into the fuel filter element. Apply a coating of...

7.3L Diesel Supplement 3rd Printing
Page 35
Close filter drain valve by turning clockwise. Refer to drain for approximately 25 seconds or until firmly seated. Place an appropriate container under the filter drain under the vehicle. 3. Locate the fuel filter drain valve. If necessary, remove the engine appearance cover. Open the hood. General maintenance information 2. On F-Series and Excursion models, open fuel filter drain valve by turning counterclockwise until clean fuel is observed. DR AIN SE CLO 35 Allow to Engine Compartment in the Service points chapter. 4.
Close filter drain valve by turning clockwise. Refer to drain for approximately 25 seconds or until firmly seated. Place an appropriate container under the filter drain under the vehicle. 3. Locate the fuel filter drain valve. If necessary, remove the engine appearance cover. Open the hood. General maintenance information 2. On F-Series and Excursion models, open fuel filter drain valve by turning counterclockwise until clean fuel is observed. DR AIN SE CLO 35 Allow to Engine Compartment in the Service points chapter. 4.

7.3L Diesel Supplement 3rd Printing
Page 36
... equates to drain for approximately 25 seconds or until clean fuel is observed. Close filter drain valve by pulling on the release handle. Close the hood and remove the container from under the vehicle. 7. If removed, install the engine appearance cover. 6. Coolant concentration testing is closed. Verify that the fuel filter...
... equates to drain for approximately 25 seconds or until clean fuel is observed. Close filter drain valve by pulling on the release handle. Close the hood and remove the container from under the vehicle. 7. If removed, install the engine appearance cover. 6. Coolant concentration testing is closed. Verify that the fuel filter...

7.3L Diesel Supplement 3rd Printing
Page 43
... concerning prohibited tampering acts and maintenance, and the noise warranty found in use, or (2) the use of the vehicle after such device or element of hood blanket, fender apron absorbers, fender apron barriers, underbody noise shields or acoustically absorptive material. • Tampering or rendering inoperative the engine speed governor, so as...
... concerning prohibited tampering acts and maintenance, and the noise warranty found in use, or (2) the use of the vehicle after such device or element of hood blanket, fender apron absorbers, fender apron barriers, underbody noise shields or acoustically absorptive material. • Tampering or rendering inoperative the engine speed governor, so as...

Diesel Supplement 2nd Printing
Page 6
... on the gauge reaches the CHANGE FILTER mark. If the vehicle is operated in Service Points chapter. Check the air filter restriction gauge whenever the hood is raised to perform general engine maintenance at least every 800 km (500 miles), or two weeks, whichever comes first. Blowing-out the air filter...
... on the gauge reaches the CHANGE FILTER mark. If the vehicle is operated in Service Points chapter. Check the air filter restriction gauge whenever the hood is raised to perform general engine maintenance at least every 800 km (500 miles), or two weeks, whichever comes first. Blowing-out the air filter...
Diesel Supplement 2nd Printing
Page 28
... dipstick represents 1.9L (2 quarts). Read oil level on both sides of dipstick and use Motorcraft oil or an equivalent oil conforming to Ford Specification WSS-M2C171-D or API Service categories CI-4, CI-4/SL or DHD-1. Engine oil specifications To help achieve proper engine performance and durability...of the crankcase ventilating system which reduces air pollution. Park the vehicle on a level surface, then turn off the engine and open the hood. 3. If the oil level exceeds OPERATING RANGE, oil consumption may result. To check the engine oil level consistently and accurately, the following...
... dipstick represents 1.9L (2 quarts). Read oil level on both sides of dipstick and use Motorcraft oil or an equivalent oil conforming to Ford Specification WSS-M2C171-D or API Service categories CI-4, CI-4/SL or DHD-1. Engine oil specifications To help achieve proper engine performance and durability...of the crankcase ventilating system which reduces air pollution. Park the vehicle on a level surface, then turn off the engine and open the hood. 3. If the oil level exceeds OPERATING RANGE, oil consumption may result. To check the engine oil level consistently and accurately, the following...
Diesel Supplement 2nd Printing
Page 37
Environmental Protection Agency may presume to constitute tampering are the acts listed below: • Removal of hood blanket, fender apron absorbers, fender apron barriers, underbody noise shields or acoustically absorptive material. • Tampering or rendering inoperative the engine speed governor, so as ...
Environmental Protection Agency may presume to constitute tampering are the acts listed below: • Removal of hood blanket, fender apron absorbers, fender apron barriers, underbody noise shields or acoustically absorptive material. • Tampering or rendering inoperative the engine speed governor, so as ...

Owner Guide 1st Printing (Spanish)
Page 326
... headlamp assembly. see your hand could cause the bulb to break the next time the headlamps are clear in the OFF position then open the hood. 2. Make sure that the headlamp control is in color except where noted. The oil from the bulb by pulling rearward. 3. To replace all bulbs frequently...
... headlamp assembly. see your hand could cause the bulb to break the next time the headlamps are clear in the OFF position then open the hood. 2. Make sure that the headlamp control is in color except where noted. The oil from the bulb by pulling rearward. 3. To replace all bulbs frequently...

Owner Guide 1st Printing (Spanish)
Page 327
Lights Install the new bulb(s) in the OFF position, then open the hood. 2. Make sure headlamp switch is in reverse order. Replacing front parking/turn signal assembly from lamp assembly. 4. Pull the bulb straight out of the socket. Install the new bulbs in reverse order. 53 Remove the two screws and carefully pull the parking lamp/turn signal bulbs 1. Rotate bulb socket counterclockwise and remove it from the vehicle. 3.
Lights Install the new bulb(s) in the OFF position, then open the hood. 2. Make sure headlamp switch is in reverse order. Replacing front parking/turn signal assembly from lamp assembly. 4. Pull the bulb straight out of the socket. Install the new bulbs in reverse order. 53 Remove the two screws and carefully pull the parking lamp/turn signal bulbs 1. Rotate bulb socket counterclockwise and remove it from the vehicle. 3.
