Owner Guide 2nd Printing
Page 215
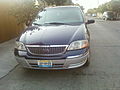
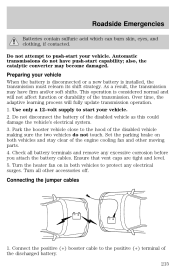
... caps are tight and level. 5. Use only a 12-volt supply to start your vehicle. Turn all battery terminals and remove any electrical surges. Connect the positive (+) booster cable to the hood of the engine cooling fan and other accessories off. also, the catalytic converter may have push...operation is installed, the transmission must relearn its shift strategy. Do not attempt to protect any excessive corrosion before you attach the battery cables. Set the parking brake on in both vehicles and stay clear of the disabled vehicle making sure the two vehicles do not have...
... caps are tight and level. 5. Use only a 12-volt supply to start your vehicle. Turn all battery terminals and remove any electrical surges. Connect the positive (+) booster cable to the hood of the engine cooling fan and other accessories off. also, the catalytic converter may have push...operation is installed, the transmission must relearn its shift strategy. Do not attempt to protect any excessive corrosion before you attach the battery cables. Set the parking brake on in both vehicles and stay clear of the disabled vehicle making sure the two vehicles do not have...

Owner Guide 2nd Printing
Page 216
Connect the negative (-) cable to an exposed metal part of the assisting battery. 4. Roadside Emergencies Note: In the illustrations, lightning bolts are used to the positive (+) terminal of the assisting battery. 3. Make the final connection of the negative (-) cable to the negative (-) terminal of the stalled vehicle's engine, away from the battery and the 216 - - - - + + - + + + + - Connect the other end of the positive (+) cable to designate the assisting (boosting) battery. 2.
Connect the negative (-) cable to an exposed metal part of the assisting battery. 4. Roadside Emergencies Note: In the illustrations, lightning bolts are used to the positive (+) terminal of the assisting battery. 3. Make the final connection of the negative (-) cable to the negative (-) terminal of the stalled vehicle's engine, away from the battery and the 216 - - - - + + - + + + + - Connect the other end of the positive (+) cable to designate the assisting (boosting) battery. 2.
Owner Guide 2nd Printing
Page 217
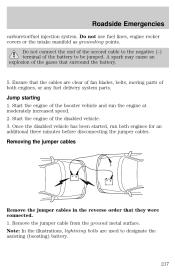
..., run the engine at moderately increased speed. 2. Start the engine of the gases that they were connected. 1. Removing the jumper cables Remove the jumper cables in the reverse order that surround the battery. 5. Roadside Emergencies carburetor/fuel injection system. Note: In the illustrations, lightning bolts are clear of fan blades, belts, moving parts...
..., run the engine at moderately increased speed. 2. Start the engine of the gases that they were connected. 1. Removing the jumper cables Remove the jumper cables in the reverse order that surround the battery. 5. Roadside Emergencies carburetor/fuel injection system. Note: In the illustrations, lightning bolts are clear of fan blades, belts, moving parts...
Owner Guide 2nd Printing
Page 218
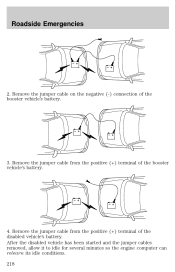
Roadside Emergencies 2. After the disabled vehicle has been started and the jumper cables removed, allow it to idle for several minutes so the engine computer can relearn its idle conditions. 218 - - - - + - - + + + + + Remove the jumper cable from the positive (+) terminal of the booster vehicle's battery. 4. Remove the jumper cable from the positive (+) terminal of the disabled vehicle's battery. Remove the jumper cable on the negative (-) connection of the booster vehicle's battery. 3.
Roadside Emergencies 2. After the disabled vehicle has been started and the jumper cables removed, allow it to idle for several minutes so the engine computer can relearn its idle conditions. 218 - - - - + - - + + + + + Remove the jumper cable from the positive (+) terminal of the booster vehicle's battery. 4. Remove the jumper cable from the positive (+) terminal of the disabled vehicle's battery. Remove the jumper cable on the negative (-) connection of the booster vehicle's battery. 3.
Owner Guide 2nd Printing
Page 243
.... If you do not allow flames, sparks or lighted substances to come near the battery, always shield your face and protect your battery has a cover/shield, make certain the battery cables are always tightly fastened to the "level indicator". Batteries normally produce explosive gases which normally does not require additional water during its life of...
.... If you do not allow flames, sparks or lighted substances to come near the battery, always shield your face and protect your battery has a cover/shield, make certain the battery cables are always tightly fastened to the "level indicator". Batteries normally produce explosive gases which normally does not require additional water during its life of...

