
Owner Guide 2nd Printing
Page 272
...; and MERCONV. Maintenance and Specifications Item Lock cylinders Power steering fluid Automatic transaxle (4F50N) Disc brake caliper rails Ford part name Penetrating and Lock Lubricant Motorcraft MERCON ATF Motorcraft MERCONV ATF2 Motorcraft Silicone Brake Caliper Grease and ... number Motorcraft XL-1 XT-2-QDX XT-5-QM Ford specification none MERCON MERCONV XG-3 ESE-M1C171-A Constant velocity joints Windshield washer fluid XG-2 ESP-M1C207-A C9AZ-19550-AC ESR-M17P5-A 1 Use only brake fluids certified to determine the correct service interval. 272 ...
...; and MERCONV. Maintenance and Specifications Item Lock cylinders Power steering fluid Automatic transaxle (4F50N) Disc brake caliper rails Ford part name Penetrating and Lock Lubricant Motorcraft MERCON ATF Motorcraft MERCONV ATF2 Motorcraft Silicone Brake Caliper Grease and ... number Motorcraft XL-1 XT-2-QDX XT-5-QM Ford specification none MERCON MERCONV XG-3 ESE-M1C171-A Constant velocity joints Windshield washer fluid XG-2 ESP-M1C207-A C9AZ-19550-AC ESR-M17P5-A 1 Use only brake fluids certified to determine the correct service interval. 272 ...
Rear Seat Entertainment System Supplement 1st Printing
Page 3
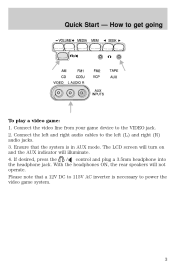
Ensure that a 12V DC to 115V AC inverter is in AUX mode. With the headphones ON, the rear speakers will illuminate. / control and plug a 3.5mm headphone into 4. Please note that the system is necessary to the VIDEO jack. 2. Connect the video line from your game device to power the video game system. 3 Connect the left and right audio cables to get going To play a video game: 1. Quick Start - How to the left (L) and right (R) audio jacks. 3. The LCD screen will turn on and the AUX indicator will not operate. If desired, press the the headphone jack.
Ensure that a 12V DC to 115V AC inverter is in AUX mode. With the headphones ON, the rear speakers will illuminate. / control and plug a 3.5mm headphone into 4. Please note that the system is necessary to the VIDEO jack. 2. Connect the video line from your game device to power the video game system. 3 Connect the left and right audio cables to get going To play a video game: 1. Quick Start - How to the left (L) and right (R) audio jacks. 3. The LCD screen will turn on and the AUX indicator will not operate. If desired, press the the headphone jack.
