
Warranty Guide 5th Printing
Page 11
Ford Motor Company or Ford Motor Vehicle Assurance Company covers these components: cylinder block, heads and all internal parts, intake and exhaust manifolds, flywheel, timing gear, harmonic balancer, valve covers, oil pan and pump, water pump, fuel system (excluding fuel ... to Bumper Coverage period (three years or 36,000 miles, whichever occurs first), you must pay a $100 deductible for five years after the vehicle leaves Ford's control 7 including the body, chassis, or components - After the end of the Bumper to Bumper Warranty (3 years or 36,000 miles, whichever occurs first). ...
Ford Motor Company or Ford Motor Vehicle Assurance Company covers these components: cylinder block, heads and all internal parts, intake and exhaust manifolds, flywheel, timing gear, harmonic balancer, valve covers, oil pan and pump, water pump, fuel system (excluding fuel ... to Bumper Coverage period (three years or 36,000 miles, whichever occurs first), you must pay a $100 deductible for five years after the vehicle leaves Ford's control 7 including the body, chassis, or components - After the end of the Bumper to Bumper Warranty (3 years or 36,000 miles, whichever occurs first). ...

Owner Guide 4th Printing
Page 34
... playback. Dolby Br noise reduction Press the MENU button repeatedly until a display like the one shown opposite appears. Then use tape cassettes that the tape head in the audio unit is cleaned regularly with a wet cleaning cassette, which is reduced. 34 MENU button (main features) - With the function on (NR ...ON") or off . tape Use the MENU button to turn this function on , background tape noise is available from your Ford Dealer. It is also recommended that are clean and in or press AMS to obtain the previous or next track on or off (NR OFF...
... playback. Dolby Br noise reduction Press the MENU button repeatedly until a display like the one shown opposite appears. Then use tape cassettes that the tape head in the audio unit is cleaned regularly with a wet cleaning cassette, which is reduced. 34 MENU button (main features) - With the function on (NR ...ON") or off . tape Use the MENU button to turn this function on , background tape noise is available from your Ford Dealer. It is also recommended that are clean and in or press AMS to obtain the previous or next track on or off (NR OFF...

Owner Guide 4th Printing
Page 78
... a vertical wall or screen directly in front of it. 2. Remove the battery cover. 78 There is a risk of masking tape works well.) 3. Using a 7 mm Allen head wrench, turn off the lamps. Note: HORIZONTAL AIM IS NOT REQUIRED FOR THIS VEHICLE AND IS NONĆADJUSTABLE. 6. Open the hood. 4. Locate the vertical... due to adjust up). The high intensity area should touch the horizontal reference line. Lights 5. VOL On vehicles fitted with VOL (HID) headlamps, have your Ford Dealer change the headlamp bulbs.
... a vertical wall or screen directly in front of it. 2. Remove the battery cover. 78 There is a risk of masking tape works well.) 3. Using a 7 mm Allen head wrench, turn off the lamps. Note: HORIZONTAL AIM IS NOT REQUIRED FOR THIS VEHICLE AND IS NONĆADJUSTABLE. 6. Open the hood. 4. Locate the vertical... due to adjust up). The high intensity area should touch the horizontal reference line. Lights 5. VOL On vehicles fitted with VOL (HID) headlamps, have your Ford Dealer change the headlamp bulbs.

Owner Guide 4th Printing
Page 129
...altogether if the left Ćhand stem and push the head restraint down. To properly adjust your dealer or qualified technician. To raise: Pull the head restraint up. To remove the head restraint, see your head restraints, lift the head restraint so that position as possible. Seating and Safety ... driver's seat or seatback when the vehicle is pressed. 129 Head restraints Front seat Your vehicle is to limit head motion in the event of a rear collision. The purpose of these head restraints is equipped with head restraints which are vertically adjustable. To lower: Press the control ...
...altogether if the left Ćhand stem and push the head restraint down. To properly adjust your dealer or qualified technician. To raise: Pull the head restraint up. To remove the head restraint, see your head restraints, lift the head restraint so that position as possible. Seating and Safety ... driver's seat or seatback when the vehicle is pressed. 129 Head restraints Front seat Your vehicle is to limit head motion in the event of a rear collision. The purpose of these head restraints is equipped with head restraints which are vertically adjustable. To lower: Press the control ...
Owner Guide 4th Printing
Page 132
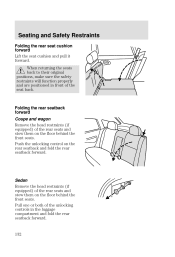
...in the luggage compartment and fold the rear seatback forward. 132 Push the unlocking control on the floor behind the front seats. Sedan Remove the head restraints (if equipped) of the rear seats and stow them on the rear seatback and fold the rear seatback forward. Seating and Safety Restraints ...Folding the rear seat cushion forward Lift the seat cushion and pull it forward. Folding the rear seatback forward Coupe and wagon Remove the head restraints (if equipped) of the seat back. Pull one or both of the unlocking controls in front of the rear seats and stow them...
...in the luggage compartment and fold the rear seatback forward. 132 Push the unlocking control on the floor behind the front seats. Sedan Remove the head restraints (if equipped) of the rear seats and stow them on the rear seatback and fold the rear seatback forward. Seating and Safety Restraints ...Folding the rear seat cushion forward Lift the seat cushion and pull it forward. Folding the rear seatback forward Coupe and wagon Remove the head restraints (if equipped) of the seat back. Pull one or both of the unlocking controls in front of the rear seats and stow them...

Owner Guide 4th Printing
Page 133
...(if equipped). When returning the seats to an upright position Fold back the seatback until the seatback has latched completely. Remove the head restraint(s) (if equipped) of the seatback. 133 Make sure the safety restraints will function properly and are positioned in the now upright... underside of the seatback. Stow the head restraint(s) in the plastic retainers provided in front of the seat cushion, as shown on that the center rear seat belt cannot be ...
...(if equipped). When returning the seats to an upright position Fold back the seatback until the seatback has latched completely. Remove the head restraint(s) (if equipped) of the seatback. 133 Make sure the safety restraints will function properly and are positioned in the now upright... underside of the seatback. Stow the head restraint(s) in the plastic retainers provided in front of the seat cushion, as shown on that the center rear seat belt cannot be ...

Owner Guide 4th Printing
Page 142
.... To unfasten, push the release button and remove the tongue from the buckle. The front and rear seat passenger safety belts have two types of a headĆon the occupant's chest. 142 This seat belt system has a retractor assembly that is designed to help further reduce the risk of injury in...
.... To unfasten, push the release button and remove the tongue from the buckle. The front and rear seat passenger safety belts have two types of a headĆon the occupant's chest. 142 This seat belt system has a retractor assembly that is designed to help further reduce the risk of injury in...

Owner Guide 4th Printing
Page 161
Do not lean your head on the side of the seatbacks of the front seats or in front seat areas that may come into contact with a deploying air bag. the ...
Do not lean your head on the side of the seatbacks of the front seats or in front seat areas that may come into contact with a deploying air bag. the ...

Owner Guide 4th Printing
Page 178
.... On a sedan, open the tether anchor cover. 5. Clip the tether strap to the tether anchor. For vehicles with adjustable head restraints, route the tether strap under the head restraint and between the head restraint posts, otherwise route the tether strap over the back of the seatback. 3. On hatchbacks, the removable luggage area cover...
.... On a sedan, open the tether anchor cover. 5. Clip the tether strap to the tether anchor. For vehicles with adjustable head restraints, route the tether strap under the head restraint and between the head restraint posts, otherwise route the tether strap over the back of the seatback. 3. On hatchbacks, the removable luggage area cover...

Owner Guide 4th Printing
Page 333
... axle weight rating (GAWR) ...206 Gross combined weight (GCW) 206 Gross vehicle weight (GVW) ...205 Gross vehicle weight rating (GVWR) ...205 H Hazard flasher control ...217 Head restraints ...129 Headlamp control ...74 Headlamps on warning chime ...18 Headlamps, aiming ...76 Headlamps, replacing bulbs . 81Ć82 Heating and ventilation ...62 High beams...
... axle weight rating (GAWR) ...206 Gross combined weight (GCW) 206 Gross vehicle weight (GVW) ...205 Gross vehicle weight rating (GVWR) ...205 H Hazard flasher control ...217 Head restraints ...129 Headlamp control ...74 Headlamps on warning chime ...18 Headlamps, aiming ...76 Headlamps, replacing bulbs . 81Ć82 Heating and ventilation ...62 High beams...
Quick Reference Guide 1st Printing
Page 2
...forward. 3. It must be thieves. Fog Lamp Control (If equipped) Nothing could be swiveled and turned to normal operation. Personalize Focus to activate the alarm. Remove the head restraints and lay the seatback down momentarily and release. A word of caution: Don't try this when the car is incorporated ...you. Press the button again to adjust the minutes. The fog lamp control is moving. Then use the volume control knob to install the head restraints once the seatback is flipped up . The power mirror switch can be simpler. To open all doors, press the LOCK button once...
...forward. 3. It must be thieves. Fog Lamp Control (If equipped) Nothing could be swiveled and turned to normal operation. Personalize Focus to activate the alarm. Remove the head restraints and lay the seatback down momentarily and release. A word of caution: Don't try this when the car is incorporated ...you. Press the button again to adjust the minutes. The fog lamp control is moving. Then use the volume control knob to install the head restraints once the seatback is flipped up . The power mirror switch can be simpler. To open all doors, press the LOCK button once...
