
Warranty Guide 5th Printing
Page 13
... bruises, bulges and impact breaks (potholes and curbs) are not covered unless required by installation of non-Ford parts other fluids • wiper blades • oil/air filters • clutch linings • brake linings/pads • engine tune-up • tire rotation Tire Wear or Damage As...9 Other Items and Conditions Not Covered Your New Vehicle Limited Warranty also does not cover: • non-Ford parts of your vehicle, for example, parts (including glass) installed by an insurance company; Any damage caused by the New Vehicle Limited Warranty. this will void the New ...
... bruises, bulges and impact breaks (potholes and curbs) are not covered unless required by installation of non-Ford parts other fluids • wiper blades • oil/air filters • clutch linings • brake linings/pads • engine tune-up • tire rotation Tire Wear or Damage As...9 Other Items and Conditions Not Covered Your New Vehicle Limited Warranty also does not cover: • non-Ford parts of your vehicle, for example, parts (including glass) installed by an insurance company; Any damage caused by the New Vehicle Limited Warranty. this will void the New ...
Warranty Guide 5th Printing
Page 32
... Prep Package by contacting the ambulance manufacturer of your vehicle. 13. In addition, the Excursion limousine must have the limousine retro-fit package installed that includes the brake hydro-boost, tire upgrade and spring package. In addition, Ford urges ambulance manufacturers to Bumper Warranty and may determine whether the ambulance manufacturer has followed...
... Prep Package by contacting the ambulance manufacturer of your vehicle. 13. In addition, the Excursion limousine must have the limousine retro-fit package installed that includes the brake hydro-boost, tire upgrade and spring package. In addition, Ford urges ambulance manufacturers to Bumper Warranty and may determine whether the ambulance manufacturer has followed...
Owner Guide 4th Printing
Page 8
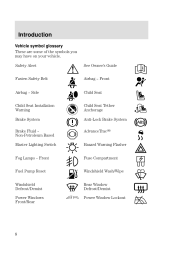
Safety Alert Fasten Safety Belt Airbag - Front Child Seat Child Seat Tether Anchorage AntiĆLock Brake System AdvanceTracT Hazard Warning Flasher Fuse Compartment Windshield Wash/Wipe Rear Window Defrost/Demist Power Window Lockout 8 Side Child Seat Installation Warning Brake System Brake Fluid NonĆPetroleum Based Master Lighting Switch Fog Lamps - Introduction Vehicle symbol glossary These are some of the symbols you may have on your vehicle. Front Fuel Pump Reset Windshield Defrost/Demist Power Windows Front/Rear See Owner's Guide Airbag -
Safety Alert Fasten Safety Belt Airbag - Front Child Seat Child Seat Tether Anchorage AntiĆLock Brake System AdvanceTracT Hazard Warning Flasher Fuse Compartment Windshield Wash/Wipe Rear Window Defrost/Demist Power Window Lockout 8 Side Child Seat Installation Warning Brake System Brake Fluid NonĆPetroleum Based Master Lighting Switch Fog Lamps - Introduction Vehicle symbol glossary These are some of the symbols you may have on your vehicle. Front Fuel Pump Reset Windshield Defrost/Demist Power Windows Front/Rear See Owner's Guide Airbag -
Owner Guide 4th Printing
Page 85
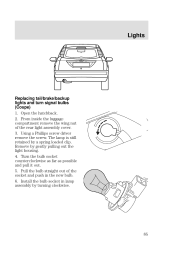
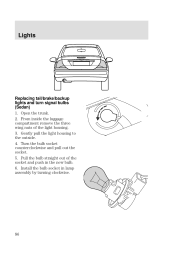
Lights Replacing tail/brake/backup lights and turn signal bulbs (Coupe) 1. From inside the luggage compartment remove the wing nut of the socket and push in lamp assembly by turning clockwise. 85 Install the bulb socket in the new bulb. 6. Using a Phillips screw driver remove the screw. Turn the bulb socket counterclockwise as far as possible and pull it out. 5. Pull the bulb straight out of the rear light assembly cover. 3. The lamp is still retained by gently pulling out the light housing. 4. Remove by a spring loaded clip. Open the hatchback. 2.
Lights Replacing tail/brake/backup lights and turn signal bulbs (Coupe) 1. From inside the luggage compartment remove the wing nut of the socket and push in lamp assembly by turning clockwise. 85 Install the bulb socket in the new bulb. 6. Using a Phillips screw driver remove the screw. Turn the bulb socket counterclockwise as far as possible and pull it out. 5. Pull the bulb straight out of the rear light assembly cover. 3. The lamp is still retained by gently pulling out the light housing. 4. Remove by a spring loaded clip. Open the hatchback. 2.
Owner Guide 4th Printing
Page 86
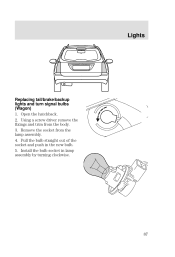
Gently pull the light housing to the outside. 4. Install the bulb socket in the new bulb. 6. Turn the bulb socket counterclockwise and pull out the socket. 5. Open the trunk. 2. From inside the luggage compartment remove the three wing nuts of the socket and push in lamp assembly by turning clockwise. 86 Lights Replacing tail/brake/backup lights and turn signal bulbs (Sedan) 1. Pull the bulb straight out of the light housing. 3.
Gently pull the light housing to the outside. 4. Install the bulb socket in the new bulb. 6. Turn the bulb socket counterclockwise and pull out the socket. 5. Open the trunk. 2. From inside the luggage compartment remove the three wing nuts of the socket and push in lamp assembly by turning clockwise. 86 Lights Replacing tail/brake/backup lights and turn signal bulbs (Sedan) 1. Pull the bulb straight out of the light housing. 3.
Owner Guide 4th Printing
Page 87
Remove the socket from the body. 3. Pull the bulb straight out of the socket and push in lamp assembly by turning clockwise. 87 Install the bulb socket in the new bulb. 5. Using a screw driver remove the fixings and trim from the lamp assembly. 4. Open the hatchback. 2. Lights Replacing tail/brake/backup lights and turn signal bulbs (Wagon) 1.
Remove the socket from the body. 3. Pull the bulb straight out of the socket and push in lamp assembly by turning clockwise. 87 Install the bulb socket in the new bulb. 5. Using a screw driver remove the fixings and trim from the lamp assembly. 4. Open the hatchback. 2. Lights Replacing tail/brake/backup lights and turn signal bulbs (Wagon) 1.
Owner Guide 4th Printing
Page 88
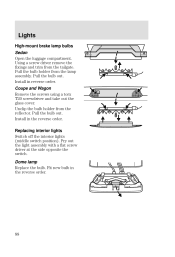
Using a screw driver remove the fixings and trim from the lamp assembly. Pull the bulb holder from the tailgate. Install in reverse order. Coupe and Wagon Remove the screws using a torx T20 screwdriver and take out the glass cover. Dome lamp Replace the bulb. ...bulb out. Pry out the light assembly with a flat screw driver at the side opposite the switch. Install in the reverse order. Fit new bulb in the reverse order. 88 Lights High-mount brake lamp bulbs Sedan Open the luggage compartment. Unclip the bulb holder from the reflector. Replacing interior lights Switch...
Using a screw driver remove the fixings and trim from the lamp assembly. Pull the bulb holder from the tailgate. Install in reverse order. Coupe and Wagon Remove the screws using a torx T20 screwdriver and take out the glass cover. Dome lamp Replace the bulb. ...bulb out. Pry out the light assembly with a flat screw driver at the side opposite the switch. Install in the reverse order. Fit new bulb in the reverse order. 88 Lights High-mount brake lamp bulbs Sedan Open the luggage compartment. Unclip the bulb holder from the reflector. Replacing interior lights Switch...

Owner Guide 4th Printing
Page 210
... Always connect the trailer's safety chains to the bumper. Do not connect a trailer's hydraulic brake system directly to your vehicle's brake system.Your vehicle may not have enough braking power and your trailer so that the rental agency gives to the manufacturer's specifications. If you...of having a collision greatly increase. 210 You must meet local and Federal regulations. Trailer brakes Electric brakes and manual automatic or surgeĆtype trailer brakes are safe if installed properly and adjusted to you use hitches that clamp onto the vehicle bumper. Driving Hitches...
... Always connect the trailer's safety chains to the bumper. Do not connect a trailer's hydraulic brake system directly to your vehicle's brake system.Your vehicle may not have enough braking power and your trailer so that the rental agency gives to the manufacturer's specifications. If you...of having a collision greatly increase. 210 You must meet local and Federal regulations. Trailer brakes Electric brakes and manual automatic or surgeĆtype trailer brakes are safe if installed properly and adjusted to you use hitches that clamp onto the vehicle bumper. Driving Hitches...

Owner Guide 4th Printing
Page 277
Let the engine idle for disposal. Follow your parking brake. 2. Call your local authorized recycling center to relearn its idle, the idle quality of automotive batteries in P (Park) (automatic transaxle) or the neutral position (manual ... your vehicle may be adversely affected until the idle is eventually relearned. • If the battery has been disconnected or if a new battery has been installed, the clock and preset radio stations must be reset once the battery is reconnected. Set your local authorized standards for at least one minute. 4.
Let the engine idle for disposal. Follow your parking brake. 2. Call your local authorized recycling center to relearn its idle, the idle quality of automotive batteries in P (Park) (automatic transaxle) or the neutral position (manual ... your vehicle may be adversely affected until the idle is eventually relearned. • If the battery has been disconnected or if a new battery has been installed, the clock and preset radio stations must be reset once the battery is reconnected. Set your local authorized standards for at least one minute. 4.

Owner Guide 4th Printing
Page 311
...the gearshift lever in the designated areas indicated by the figure to engage. 4. Install the dipstick making sure it clean with a clean, dry lint free rag. ... the fluid level is fully seated in the filler tube. 7. Automatic transaxle dipstick 311 With the parking brake engaged and your foot on the indicator. Remove the dipstick and inspect the fluid level. The transaxle fluid... should be within the MIN and MAX marks shown on the brake pedal, start the engine and move the gearshift lever through all of 50ºCĆ60ºC (120...
...the gearshift lever in the designated areas indicated by the figure to engage. 4. Install the dipstick making sure it clean with a clean, dry lint free rag. ... the fluid level is fully seated in the filler tube. 7. Automatic transaxle dipstick 311 With the parking brake engaged and your foot on the indicator. Remove the dipstick and inspect the fluid level. The transaxle fluid... should be within the MIN and MAX marks shown on the brake pedal, start the engine and move the gearshift lever through all of 50ºCĆ60ºC (120...
Owner Guide 4th Printing
Page 313
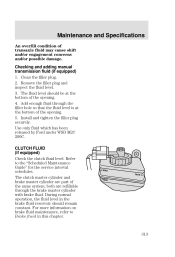
... An overfill condition of the opening . 4. Remove the filler plug and inspect the fluid level. 3. Install and tighten the filler plug securely. Refer to Brake fluid in the brake fluid reservoir should be at the bottom of transaxle fluid may cause shift and/or engagement concerns and/or...) Check the clutch fluid level. The fluid level should remain constant. Use only fluid which has been released by Ford under WSD M2C 200C. For more information on brake fluid maintenance, refer to the Scheduled Maintenance Guide" for the service interval schedules. Clean the filler plug. 2. ...
... An overfill condition of the opening . 4. Remove the filler plug and inspect the fluid level. 3. Install and tighten the filler plug securely. Refer to Brake fluid in the brake fluid reservoir should be at the bottom of transaxle fluid may cause shift and/or engagement concerns and/or...) Check the clutch fluid level. The fluid level should remain constant. Use only fluid which has been released by Ford under WSD M2C 200C. For more information on brake fluid maintenance, refer to the Scheduled Maintenance Guide" for the service interval schedules. Clean the filler plug. 2. ...

Owner Guide 4th Printing
Page 320
... the tire chains when they are no longer needed. Maintenance and Specifications • Use only SAE Class S chains. • Install chains securely, verifying that the chains do not touch any wiring, brake lines or fuel lines. • Drive cautiously. Do not use tire chains on dry roads. • The suspension insulation and...
... the tire chains when they are no longer needed. Maintenance and Specifications • Use only SAE Class S chains. • Install chains securely, verifying that the chains do not touch any wiring, brake lines or fuel lines. • Drive cautiously. Do not use tire chains on dry roads. • The suspension insulation and...

Owner Guide 4th Printing
Page 332
... Battery ...234, 274, 321 Beltminder ...148Ć153 Brake fluid ...309, 321 Brake lamps ...85Ć88 Brake system warning ...13 Brake-shift interlock ...194 Brake/clutch fluid ...323 Brakes ...188 332 B Bulb replacement ...81Ć89 Bulb specifications... ...90 C Cabin air filter ...321 Capacities ...321Ć322 Car care products ...330 Catalytic converter ...12 Changing the tires ...227Ć233 Charging system warning light . . 15 Child restraint precautions ...167 Child safety seats, installing...
... Battery ...234, 274, 321 Beltminder ...148Ć153 Brake fluid ...309, 321 Brake lamps ...85Ć88 Brake system warning ...13 Brake-shift interlock ...194 Brake/clutch fluid ...323 Brakes ...188 332 B Bulb replacement ...81Ć89 Bulb specifications... ...90 C Cabin air filter ...321 Capacities ...321Ć322 Car care products ...330 Catalytic converter ...12 Changing the tires ...227Ć233 Charging system warning light . . 15 Child restraint precautions ...167 Child safety seats, installing...


