
Scheduled Maintenance Guide 3rd Printing
Page 8
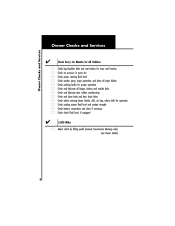
... and clean body and door drain holes safety warning lamps (brake, ABS, air bag, safety belt) for operation cooling system fluid level and coolant strength battery connections and clean if necessary clutch fluid level, if equipped 5,000 Miles Adjust clutch by lifting pedal (manual transmission Mustang only) (see Owner Guide) 8
... and clean body and door drain holes safety warning lamps (brake, ABS, air bag, safety belt) for operation cooling system fluid level and coolant strength battery connections and clean if necessary clutch fluid level, if equipped 5,000 Miles Adjust clutch by lifting pedal (manual transmission Mustang only) (see Owner Guide) 8
Scheduled Maintenance Guide 3rd Printing
Page 35
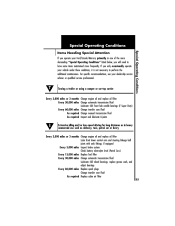
... your dealership service advisor or qualified service professional. Special Operating Conditions Special Operating Conditions Items Needing Special Attention If you operate your Ford/Lincoln/Mercury primarily in heavy commercial use such as delivery, taxi, patrol car or livery Every 3,000 miles or 3 months... front lower control arm and steering linkage ball joints with zerk fittings, if equipped Every 5,000 miles Inspect brake system Check battery electrolyte level (Patrol Cars) Every 15,000 miles Replace fuel filter Every 30,000 miles Change automatic transmission fluid Lubricate 4X2 ...
... your dealership service advisor or qualified service professional. Special Operating Conditions Special Operating Conditions Items Needing Special Attention If you operate your Ford/Lincoln/Mercury primarily in heavy commercial use such as delivery, taxi, patrol car or livery Every 3,000 miles or 3 months... front lower control arm and steering linkage ball joints with zerk fittings, if equipped Every 5,000 miles Inspect brake system Check battery electrolyte level (Patrol Cars) Every 15,000 miles Replace fuel filter Every 30,000 miles Change automatic transmission fluid Lubricate 4X2 ...
Owner Guide 4th Printing
Page 3
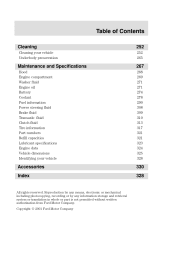
... storage and retrieval system or translation in whole or part is not permitted without written authorization from Ford Motor Company. Copyright E 2001 Ford Motor Company Table of Contents Cleaning Cleaning your vehicle Underbody preservation 252 252 265 Maintenance and Specifications Hood... Engine compartment Washer fluid Engine oil Battery Coolant Fuel information Power steering fluid Brake fluid Transaxle fluid Clutch fluid...
... storage and retrieval system or translation in whole or part is not permitted without written authorization from Ford Motor Company. Copyright E 2001 Ford Motor Company Table of Contents Cleaning Cleaning your vehicle Underbody preservation 252 252 265 Maintenance and Specifications Hood... Engine compartment Washer fluid Engine oil Battery Coolant Fuel information Power steering fluid Brake fluid Transaxle fluid Clutch fluid...
Owner Guide 4th Printing
Page 9
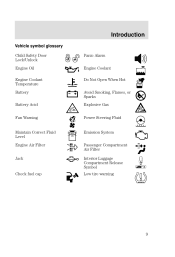
Introduction Vehicle symbol glossary Child Safety Door Lock/Unlock Engine Oil Engine Coolant Temperature Battery Battery Acid Fan Warning Maintain Correct Fluid Level Engine Air Filter Jack Check fuel cap Panic Alarm Engine Coolant Do Not Open When Hot Avoid Smoking, Flames, or Sparks Explosive Gas Power Steering Fluid Emission System Passenger Compartment Air Filter Interior Luggage Compartment Release Symbol Low tire warning 9
Introduction Vehicle symbol glossary Child Safety Door Lock/Unlock Engine Oil Engine Coolant Temperature Battery Battery Acid Fan Warning Maintain Correct Fluid Level Engine Air Filter Jack Check fuel cap Panic Alarm Engine Coolant Do Not Open When Hot Avoid Smoking, Flames, or Sparks Explosive Gas Power Steering Fluid Emission System Passenger Compartment Air Filter Interior Luggage Compartment Release Symbol Low tire warning 9

Owner Guide 4th Printing
Page 15
... and add oil if needed. Stop the vehicle as soon as safely possible and switch off the engine immediately. The light also illuminates when the battery is not charging properly, requiring electrical system service. If the light illuminates while driving, have your vehicle serviced. 15
... and add oil if needed. Stop the vehicle as soon as safely possible and switch off the engine immediately. The light also illuminates when the battery is not charging properly, requiring electrical system service. If the light illuminates while driving, have your vehicle serviced. 15

Owner Guide 4th Printing
Page 78
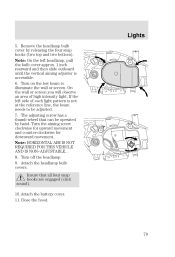
... wall or screen directly in front of injury due to adjust up). Using a 7 mm Allen head wrench, turn off the lamps. Remove the battery cover. 78 Close the hood and turn the adjuster either clockwise (to adjust down) or counterclockwise (to high voltage. 1. The high intensity area should... touch the horizontal reference line. VOL On vehicles fitted with VOL (HID) headlamps, have your Ford Dealer change the headlamp bulbs. Locate the vertical adjuster on each headlamp. There is a risk of it. 2. Open the hood. 4. Lights 5.
... wall or screen directly in front of injury due to adjust up). Using a 7 mm Allen head wrench, turn off the lamps. Remove the battery cover. 78 Close the hood and turn the adjuster either clockwise (to adjust down) or counterclockwise (to high voltage. 1. The high intensity area should... touch the horizontal reference line. VOL On vehicles fitted with VOL (HID) headlamps, have your Ford Dealer change the headlamp bulbs. Locate the vertical adjuster on each headlamp. There is a risk of it. 2. Open the hood. 4. Lights 5.
Owner Guide 4th Printing
Page 79
... the left side of high intensity light. On the wall or screen you will observe an area of each light pattern is accessible. 6. Attach the battery cover. 11. If the left headlamp, pull the bulb cover approx. 1 inch rearward and then slide outboard until the vertical aiming adjuster is not at...
... the left side of high intensity light. On the wall or screen you will observe an area of each light pattern is accessible. 6. Attach the battery cover. 11. If the left headlamp, pull the bulb cover approx. 1 inch rearward and then slide outboard until the vertical aiming adjuster is not at...
Owner Guide 4th Printing
Page 119
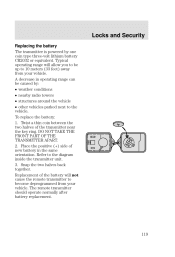
...THE FRONT PART OF THE TRANSMITTER APART. 2. Snap the two halves back together. Twist a thin coin between the two halves of new battery in operating range can be up to become deprogrammed from your vehicle. Typical operating range will not cause the remote transmitter to 10 meters (...33 feet) away from your vehicle. Replacement of the battery will allow you to the diagram inside the transmitter unit. 3. Place the positive (+) side of the transmitter near the key ring. The ...
...THE FRONT PART OF THE TRANSMITTER APART. 2. Snap the two halves back together. Twist a thin coin between the two halves of new battery in operating range can be up to become deprogrammed from your vehicle. Typical operating range will not cause the remote transmitter to 10 meters (...33 feet) away from your vehicle. Replacement of the battery will allow you to the diagram inside the transmitter unit. 3. Place the positive (+) side of the transmitter near the key ring. The ...
Owner Guide 4th Printing
Page 224
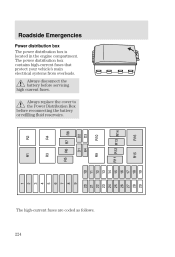
Always disconnect the battery before reconnecting the battery or refilling fluid reservoirs. The highĆcurrent fuses are coded as follows. 224 Roadside Emergencies Power distribution box The power distribution box is located in the engine compartment. Always replace the cover to the Power Distribution Box before servicing high current fuses. The power distribution box contains highĆcurrent fuses that protect your vehicle's main electrical systems from overloads.
Always disconnect the battery before reconnecting the battery or refilling fluid reservoirs. The highĆcurrent fuses are coded as follows. 224 Roadside Emergencies Power distribution box The power distribution box is located in the engine compartment. Always replace the cover to the Power Distribution Box before servicing high current fuses. The power distribution box contains highĆcurrent fuses that protect your vehicle's main electrical systems from overloads.
Owner Guide 4th Printing
Page 225
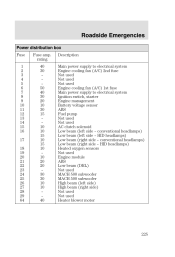
... fan (A/C) 2nd fuse Not used Not used Not used Engine cooling fan (A/C) 1st fuse Main power supply to electrical system Ignition switch, starter Engine management Battery voltage sensor ABS Fuel pump Not used Not used Heater blower motor 225 HID headlamps) Heated oxygen sensors Not used Engine module ABS Low beam...
... fan (A/C) 2nd fuse Not used Not used Not used Engine cooling fan (A/C) 1st fuse Main power supply to electrical system Ignition switch, starter Engine management Battery voltage sensor ABS Fuel pump Not used Not used Heater blower motor 225 HID headlamps) Heated oxygen sensors Not used Engine module ABS Low beam...

Owner Guide 4th Printing
Page 234
... your disabled vehicle as this could damage the catalytic converter. Automatic transaxles do not have pushĆstart your vehicle. Batteries contain sulfuric acid which burns skin, eyes, and clothing, if contacted. Use only a 12Ćvolt supply to flames, sparks, or lit cigarettes. Preparing your ...vehicle 1. Do not push start your vehicle. 2. Roadside Emergencies JUMP STARTING YOUR VEHICLE The gases around the battery can explode if exposed to start your vehicle. An explosion could result in injury or vehicle damage.
... your disabled vehicle as this could damage the catalytic converter. Automatic transaxles do not have pushĆstart your vehicle. Batteries contain sulfuric acid which burns skin, eyes, and clothing, if contacted. Use only a 12Ćvolt supply to flames, sparks, or lit cigarettes. Preparing your ...vehicle 1. Do not push start your vehicle. 2. Roadside Emergencies JUMP STARTING YOUR VEHICLE The gases around the battery can explode if exposed to start your vehicle. An explosion could result in injury or vehicle damage.

Owner Guide 4th Printing
Page 235
... parts. 4. Note: In the illustrations, lightning bolts are tight and level. 5. Turn all battery terminals and remove any excessive corrosion before you attach the battery cables. Set the parking brake on both vehicles and stay clear of the discharged battery. Connecting the jumper cables 1. Check all accessories off. Ensure that vent caps are...
... parts. 4. Note: In the illustrations, lightning bolts are tight and level. 5. Turn all battery terminals and remove any excessive corrosion before you attach the battery cables. Set the parking brake on both vehicles and stay clear of the discharged battery. Connecting the jumper cables 1. Check all accessories off. Ensure that vent caps are...

Owner Guide 4th Printing
Page 236
Connect the other end of the positive (+) cable to the negative (-) terminal of the assisting battery. 3. Roadside Emergencies 2. Connect the negative (-) cable to the positive (+) terminal of the assisting battery. 236
Connect the other end of the positive (+) cable to the negative (-) terminal of the assisting battery. 3. Roadside Emergencies 2. Connect the negative (-) cable to the positive (+) terminal of the assisting battery. 236

Owner Guide 4th Printing
Page 237
A spark may cause an explosion of the stalled vehicle's engine, away from the battery. Make the final connection of the negative (-) cable to be jumped. Do not connect the end of the second cable to the negative (-) terminal of the battery to an exposed metal part of the gases that surround the battery. • 2.0 litre Zetec engine 237 Roadside Emergencies 4. Do not use fuel lines, engine rocker covers, or the intake manifold as grounding points.
A spark may cause an explosion of the stalled vehicle's engine, away from the battery. Make the final connection of the negative (-) cable to be jumped. Do not connect the end of the second cable to the negative (-) terminal of the battery to an exposed metal part of the gases that surround the battery. • 2.0 litre Zetec engine 237 Roadside Emergencies 4. Do not use fuel lines, engine rocker covers, or the intake manifold as grounding points.

Owner Guide 4th Printing
Page 240
Remove the jumper cable on the negative (-) connection of the disabled vehicle's battery. After the disabled vehicle has been started and the jumper cables removed, allow it to idle for several minutes so the engine computer can relearn its idle conditions. 240 Remove the jumper cable from the positive (+) terminal of the booster vehicle's battery. 4. Remove the jumper cable from the positive (+) terminal of the booster vehicle's battery. 3. Roadside Emergencies 2.
Remove the jumper cable on the negative (-) connection of the disabled vehicle's battery. After the disabled vehicle has been started and the jumper cables removed, allow it to idle for several minutes so the engine computer can relearn its idle conditions. 240 Remove the jumper cable from the positive (+) terminal of the booster vehicle's battery. 4. Remove the jumper cable from the positive (+) terminal of the booster vehicle's battery. 3. Roadside Emergencies 2.

Owner Guide 4th Printing
Page 268
... it with the engine running in an enclosed space, unless you are sure you disconnect the battery, the engine must relearn" its strut in the holes in the hood ensuring it is located under the Battery section in its retaining clip, lower the hood and allow it to the front of the... the auxiliary latch that is secure. 4. If you have enough ventilation. • Keep all lit cigarettes, open flames and other lit material away from the battery and all fuel related parts.
... it with the engine running in an enclosed space, unless you are sure you disconnect the battery, the engine must relearn" its strut in the holes in the hood ensuring it is located under the Battery section in its retaining clip, lower the hood and allow it to the front of the... the auxiliary latch that is secure. 4. If you have enough ventilation. • Keep all lit cigarettes, open flames and other lit material away from the battery and all fuel related parts.
Owner Guide 4th Printing
Page 269
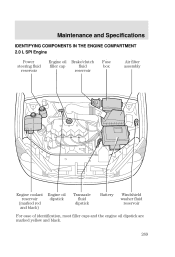
Maintenance and Specifications IDENTIFYING COMPONENTS IN THE ENGINE COMPARTMENT 2.0 L SPI Engine Power steering fluid reservoir Engine oil filler cap Brake/clutch fluid reservoir Fuse box Air filter assembly Engine coolant reservoir (marked red and black) Engine oil dipstick Transaxle fluid dipstick Battery Windshield washer fluid reservoir For ease of identification, most filler caps and the engine oil dipstick are marked yellow and black. 269
Maintenance and Specifications IDENTIFYING COMPONENTS IN THE ENGINE COMPARTMENT 2.0 L SPI Engine Power steering fluid reservoir Engine oil filler cap Brake/clutch fluid reservoir Fuse box Air filter assembly Engine coolant reservoir (marked red and black) Engine oil dipstick Transaxle fluid dipstick Battery Windshield washer fluid reservoir For ease of identification, most filler caps and the engine oil dipstick are marked yellow and black. 269
Owner Guide 4th Printing
Page 270
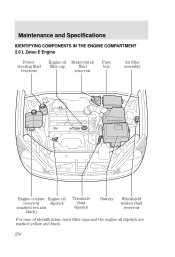
Maintenance and Specifications IDENTIFYING COMPONENTS IN THE ENGINE COMPARTMENT 2.0 L Zetec-E Engine Power steering fluid reservoir Engine oil filler cap Brake/clutch fluid reservoir Fuse box Air filter assembly Engine coolant Engine oil reservoir dipstick (marked red and black) Transaxle fluid dipstick Battery Windshield washer fluid reservoir For ease of identification, most filler caps and the engine oil dipstick are marked yellow and black. 270
Maintenance and Specifications IDENTIFYING COMPONENTS IN THE ENGINE COMPARTMENT 2.0 L Zetec-E Engine Power steering fluid reservoir Engine oil filler cap Brake/clutch fluid reservoir Fuse box Air filter assembly Engine coolant Engine oil reservoir dipstick (marked red and black) Transaxle fluid dipstick Battery Windshield washer fluid reservoir For ease of identification, most filler caps and the engine oil dipstick are marked yellow and black. 270

Owner Guide 4th Printing
Page 274
... Specifications It is recommended you do not use the appropriate Motorcraft oil filter (or another brand meeting Ford specifications) for severe usage or in high temperature climates, check the battery electrolyte level. BATTERY Your vehicle is low, you can add plain tap water to only fill the... are always tightly fastened to the Scheduled Maintenance Guide" for the service interval schedules. Do not overfill the battery cells. If possible, however, try to the battery, as long as you use hard water (water with a high mineral or alkali content). However, for your engine ...
... Specifications It is recommended you do not use the appropriate Motorcraft oil filter (or another brand meeting Ford specifications) for severe usage or in high temperature climates, check the battery electrolyte level. BATTERY Your vehicle is low, you can add plain tap water to only fill the... are always tightly fastened to the Scheduled Maintenance Guide" for the service interval schedules. Do not overfill the battery cells. If possible, however, try to the battery, as long as you use hard water (water with a high mineral or alkali content). However, for your engine ...

Owner Guide 4th Printing
Page 275
...do not allow flames, sparks or lighted substances to come near the battery, always shield your face and protect your battery has a cover/shield, make sure it is reinstalled after the battery has been cleaned or replaced. Batteries normally produce explosive gases which can neutralize the acid with a wire ...brush. Maintenance and Specifications If you are done cleaning them. Reinstall the cables when you see any corrosion on the battery cables or terminals, remove the cables from the terminals and clean with a solution of baking soda and water. If your eyes. When...
...do not allow flames, sparks or lighted substances to come near the battery, always shield your face and protect your battery has a cover/shield, make sure it is reinstalled after the battery has been cleaned or replaced. Batteries normally produce explosive gases which can neutralize the acid with a wire ...brush. Maintenance and Specifications If you are done cleaning them. Reinstall the cables when you see any corrosion on the battery cables or terminals, remove the cables from the terminals and clean with a solution of baking soda and water. If your eyes. When...


