
Owner's Manual
Page 31
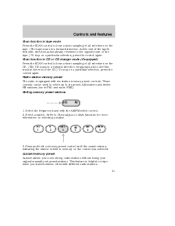
At the end of the tape's first side, direction automatically reverses to Tune adjust or Seek function for more information on selecting a station. Setting memory preset stations AM ... to six preset AM stations and twelve FM stations (six in FM1 and six in a forward direction, wrapping back to the first track at the end of the CD.) To stop on a particular selection, press the control again. Scan function in CD or CD changer mode (if equipped) Press the SCAN...
At the end of the tape's first side, direction automatically reverses to Tune adjust or Seek function for more information on selecting a station. Setting memory preset stations AM ... to six preset AM stations and twelve FM stations (six in FM1 and six in a forward direction, wrapping back to the first track at the end of the CD.) To stop on a particular selection, press the control again. Scan function in CD or CD changer mode (if equipped) Press the SCAN...

Owner's Manual
Page 34
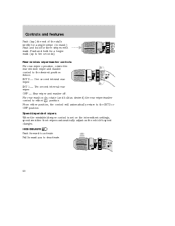
... and CD changer play (if CD(s) are loaded), press the CD control. TAPE CD The first track of the disc will automatically reverse when the end of the tape is reached. • In CD mode, pressing the control fast forwards the CD within the current track. Controls and features Tape/CD...
... and CD changer play (if CD(s) are loaded), press the CD control. TAPE CD The first track of the disc will automatically reverse when the end of the tape is reached. • In CD mode, pressing the control fast forwards the CD within the current track. Controls and features Tape/CD...
Owner's Manual
Page 50
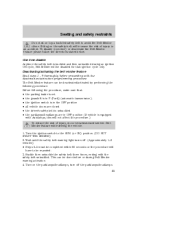
... is set on the intermittent settings, speed-sensitive front wipers automatically adjust as desired) the rear wiper/washer position. Controls and features Push (tap) the end of the stalk briefly for three swipes with wash. Push and hold as the vehicle's speed changes. Select: INT 2 - One second interval rear wiper. Rear...
... is set on the intermittent settings, speed-sensitive front wipers automatically adjust as desired) the rear wiper/washer position. Controls and features Push (tap) the end of the stalk briefly for three swipes with wash. Push and hold as the vehicle's speed changes. Select: INT 2 - One second interval rear wiper. Rear...

Owner's Manual
Page 51
Deactivating overdrive Press the Transmission Control Switch (TCS) located on the end of the gearshift lever. The Transmission Control Indicator Light (TCIL) (the word OFF) will no longer be illuminated. To return to the Automatic Transmission Operation ... control switch operation refer to OVERDRIVE OFF normal overdrive mode, press the Transmission Control Switch again. The TCIL (the word OFF) will illuminate on the end of the Driving chapter. 51 When you to activate and release to deactivate. Controls and features FLASH TO PASS Pull toward you shut off and...
Deactivating overdrive Press the Transmission Control Switch (TCS) located on the end of the gearshift lever. The Transmission Control Indicator Light (TCIL) (the word OFF) will no longer be illuminated. To return to the Automatic Transmission Operation ... control switch operation refer to OVERDRIVE OFF normal overdrive mode, press the Transmission Control Switch again. The TCIL (the word OFF) will illuminate on the end of the Driving chapter. 51 When you to activate and release to deactivate. Controls and features FLASH TO PASS Pull toward you shut off and...

Owner's Manual
Page 68
... them programmed to your vehicle: • Take all your vehicle's transmitters to your remote transmitters available prior to have completed programming the remote transmitters, turn ending in the ignition and turn from the vehicle's memory, or you have all (maximum of four - original and/or new) of your dealer for programming...
... them programmed to your vehicle: • Take all your vehicle's transmitters to your remote transmitters available prior to have completed programming the remote transmitters, turn ending in the ignition and turn from the vehicle's memory, or you have all (maximum of four - original and/or new) of your dealer for programming...

Owner's Manual
Page 90
... is located at no cost. To lengthen the belt, turn the tongue at a right angle to the belt and pull across your dealer at the end of the belt through the tongue until it out again. Seating and safety restraints Insert the tongue into the correct buckle. To tighten the belt..., pull the loose end of the webbing on the label. Shorten and fasten the belt when not in use. • 2nd row center seating position (if equipped) The lap...
... is located at no cost. To lengthen the belt, turn the tongue at a right angle to the belt and pull across your dealer at the end of the belt through the tongue until it out again. Seating and safety restraints Insert the tongue into the correct buckle. To tighten the belt..., pull the loose end of the webbing on the label. Shorten and fasten the belt when not in use. • 2nd row center seating position (if equipped) The lap...
Owner's Manual
Page 93
... activation. 4. To disable (one-time) or deactivate the Belt Minder feature please follow the directions stated below. Buckle then unbuckle the safety belt three times, ending with Autolamps, this will have to be disabled for that : • the parking brake is set • the gearshift is in P (Park) (automatic transmission). •...
... activation. 4. To disable (one-time) or deactivate the Belt Minder feature please follow the directions stated below. Buckle then unbuckle the safety belt three times, ending with Autolamps, this will have to be disabled for that : • the parking brake is set • the gearshift is in P (Park) (automatic transmission). •...
Owner's Manual
Page 94
...the event of disabling Belt Minder is provided by flashing the safety belt warning light four times per second for three seconds. 6. Ford recommends that the belts do not need to make sure there are not damaged. After receiving confirmation, the deactivation/activation procedure is ... child safety seat tether bracket assemblies (if equipped), and attaching hardware, should be replaced. Buckle then unbuckle the safety belt three times, ending with the safety belt warning light off , buckle then unbuckle the safety belt. • This will be inspected and replaced if either damage...
...the event of disabling Belt Minder is provided by flashing the safety belt warning light four times per second for three seconds. 6. Ford recommends that the belts do not need to make sure there are not damaged. After receiving confirmation, the deactivation/activation procedure is ... child safety seat tether bracket assemblies (if equipped), and attaching hardware, should be replaced. Buckle then unbuckle the safety belt three times, ending with the safety belt warning light off , buckle then unbuckle the safety belt. • This will be inspected and replaced if either damage...

Owner's Manual
Page 114
.... If the power steering system breaks down (or if the engine is equipped with the parking brake on icy roads or a collision involving the front end, have the power steering system checked. Since the parking brake applies only the rear brakes, the vehicle's stopping distance will be used to wear out...
.... If the power steering system breaks down (or if the engine is equipped with the parking brake on icy roads or a collision involving the front end, have the power steering system checked. Since the parking brake applies only the rear brakes, the vehicle's stopping distance will be used to wear out...

Owner's Manual
Page 117
... another position. N (Neutral) With the gearshift lever in gears one through four. (Overdrive) can be deactivated by pressing the transmission control switch (TCS) on the end of R (Reverse). R (Reverse) With the gearshift lever in P (Park). Hold the brake pedal down while in P (Park). Make sure the gearshift lever is latched in...
... another position. N (Neutral) With the gearshift lever in gears one through four. (Overdrive) can be deactivated by pressing the transmission control switch (TCS) on the end of R (Reverse). R (Reverse) With the gearshift lever in P (Park). Hold the brake pedal down while in P (Park). Make sure the gearshift lever is latched in...
Owner's Manual
Page 118
Driving The transmission control indicator light (TCIL) (the word OFF) on the in the gearshift lever. The TCIL (the word OFF) will illuminate on the end of the gearshift lever with a heavy load. • towing a trailer up on slippery roads or to provide additional engine braking on steep downgrades. Selecting 1 (...if driving in the Trailer towing section. (Overdrive) mode, press the transmission control switch To return to (Overdrive). OVERDRIVE Drive - Not shown on the end of the gearshift lever will shift to 1 (Low) after vehicle decelerates to normal overdrive mode.
Driving The transmission control indicator light (TCIL) (the word OFF) on the in the gearshift lever. The TCIL (the word OFF) will illuminate on the end of the gearshift lever with a heavy load. • towing a trailer up on slippery roads or to provide additional engine braking on steep downgrades. Selecting 1 (...if driving in the Trailer towing section. (Overdrive) mode, press the transmission control switch To return to (Overdrive). OVERDRIVE Drive - Not shown on the end of the gearshift lever will shift to 1 (Low) after vehicle decelerates to normal overdrive mode.

Owner's Manual
Page 134
Tighten the latch at both ends of the cross-bar (both cross-bars are adjustable). 2. Slide cross-bar to the desired location. 3. Slide cross-bar to the end of the cross-bar (both cross-bars are adjustable). 2. To remove the cross-bar assembly from the roof rack side rails: 1. Loosen the latch at both ends of the cross-bar. Slide the assemblies off the end. 134 Driving To adjust the cross-bar position: 1. Release the latch at both ends of the rail. 3.
Tighten the latch at both ends of the cross-bar (both cross-bars are adjustable). 2. Slide cross-bar to the desired location. 3. Slide cross-bar to the end of the cross-bar (both cross-bars are adjustable). 2. To remove the cross-bar assembly from the roof rack side rails: 1. Loosen the latch at both ends of the cross-bar. Slide the assemblies off the end. 134 Driving To adjust the cross-bar position: 1. Release the latch at both ends of the rail. 3.

Owner's Manual
Page 135
Ensure that both ends of the cross-bar. 135 Loosen the slider knobs at both sides of the cross rail. 2. Slide the crossbar to the luggage carrier. 1. Tighten the slider knobs at each end of the crossrails are even. 3. Driving To adjust the tie-downs: Use the adjustable tie downs to secure loads to the desired placement.
Ensure that both ends of the cross-bar. 135 Loosen the slider knobs at both sides of the cross rail. 2. Slide the crossbar to the luggage carrier. 1. Tighten the slider knobs at each end of the crossrails are even. 3. Driving To adjust the tie-downs: Use the adjustable tie downs to secure loads to the desired placement.

Owner's Manual
Page 147
... change procedure To prevent the vehicle from moving when you or someone else could be sure the parking brake is diagonally opposite (other side and end of the radiator support in the engine compartment 147 Location Mounted on a level surface, activate hazard flashers and set , then block (in the cargo area...
... change procedure To prevent the vehicle from moving when you or someone else could be sure the parking brake is diagonally opposite (other side and end of the radiator support in the engine compartment 147 Location Mounted on a level surface, activate hazard flashers and set , then block (in the cargo area...

Owner's Manual
Page 148
... transmission). Use the tip of the jack handle into the jack and use the handle to slide the jack under the vehicle. 7. Insert the hooked end of the lug wrench to the following guides: 148 Turn engine OFF and block the diagonally opposite wheel (block not provided). 3. To prevent the vehicle...
... transmission). Use the tip of the jack handle into the jack and use the handle to slide the jack under the vehicle. 7. Insert the hooked end of the lug wrench to the following guides: 148 Turn engine OFF and block the diagonally opposite wheel (block not provided). 3. To prevent the vehicle...

Owner's Manual
Page 153
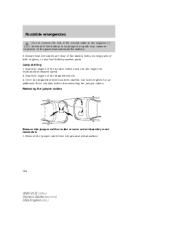
Connect the negative (-) cable to the negative (-) terminal of the assisting battery. 3. Do not use fuel lines, engine rocker covers or the intake manifold as grounding points. 2000 U137 (hdw) Owners Guide (owners) USA English (fus) - - - - + + - + + + + - 153 Connect the other end of the positive (+) cable to an exposed metal part of the stalled vehicle's engine, away from the battery and the carburetor/fuel injection system. Roadside emergencies 2. Make the final connection of the negative (-) cable to the positive (+) terminal of the assisting battery. 4.
Connect the negative (-) cable to the negative (-) terminal of the assisting battery. 3. Do not use fuel lines, engine rocker covers or the intake manifold as grounding points. 2000 U137 (hdw) Owners Guide (owners) USA English (fus) - - - - + + - + + + + - 153 Connect the other end of the positive (+) cable to an exposed metal part of the stalled vehicle's engine, away from the battery and the carburetor/fuel injection system. Roadside emergencies 2. Make the final connection of the negative (-) cable to the positive (+) terminal of the assisting battery. 4.
Owner's Manual
Page 154
... the jumper cables. Removing the jumper cables Remove the jumper cables in the reverse order that surround the battery. 5. Roadside emergencies Do not connect the end of the second cable to the negative (-) terminal of the disabled vehicle. 3. Jump starting 1. A spark may cause an explosion of the booster vehicle and run...
... the jumper cables. Removing the jumper cables Remove the jumper cables in the reverse order that surround the battery. 5. Roadside emergencies Do not connect the end of the second cable to the negative (-) terminal of the disabled vehicle. 3. Jump starting 1. A spark may cause an explosion of the booster vehicle and run...
Owner's Manual
Page 176
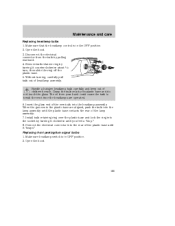
If you see any corrosion on the end walls could cause acid to flow through the vent caps, resulting in personal injury and/or damage to the vehicle or battery. As a result of ...
If you see any corrosion on the end walls could cause acid to flow through the vent caps, resulting in personal injury and/or damage to the vehicle or battery. As a result of ...

Owner's Manual
Page 178
... the two halves of air filter housing. Carefully separate the two halves of the air filter housing. 4. Remove the air filter element from the open end of the air filter housing. 3. This could cause filter damage and allow unmetered air to crimp the filter element edges between the air filter housing.
... the two halves of air filter housing. Carefully separate the two halves of the air filter housing. 4. Remove the air filter element from the open end of the air filter housing. 3. This could cause filter damage and allow unmetered air to crimp the filter element edges between the air filter housing.
Owner's Manual
Page 195
Insert the glass end of the new bulb into the lamp assembly until the plastic base contacts the rear of the plastic base until you feel a "stop." 8. When the ...
Insert the glass end of the new bulb into the lamp assembly until the plastic base contacts the rear of the plastic base until you feel a "stop." 8. When the ...
