
Owner's Manual
Page 58
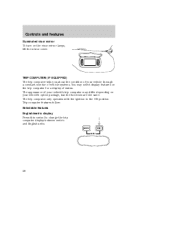
... vehicle through a constant monitor of vehicle systems. You may differ depending on your vehicle's trip computer may select display features on the visor mirror lamps, lift the mirror cover. Controls and features Illuminated visor mirror To turn on the trip computer for a display of status. The appearance of your vehicle's option...
... vehicle through a constant monitor of vehicle systems. You may differ depending on your vehicle's trip computer may select display features on the visor mirror lamps, lift the mirror cover. Controls and features Illuminated visor mirror To turn on the trip computer for a display of status. The appearance of your vehicle's option...
Owner's Manual
Page 74
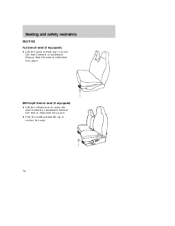
Ensure that the seat is relatched into place. 60/40 split bench seat (if equipped) • Lift the release bar to move the seat forward or backward. Ensure the seat is relatched into place. • Pull the seatback handle up to recline the seat. 74 Seating and safety restraints SEATING Full bench seat (if equipped) • Lift the track release bar to move the seat forward or backward.
Ensure that the seat is relatched into place. 60/40 split bench seat (if equipped) • Lift the release bar to move the seat forward or backward. Ensure the seat is relatched into place. • Pull the seatback handle up to recline the seat. 74 Seating and safety restraints SEATING Full bench seat (if equipped) • Lift the track release bar to move the seat forward or backward.

Owner's Manual
Page 75
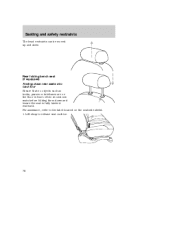
... the seatback can reduce the effectiveness of the seat's safety belt in a collision or sudden stop. Seating and safety restraints Captain's chair (if equipped) • Lift the track release bar to recline the seat. Adjusting the front power seat (if equipped) Never adjust the driver's seat or seatback when the vehicle...
... the seatback can reduce the effectiveness of the seat's safety belt in a collision or sudden stop. Seating and safety restraints Captain's chair (if equipped) • Lift the track release bar to recline the seat. Adjusting the front power seat (if equipped) Never adjust the driver's seat or seatback when the vehicle...
Owner's Manual
Page 77
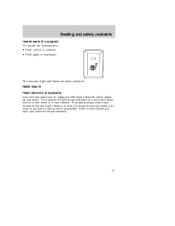
... SEATS Head restraints (if equipped) Your vehicle's seats may be equipped with head restraints which adjust up and down. To properly adjust your head restraints, lift the head restraint so that it is to that position as possible. The indicator light will illuminate when activated.
... SEATS Head restraints (if equipped) Your vehicle's seats may be equipped with head restraints which adjust up and down. To properly adjust your head restraints, lift the head restraint so that it is to that position as possible. The indicator light will illuminate when activated.
Owner's Manual
Page 78
Seating and safety restraints The head restraints can be moved up and down rear seats into load floor Ensure that no objects such as books, purses or briefcases are on the seat side shield. 1. For assistance, refer to release seat cushion. 78 Lift strap to the label located on the floor in front of the second row seats before folding them down and insure the seat is fully latched rearward. Rear folding bench seat (if equipped) Folding down .
Seating and safety restraints The head restraints can be moved up and down rear seats into load floor Ensure that no objects such as books, purses or briefcases are on the seat side shield. 1. For assistance, refer to release seat cushion. 78 Lift strap to the label located on the floor in front of the second row seats before folding them down and insure the seat is fully latched rearward. Rear folding bench seat (if equipped) Folding down .

Owner's Manual
Page 79
Remove 2nd row seat headrest by pushing in order to fold the seatback down. Stow headrest into the green caps found on headrest simultaneously. 4. Seating and safety restraints 2. Lift seat cushion up on the top of the seat cushion. 79 The headrest must be removed in both tabs while pulling up and rotate forward. 3.
Remove 2nd row seat headrest by pushing in order to fold the seatback down. Stow headrest into the green caps found on headrest simultaneously. 4. Seating and safety restraints 2. Lift seat cushion up on the top of the seat cushion. 79 The headrest must be removed in both tabs while pulling up and rotate forward. 3.

Owner's Manual
Page 80
Lift the lower seat control and flip the seatback down. 6. Lift up flap on seatback to the locked position, whether the seat is occupied or empty. Rotate the closeout panel onto the seatback and secure with the retaining flap. 80 Returning the seat to upright Insure the seat is pulled back to release closeout panel. 7. If not latched, the seat may cause injury during a sudden stop. 1. Seating and safety restraints 5. Rotate panel to closeout the space between the seatback and the floor.
Lift the lower seat control and flip the seatback down. 6. Lift up flap on seatback to the locked position, whether the seat is occupied or empty. Rotate the closeout panel onto the seatback and secure with the retaining flap. 80 Returning the seat to upright Insure the seat is pulled back to release closeout panel. 7. If not latched, the seat may cause injury during a sudden stop. 1. Seating and safety restraints 5. Rotate panel to closeout the space between the seatback and the floor.

Owner's Manual
Page 81
...may be removed from storage position and return to adjust the seatback. Remove headrest from the vehicle for additional cargo space. Reclining the seatback Lift the control to 2nd row seatback. Seating and safety restraints 2. Push down headrest completely to Safety Restraints in the center seating position. The ...third row seat may enter the third row seat through either rear side door. 81 For information on the seatback while lifting the handle to the third row seat. THIRD ROW SEAT (IF EQUIPPED) The third row seat is equipped with combination lap and ...
...may be removed from storage position and return to adjust the seatback. Remove headrest from the vehicle for additional cargo space. Reclining the seatback Lift the control to 2nd row seatback. Seating and safety restraints 2. Push down headrest completely to Safety Restraints in the center seating position. The ...third row seat may enter the third row seat through either rear side door. 81 For information on the seatback while lifting the handle to the third row seat. THIRD ROW SEAT (IF EQUIPPED) The third row seat is equipped with combination lap and ...

Owner's Manual
Page 83
... THE THIRD ROW SEAT From the rear of the vehicle, with the liftgate open : 1. With assistance, lift the seat out of the floor tubs and roll seat rearward. 4. While pulling up on the release bar, lift the seat up and out of the vehicle. When reinstalling a rear seat in your vehicle it... seat locator pins of the front floor tubs. • When the rear of the vehicle, with the liftgate window and cargo doors open : 1. With assistance, lift the seat into the floor. 83 For proper latching, ensure that the seat will prevent correct use of the safety belts and could increase the...
... THE THIRD ROW SEAT From the rear of the vehicle, with the liftgate open : 1. With assistance, lift the seat out of the floor tubs and roll seat rearward. 4. While pulling up on the release bar, lift the seat up and out of the vehicle. When reinstalling a rear seat in your vehicle it... seat locator pins of the front floor tubs. • When the rear of the vehicle, with the liftgate window and cargo doors open : 1. With assistance, lift the seat into the floor. 83 For proper latching, ensure that the seat will prevent correct use of the safety belts and could increase the...

Owner's Manual
Page 157
...your tow truck operator refer to this manual for proper hook-up and towing procedures for all the wheels off the ground using a wheel lift or a slingbelt with all authorized tow truck operators. Roadside emergencies WRECKER TOWING If you need to have your vehicle towed, contact a professional... towing service or, if you are a member, your vehicle. 157 If the vehicle is recommended that your vehicle be used. Ford Motor Company provides a towing manual for your roadside assistance center. However, a slingbelt with T-hooks and a wheel dolly can also be towed with a...
...your tow truck operator refer to this manual for proper hook-up and towing procedures for all the wheels off the ground using a wheel lift or a slingbelt with all authorized tow truck operators. Roadside emergencies WRECKER TOWING If you need to have your vehicle towed, contact a professional... towing service or, if you are a member, your vehicle. 157 If the vehicle is recommended that your vehicle be used. Ford Motor Company provides a towing manual for your roadside assistance center. However, a slingbelt with T-hooks and a wheel dolly can also be towed with a...

Owner's Manual
Page 159
Inside the vehicle, pull the hood release handle located under the right center of the instrument panel. Go to release the auxiliary latch. 3. OPENING THE HOOD 1. Slide the handle to the front of the vehicle and release the auxiliary latch located under the bottom left corner of the hood. Maintenance and care Do not start your engine with the air cleaner removed and do not remove it open. 159 HOOD 2. Lift the hood until the lift cylinders hold it while the engine is running.
Inside the vehicle, pull the hood release handle located under the right center of the instrument panel. Go to release the auxiliary latch. 3. OPENING THE HOOD 1. Slide the handle to the front of the vehicle and release the auxiliary latch located under the bottom left corner of the hood. Maintenance and care Do not start your engine with the air cleaner removed and do not remove it open. 159 HOOD 2. Lift the hood until the lift cylinders hold it while the engine is running.
Owner's Manual
Page 176
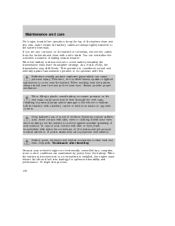
... tightly fastened to the vehicle or battery. Therefore, do not allow flames, sparks or lighted substances to its adaptive strategy. When lifting a plastic-cased battery, excessive pressure on opposite corners. Lift the battery with a battery carrier or with your vehicle's engine is considered normal and will fully update transmission operation to come...
... tightly fastened to the vehicle or battery. Therefore, do not allow flames, sparks or lighted substances to its adaptive strategy. When lifting a plastic-cased battery, excessive pressure on opposite corners. Lift the battery with a battery carrier or with your vehicle's engine is considered normal and will fully update transmission operation to come...

Driving Your SUV or Truck 1st Printing
Page 13
...steering, suspension, axle or transfer case/power transfer unit failure. If you nevertheless decide to equip your vehicle handles. These "aftermarket lift kits" could adversely affect the vehicle's handling characteristics, which could lead to loss of vehicle control or rollover and serious injury. Do... than the maximum pressure allowed for the tire. 13 Do not use "aftermarket lift kits" or other than what Ford recommends, you have questions regarding tire replacement, see an authorized Ford or Lincoln/Mercury dealer. Make sure all tires and wheels on the safety compliance...
...steering, suspension, axle or transfer case/power transfer unit failure. If you nevertheless decide to equip your vehicle handles. These "aftermarket lift kits" could adversely affect the vehicle's handling characteristics, which could lead to loss of vehicle control or rollover and serious injury. Do... than the maximum pressure allowed for the tire. 13 Do not use "aftermarket lift kits" or other than what Ford recommends, you have questions regarding tire replacement, see an authorized Ford or Lincoln/Mercury dealer. Make sure all tires and wheels on the safety compliance...
Driving Your SUV or Truck 1st Printing
Page 15
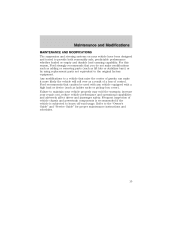
... control. Frequent inspection of gravity can make modifications such as adding or removing parts (such as ladder racks or pickup box cover). Ford recommends that raise the center of vehicle chassis and powertrain components is recommended if the vehicle is subjected to the "Owner's Guide" and... passenger safety. Any modifications to a vehicle that caution be used with any vehicle equipped with a high load or device (such as lift kits or stabilizer bars) or by using replacement parts not equivalent to provide both reasonably safe, predictable performance whether loaded or empty and...
... control. Frequent inspection of gravity can make modifications such as adding or removing parts (such as ladder racks or pickup box cover). Ford recommends that raise the center of vehicle chassis and powertrain components is recommended if the vehicle is subjected to the "Owner's Guide" and... passenger safety. Any modifications to a vehicle that caution be used with any vehicle equipped with a high load or device (such as lift kits or stabilizer bars) or by using replacement parts not equivalent to provide both reasonably safe, predictable performance whether loaded or empty and...
Scheduled Maintenance Guide 3rd Printing
Page 8
...) for operation cooling system fluid level and coolant strength battery connections and clean if necessary clutch fluid level, if equipped 5,000 Miles Adjust clutch by lifting pedal (manual transmission Mustang only) (see Owner Guide) 8
...) for operation cooling system fluid level and coolant strength battery connections and clean if necessary clutch fluid level, if equipped 5,000 Miles Adjust clutch by lifting pedal (manual transmission Mustang only) (see Owner Guide) 8
7.3L Diesel Supplement 2nd Printing
Page 18
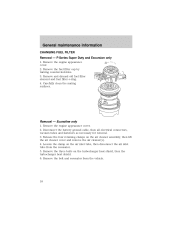
F-Series Super Duty and Excursion only 1. Remove the engine appearance cover. 2. Remove and discard old fuel filter element and fuel filter o-ring. 4. Loosen the clamp on the turbocharger heat shield, ... and resonator from the resonator. 5. General maintenance information CHANGING FUEL FILTER Removal - Econoline only 1. Release the four retaining clamps on the air cleaner assembly, then lift the air cleaner cover and remove the air cleaner(s). 4. Carefully clean the mating surfaces. Remove the engine appearance cover. 2.
F-Series Super Duty and Excursion only 1. Remove the engine appearance cover. 2. Remove and discard old fuel filter element and fuel filter o-ring. 4. Loosen the clamp on the turbocharger heat shield, ... and resonator from the resonator. 5. General maintenance information CHANGING FUEL FILTER Removal - Econoline only 1. Release the four retaining clamps on the air cleaner assembly, then lift the air cleaner cover and remove the air cleaner(s). 4. Carefully clean the mating surfaces. Remove the engine appearance cover. 2.
Owner Guide 4th Printing
Page 82
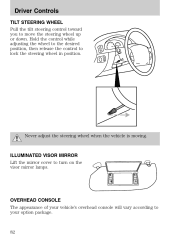
Driver Controls TILT STEERING WHEEL Pull the tilt steering control toward you to your vehicle's overhead console will vary according to move the steering wheel up or down. Never adjust the steering wheel when the vehicle is moving. OVERHEAD CONSOLE The appearance of your option package. 82 ILLUMINATED VISOR MIRROR Lift the mirror cover to lock the steering wheel in position. Hold the control while adjusting the wheel to the desired position, then release the control to turn on the visor mirror lamps.
Driver Controls TILT STEERING WHEEL Pull the tilt steering control toward you to your vehicle's overhead console will vary according to move the steering wheel up or down. Never adjust the steering wheel when the vehicle is moving. OVERHEAD CONSOLE The appearance of your option package. 82 ILLUMINATED VISOR MIRROR Lift the mirror cover to lock the steering wheel in position. Hold the control while adjusting the wheel to the desired position, then release the control to turn on the visor mirror lamps.
Owner Guide 4th Printing
Page 104
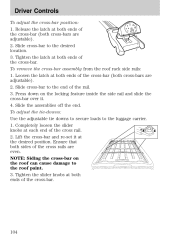
... desired position. Slide the assemblies off the end. To adjust the tie-downs: Use the adjustable tie downs to secure loads to the desired location. 3. Lift the cross-bar and re-set it . 4. NOTE: Siding the cross-bar on the locking feature inside the side rail and slide the cross-bar...
... desired position. Slide the assemblies off the end. To adjust the tie-downs: Use the adjustable tie downs to secure loads to the desired location. 3. Lift the cross-bar and re-set it . 4. NOTE: Siding the cross-bar on the locking feature inside the side rail and slide the cross-bar...

Owner Guide 4th Printing
Page 117
Ensure the seat is relatched into place. • Pull the seatback handle up to recline the seat. 117 Ensure that the seat is relatched into place. 60/40 split bench seat (if equipped) • Lift the release bar to move the seat forward or backward. Seating and Safety Restraints SEATING Full bench seat (if equipped) • Lift the track release bar to move the seat forward or backward.
Ensure the seat is relatched into place. • Pull the seatback handle up to recline the seat. 117 Ensure that the seat is relatched into place. 60/40 split bench seat (if equipped) • Lift the release bar to move the seat forward or backward. Seating and Safety Restraints SEATING Full bench seat (if equipped) • Lift the track release bar to move the seat forward or backward.

Owner Guide 4th Printing
Page 118
...) This system allows automatic positioning of the driver seat and adjustable pedals to three programmable positions. Seating and Safety Restraints Captain's chair (if equipped) • Lift the track release bar to move the driver seat to the desired position using control 2. • To program position three, repeat the previous procedure but...
...) This system allows automatic positioning of the driver seat and adjustable pedals to three programmable positions. Seating and Safety Restraints Captain's chair (if equipped) • Lift the track release bar to move the driver seat to the desired position using control 2. • To program position three, repeat the previous procedure but...
