
Owner's Manual
Page 1
Table of Contents Introduction Congratulations Safety and environment protection Symbol glossary 4 4 5 8 Instrument Cluster Warning and control lights Gauges 10 10 16 Entertainment Systems AM/FM stereo with CD AM/FM stereo cassette with CD 19 19 26 Climate Controls Heater only Manual heating and air conditioning 63 63 65 Lights Headlamps Bulb replacement 69 69 74 Driver Controls Steering wheel adjustment Power windows Mirrors 80 83 85 87 Locks and Security Keys Locks Anti-theft system 105 105 105 106 1
Table of Contents Introduction Congratulations Safety and environment protection Symbol glossary 4 4 5 8 Instrument Cluster Warning and control lights Gauges 10 10 16 Entertainment Systems AM/FM stereo with CD AM/FM stereo cassette with CD 19 19 26 Climate Controls Heater only Manual heating and air conditioning 63 63 65 Lights Headlamps Bulb replacement 69 69 74 Driver Controls Steering wheel adjustment Power windows Mirrors 80 83 85 87 Locks and Security Keys Locks Anti-theft system 105 105 105 106 1

Owner's Manual
Page 22
Press the control. 3. Bass adjust The bass adjust control allows you to your original manually set memory stations, press the control again. Starting autoset memory preset 1. When the first six strong stations SCN are less than six strong stations available ... 22 SET If there are filled, the station stored in memory on trips when you to set strong radio stations without losing your audio system's manually set preset stations. This feature is held in memory preset control 1 will all store the last strong station available. To deactivate autoset and return to...
Press the control. 3. Bass adjust The bass adjust control allows you to your original manually set memory stations, press the control again. Starting autoset memory preset 1. When the first six strong stations SCN are less than six strong stations available ... 22 SET If there are filled, the station stored in memory on trips when you to set strong radio stations without losing your audio system's manually set preset stations. This feature is held in memory preset control 1 will all store the last strong station available. To deactivate autoset and return to...

Owner's Manual
Page 29
... stop on a particular selection, press the control again. These controls can be used to select up to set strong radio stations without losing your original manually set preset stations.
... stop on a particular selection, press the control again. These controls can be used to select up to set strong radio stations without losing your original manually set preset stations.

Owner's Manual
Page 30
... stations are temporarily stored in the memory preset controls (until deactivated) and are filled, the station stored in the same manner as your audio system's manually set memory stations, press the AUTO control again. Entertainment Systems Starting autoset memory preset 1. Press the BASS control then press: to decrease the bass output...
... stations are temporarily stored in the memory preset controls (until deactivated) and are filled, the station stored in the same manner as your audio system's manually set memory stations, press the AUTO control again. Entertainment Systems Starting autoset memory preset 1. Press the BASS control then press: to decrease the bass output...

Owner's Manual
Page 39
Refer to set strong radio stations without losing your audio system's manually set preset stations. Starting autoset memory preset 1. If there are filled, the station stored in FM2). Setting memory preset stations 1. REW FF SIDE 1-2 COMP SHUFFLE 6 ... memory preset The radio is equipped with AM FM the AM/FM select control. 2. These controls can be used to select up to your original manually set memory stations, press the AUTO control again. 39 Press the AUTO control. Select a station. Press and hold a memory preset 1 2 3 5 4 control until the sound returns...
Refer to set strong radio stations without losing your audio system's manually set preset stations. Starting autoset memory preset 1. If there are filled, the station stored in FM2). Setting memory preset stations 1. REW FF SIDE 1-2 COMP SHUFFLE 6 ... memory preset The radio is equipped with AM FM the AM/FM select control. 2. These controls can be used to select up to your original manually set memory stations, press the AUTO control again. 39 Press the AUTO control. Select a station. Press and hold a memory preset 1 2 3 5 4 control until the sound returns...

Owner's Manual
Page 51
... audio system. Press and hold the AM/FM control. 2. The display will mute momentarily. To deactivate autoset and return to your original manually set memory stations, press the AM/FM control again. After that, CD play will flash in the display as the frequency band is ... 51 The first track of a loaded CD, or press the TUNE control to set the strongest local radio stations without losing your audio system's manually set preset stations. When the sound returns, the station is scrolled through. 3. AUTOSET will begin playing. Entertainment Systems 4. If there are filled,...
... audio system. Press and hold the AM/FM control. 2. The display will mute momentarily. To deactivate autoset and return to your original manually set memory stations, press the AM/FM control again. After that, CD play will flash in the display as the frequency band is ... 51 The first track of a loaded CD, or press the TUNE control to set the strongest local radio stations without losing your audio system's manually set preset stations. When the sound returns, the station is scrolled through. 3. AUTOSET will begin playing. Entertainment Systems 4. If there are filled,...

Owner's Manual
Page 61
.... CD AND CD CHANGER CARE • Handle discs by their edges only. Entertainment Systems Use the SEL control to decrease • Press hours/minutes. to manually set the time. If sound skips: • You may be traveling on a rough road, playing badly scratched discs or the disc may be dirty.
.... CD AND CD CHANGER CARE • Handle discs by their edges only. Entertainment Systems Use the SEL control to decrease • Press hours/minutes. to manually set the time. If sound skips: • You may be traveling on a rough road, playing badly scratched discs or the disc may be dirty.

Owner's Manual
Page 65
... the vehicle faster. This mode can operate in the vehicle. 1 2 3 4 Temperature control knob Controls the temperature of the airflow inside of the vehicle. Climate Controls MANUAL HEATING AND AIR CONDITIONING SYSTEM Fan speed control Controls the volume of air circulated in all modes , , and . However, the air conditioning will be used...
... the vehicle faster. This mode can operate in the vehicle. 1 2 3 4 Temperature control knob Controls the temperature of the airflow inside of the vehicle. Climate Controls MANUAL HEATING AND AIR CONDITIONING SYSTEM Fan speed control Controls the volume of air circulated in all modes , , and . However, the air conditioning will be used...

Owner's Manual
Page 82
Turn the blade at an angle from the arm. 3. Push the lock pin manually to release the blade and pull the wiper blade down toward the windshield to the wiper arm and press it from the wiper arm. Attach ...
Turn the blade at an angle from the arm. 3. Push the lock pin manually to release the blade and pull the wiper blade down toward the windshield to the wiper arm and press it from the wiper arm. Attach ...

Owner's Manual
Page 83
MANUAL TILT STEERING COLUMN (IF EQUIPPED) Push the tilt steering wheel lever downward to move the steering wheel up into the original position to lock the steering wheel in this section for more information on rear wiper blades. Driver Controls To activate the rear washer, rotate the control to Windshield wiper blades in position. Rear window wiper blades Refer to the position and release. Never adjust the steering wheel when the vehicle is moving. 83 Pull the control up or down.
MANUAL TILT STEERING COLUMN (IF EQUIPPED) Push the tilt steering wheel lever downward to move the steering wheel up into the original position to lock the steering wheel in this section for more information on rear wiper blades. Driver Controls To activate the rear washer, rotate the control to Windshield wiper blades in position. Rear window wiper blades Refer to the position and release. Never adjust the steering wheel when the vehicle is moving. 83 Pull the control up or down.

Owner's Manual
Page 115
Lift handle to reduce the risk of a collision. Reclining the seatback can reduce the effectiveness of the seat's safety belt in the event of injuring people in a collision or sudden stop. Do not pile cargo higher than the seatbacks to move seat forward or backward. 115 Always drive and ride with your seatback upright and the lap belt snug and low across the hips. Seating and Safety Restraints SEATING Adjusting the front manual seat Never adjust the driver's seat or seatback when the vehicle is moving.
Lift handle to reduce the risk of a collision. Reclining the seatback can reduce the effectiveness of the seat's safety belt in the event of injuring people in a collision or sudden stop. Do not pile cargo higher than the seatbacks to move seat forward or backward. 115 Always drive and ride with your seatback upright and the lap belt snug and low across the hips. Seating and Safety Restraints SEATING Adjusting the front manual seat Never adjust the driver's seat or seatback when the vehicle is moving.

Owner's Manual
Page 117
Using the manual lumbar support (if equipped) The lumbar support control is located on the inboard side of the driver's seat. Turn the lumbar support control clockwise to increase softness. 117 Press to raise or lower the rear portion of the seat cushion. Turn the lumbar support control counterclockwise to increase firmness. Press the control to raise or lower the front portion of the seat cushion. Press to move the seat forward, backward, up or down. Seating and Safety Restraints The control is located on the outboard side of the seat cushion.
Using the manual lumbar support (if equipped) The lumbar support control is located on the inboard side of the driver's seat. Turn the lumbar support control clockwise to increase softness. 117 Press to raise or lower the rear portion of the seat cushion. Turn the lumbar support control counterclockwise to increase firmness. Press the control to raise or lower the front portion of the seat cushion. Press to move the seat forward, backward, up or down. Seating and Safety Restraints The control is located on the outboard side of the seat cushion.

Owner's Manual
Page 128
Seating and Safety Restraints Always transport children 12 years old and under in Workshop Manual. Energy Management Feature • This vehicle has a safety belt system with an energy management feature at all safety belts should be checked by a qualified technician ...
Seating and Safety Restraints Always transport children 12 years old and under in Workshop Manual. Energy Management Feature • This vehicle has a safety belt system with an energy management feature at all safety belts should be checked by a qualified technician ...

Owner's Manual
Page 131
... at all seat belts should be checked by a qualified technician to replace the Belt and Retractor assembly could increase the risk of injury in Workshop Manual.
... at all seat belts should be checked by a qualified technician to replace the Belt and Retractor assembly could increase the risk of injury in Workshop Manual.

Owner's Manual
Page 137
...: Before following the procedure, make sure that: • the parking brake is set • the gearshift is in P (Park) (automatic transmission) or the neutral position (manual transmission). • the ignition switch is in the OFF position • all vehicle doors are closed • the driver's safety belt is unbuckled • the...
...: Before following the procedure, make sure that: • the parking brake is set • the gearshift is in P (Park) (automatic transmission) or the neutral position (manual transmission). • the ignition switch is in the OFF position • all vehicle doors are closed • the driver's safety belt is unbuckled • the...
Owner's Manual
Page 146
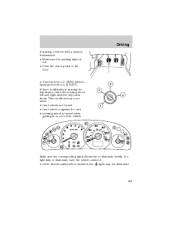
... is operational The SRS uses a readiness light in the instrument cluster or a tone to indicate the condition of the system. A difficulty with the vehicle service manual. Rather, it means the forces were not of the type sufficient to the Air bag readiness section in the Instrumentation chapter. Side air bags are...
... is operational The SRS uses a readiness light in the instrument cluster or a tone to indicate the condition of the system. A difficulty with the vehicle service manual. Rather, it means the forces were not of the type sufficient to the Air bag readiness section in the Instrumentation chapter. Side air bags are...
Owner's Manual
Page 159
... • front wheel is against the curb • steering wheel is set. • Push the clutch pedal to the floor. 3. Driving If starting a vehicle with a manual transmission: • Make sure the parking brake is turned when getting in turning the key, firmly rotate the steering wheel left and right until the...
... • front wheel is against the curb • steering wheel is set. • Push the clutch pedal to the floor. 3. Driving If starting a vehicle with a manual transmission: • Make sure the parking brake is turned when getting in turning the key, firmly rotate the steering wheel left and right until the...

Owner's Manual
Page 163
... instrument cluster momentarily illuminates when the ignition is turned to apply the brakes or always reduce stopping distance. The BRAKE warning lamp in 1 (First Gear) (manual transmission). 163 With the ABS light on or continues to flash, the ABS needs to stop. • We recommend that the gearshift is parked. If...
... instrument cluster momentarily illuminates when the ignition is turned to apply the brakes or always reduce stopping distance. The BRAKE warning lamp in 1 (First Gear) (manual transmission). 163 With the ABS light on or continues to flash, the ABS needs to stop. • We recommend that the gearshift is parked. If...

Owner's Manual
Page 164
... be pulled up slightly to release pressure before pushing in the button. However, if the normal brakes fail, the parking brake can steer the vehicle manually, but it takes more than a few seconds when the engine is running. • Do not operate the vehicle with power steering. STEERING Your vehicle is...
... be pulled up slightly to release pressure before pushing in the button. However, if the normal brakes fail, the parking brake can steer the vehicle manually, but it takes more than a few seconds when the engine is running. • Do not operate the vehicle with power steering. STEERING Your vehicle is...

Owner's Manual
Page 168
... shift firmly during the first few hundred kilometers (miles) of P ODO (Park). To put your vehicle in 1 (First) and then shift manually. Driving with the O/D OFF switch depressed. For manual control, start in gear, start the engine, depress the brake pedal, then move gearshift lever out of operation. The adaptive learning strategy...
... shift firmly during the first few hundred kilometers (miles) of P ODO (Park). To put your vehicle in 1 (First) and then shift manually. Driving with the O/D OFF switch depressed. For manual control, start in gear, start the engine, depress the brake pedal, then move gearshift lever out of operation. The adaptive learning strategy...


