
Owner's Manual
Page 14
THEFT Low coolant (if equipped) Illuminates when the coolant level in the Maintenance and specifications chapter. 14 Instrument Cluster High beams Illuminates when the high beam headlamps are turned on adding engine coolant, refer to Engine coolant in the coolant reservoir is open. For more needs to SecuriLock passive anti-theft system in the Locks and Security chapter. Anti-theft system Refer to be added. Door ajar Illuminates when any door, liftgate or liftgate window is low and more information on .
THEFT Low coolant (if equipped) Illuminates when the coolant level in the Maintenance and specifications chapter. 14 Instrument Cluster High beams Illuminates when the high beam headlamps are turned on adding engine coolant, refer to Engine coolant in the coolant reservoir is open. For more needs to SecuriLock passive anti-theft system in the Locks and Security chapter. Anti-theft system Refer to be added. Door ajar Illuminates when any door, liftgate or liftgate window is low and more information on .

Owner's Manual
Page 15
... detected. Have the supplemental restraint system inspected immediately. Key-in-ignition warning chime Sounds when the key is left in the ignition and the door, liftgate or liftgate window is not CHECK installed correctly. Safety belt warning chime Sounds to remind you to flash have the system serviced.
... detected. Have the supplemental restraint system inspected immediately. Key-in-ignition warning chime Sounds when the key is left in the ignition and the door, liftgate or liftgate window is not CHECK installed correctly. Safety belt warning chime Sounds to remind you to flash have the system serviced.

Owner's Manual
Page 77
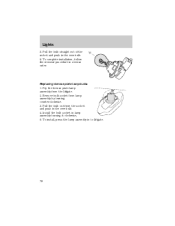
... bulb into the rear of the new bulb into the headlamp assembly. Be sure to press firmly around the perimeter of the lamp. 4. Open the liftgate to disengage snap features on the outward side of the boot and around the bulb to replace either bulb: 1. Carefully remove the lamp assembly by...
... bulb into the rear of the new bulb into the headlamp assembly. Be sure to press firmly around the perimeter of the lamp. 4. Open the liftgate to disengage snap features on the outward side of the boot and around the bulb to replace either bulb: 1. Carefully remove the lamp assembly by...
Owner's Manual
Page 78
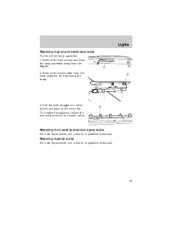
To complete installation, follow the removal procedure in to liftgate. 78 To install, press the lamp assembly in reverse order. Install the bulb socket in the new bulb. 4. Replacing license plate lamp bulbs 1. Pull the bulb out from the socket and push in lamp assembly turning it clockwise, 5. Remove bulb socket from the liftgate. 2. Lights 5. Pull the bulb straight out of the socket and push in the new bulb. 6. Pry the license plate lamp assembly from lamp assembly by turning counterclockwise. 3.
To complete installation, follow the removal procedure in to liftgate. 78 To install, press the lamp assembly in reverse order. Install the bulb socket in the new bulb. 4. Replacing license plate lamp bulbs 1. Pull the bulb out from the socket and push in lamp assembly turning it clockwise, 5. Remove bulb socket from the liftgate. 2. Lights 5. Pull the bulb straight out of the socket and push in the new bulb. 6. Pry the license plate lamp assembly from lamp assembly by turning counterclockwise. 3.
Owner's Manual
Page 79
Remove the two screws and move the lamp assembly away from the lamp assembly by depressing the snaps. 3. Pull the bulb straight out of the socket and push in reverse order. To complete installation, follow the removal procedure in the new bulb. Remove the bulb holder from the liftgate. 2. Replacing foglamp bulbs For bulb replacement, see a dealer or qualified technician. Lights Replacing high-mount brake lamp bulbs To remove the lamp assembly: 1. Replacing front parking lamp/turn signal bulbs For bulb replacement, see a dealer or qualified technician. 79
Remove the two screws and move the lamp assembly away from the lamp assembly by depressing the snaps. 3. Pull the bulb straight out of the socket and push in reverse order. To complete installation, follow the removal procedure in the new bulb. Remove the bulb holder from the liftgate. 2. Replacing foglamp bulbs For bulb replacement, see a dealer or qualified technician. Lights Replacing high-mount brake lamp bulbs To remove the lamp assembly: 1. Replacing front parking lamp/turn signal bulbs For bulb replacement, see a dealer or qualified technician. 79

Owner's Manual
Page 92
...will open the rear window, pull the right side of the control. They may overheat and shut down for 45 seconds while the motor cools. LIFTGATE To open the vent. • To close the moon roof repeatedly, the moon roof motor may seriously injure themselves. If you must drive with... components as well as allowing carbon monoxide to enter the vehicle. Do not let children play with the liftgate door or window open, keep the vents open while driving. To open the liftgate or liftgate glass in a garage or other enclosed area with a low ceiling. This will also prevent passengers and...
...will open the rear window, pull the right side of the control. They may overheat and shut down for 45 seconds while the motor cools. LIFTGATE To open the vent. • To close the moon roof repeatedly, the moon roof motor may seriously injure themselves. If you must drive with... components as well as allowing carbon monoxide to enter the vehicle. Do not let children play with the liftgate door or window open, keep the vents open while driving. To open the liftgate or liftgate glass in a garage or other enclosed area with a low ceiling. This will also prevent passengers and...

Owner's Manual
Page 104
... items (i.e., plywood, mattresses) on the roof when using an automated car wash. Only load cargo in the down position. Do not attempt to open the liftgate or rear window when the rack is in the designated area. Loading outside of the approved area could result in the approved area (1) shown above...
... items (i.e., plywood, mattresses) on the roof when using an automated car wash. Only load cargo in the down position. Do not attempt to open the liftgate or rear window when the rack is in the designated area. Loading outside of the approved area could result in the approved area (1) shown above...
Owner's Manual
Page 105
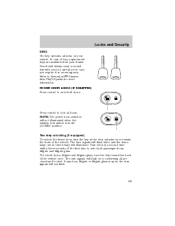
... case you require it in the door cylinder once toward the back of the vehicle once. To lock all doors, liftgate and liftgate glass, turn to unlock all doors. If any door, liftgate or liftgate glass is in time delay) will not flash. 105 In case of the vehicle. Locks and Security KEYS The... signals will flash twice and the dome lamp (set in the LOCKED position. POWER DOOR LOCKS (IF EQUIPPED) Press control to unlock all passenger doors, liftgate and liftgate glass. The turn the key in an emergency.
... case you require it in the door cylinder once toward the back of the vehicle once. To lock all doors, liftgate and liftgate glass, turn to unlock all doors. If any door, liftgate or liftgate glass is in time delay) will not flash. 105 In case of the vehicle. Locks and Security KEYS The... signals will flash twice and the dome lamp (set in the LOCKED position. POWER DOOR LOCKS (IF EQUIPPED) Press control to unlock all passenger doors, liftgate and liftgate glass. The turn the key in an emergency.

Owner's Manual
Page 234
... fluid to drain into the oil pan. 3. If the level is securely latched in the cooling system may restrict the use a washer fluid that meets Ford specifications. Washer fluid placed in P (Park) (automatic transmissions) or 1 (First) (manual transmissions). 234 Turn the engine off and wait a few... the engine oil. 1. Maintenance and Specifications WINDSHIELD WASHER FLUID Checking and adding washer fluid Check the washer fluid whenever you stop for the liftgate is highlighted with a symbol. In very cold weather, do not fill the reservoir all the way. Note: Do not put washer fluid...
... fluid to drain into the oil pan. 3. If the level is securely latched in the cooling system may restrict the use a washer fluid that meets Ford specifications. Washer fluid placed in P (Park) (automatic transmissions) or 1 (First) (manual transmissions). 234 Turn the engine off and wait a few... the engine oil. 1. Maintenance and Specifications WINDSHIELD WASHER FLUID Checking and adding washer fluid Check the washer fluid whenever you stop for the liftgate is highlighted with a symbol. In very cold weather, do not fill the reservoir all the way. Note: Do not put washer fluid...

Owner's Manual
Page 280
... to pass ...70 instrument panel, dimming ...70 interior lamps ...72-73, 75 replacing bulbs ...74-75, 77-79 Lane change indicator (see Turn signal) ...72 Liftgate ...92 Lights, warning and indicator ...10 air bag ...12 anti-lock brakes (ABS) ...12, 163 anti-theft ...14 brake ...11 charging system ...12 cruise indicator...
... to pass ...70 instrument panel, dimming ...70 interior lamps ...72-73, 75 replacing bulbs ...74-75, 77-79 Lane change indicator (see Turn signal) ...72 Liftgate ...92 Lights, warning and indicator ...10 air bag ...12 anti-lock brakes (ABS) ...12, 163 anti-theft ...14 brake ...11 charging system ...12 cruise indicator...

Owner's Manual
Page 283
Index Vehicle Identification Number (VIN) ...272 Vehicle loading ...180 Ventilating your vehicle ...161 W Warning chimes ...15 Warning lights (see Lights) ...10 Washer fluid ...234 Water, Driving through ...180 Windows power ...85 rear wiper/washer ...82 Windshield washer fluid and wipers checking and adding fluid ...234 checking and cleaning ...81, 83 liftgate reservoir ...234 operation ...80 replacing wiper blades ...82 Wrecker towing ...209 283
Index Vehicle Identification Number (VIN) ...272 Vehicle loading ...180 Ventilating your vehicle ...161 W Warning chimes ...15 Warning lights (see Lights) ...10 Washer fluid ...234 Water, Driving through ...180 Windows power ...85 rear wiper/washer ...82 Windshield washer fluid and wipers checking and adding fluid ...234 checking and cleaning ...81, 83 liftgate reservoir ...234 operation ...80 replacing wiper blades ...82 Wrecker towing ...209 283

