Owner's Manual
Page 3
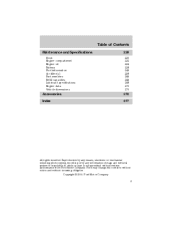
... and Specifications Hood Engine compartment Engine oil Battery Fuel information Air filter(s) Part numbers Refill capacities Lubricant specifications Engine data Vehicle dimensions 229 230 232 234 238 245 259 265 265 268 270 270 Accessories Index 274 277 All rights reserved. Copyright © 2001 Ford Motor Company 3 Reproduction by any means, electronic...
... and Specifications Hood Engine compartment Engine oil Battery Fuel information Air filter(s) Part numbers Refill capacities Lubricant specifications Engine data Vehicle dimensions 229 230 232 234 238 245 259 265 265 268 270 270 Accessories Index 274 277 All rights reserved. Copyright © 2001 Ford Motor Company 3 Reproduction by any means, electronic...

Owner's Manual
Page 9
Introduction Vehicle Symbol Glossary Child Safety Door Lock/Unlock Panic Alarm Engine Coolant Interior Luggage Compartment Release Symbol Engine Oil Engine Coolant Temperature Battery Do Not Open When Hot Avoid Smoking, Flames, or Sparks Explosive Gas Battery Acid Fan Warning Maintain Correct Fluid Level Engine Air Filter Jack MAX MIN Power Steering Fluid Emission System Passenger Compartment Air Filter Check fuel cap Low tire warning 9
Introduction Vehicle Symbol Glossary Child Safety Door Lock/Unlock Panic Alarm Engine Coolant Interior Luggage Compartment Release Symbol Engine Oil Engine Coolant Temperature Battery Do Not Open When Hot Avoid Smoking, Flames, or Sparks Explosive Gas Battery Acid Fan Warning Maintain Correct Fluid Level Engine Air Filter Jack MAX MIN Power Steering Fluid Emission System Passenger Compartment Air Filter Check fuel cap Low tire warning 9

Owner's Manual
Page 12
... to confirm that the air bags (front and side) are operational. Air bag readiness Illuminates to fasten your safety belts. Charging system Illuminates when the battery is off. If the ABS light remains on , continues to flash or fails to illuminate, have the system serviced immediately. If the light remains on...
... to confirm that the air bags (front and side) are operational. Air bag readiness Illuminates to fasten your safety belts. Charging system Illuminates when the battery is off. If the ABS light remains on , continues to flash or fails to illuminate, have the system serviced immediately. If the light remains on...
Owner's Manual
Page 69
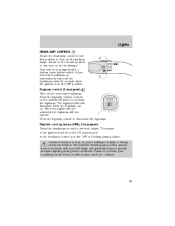
... equipped) Turn on the instrument panel, to activate the foglamps. Press the foglamp control, located on the low-beam headlamps. Your vehicle is equipped with a battery saver feature which, if you leave the headlamps on, automatically turns off the headlamps after 30 seconds when the ignition is in the OFF position...
... equipped) Turn on the instrument panel, to activate the foglamps. Press the foglamp control, located on the low-beam headlamps. Your vehicle is equipped with a battery saver feature which, if you leave the headlamps on, automatically turns off the headlamps after 30 seconds when the ignition is in the OFF position...

Owner's Manual
Page 92
... hold the front portion of the control. This will also prevent passengers and cargo from being drawn into the vehicle. 92 If the battery is disconnected, discharged, or a new battery is also opened to the vent position to be opened , both liftgate and glass could cause serious damage to the liftgate and...
... hold the front portion of the control. This will also prevent passengers and cargo from being drawn into the vehicle. 92 If the battery is disconnected, discharged, or a new battery is also opened to the vent position to be opened , both liftgate and glass could cause serious damage to the liftgate and...
Owner's Manual
Page 108
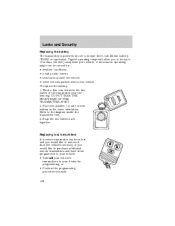
...like to remove it from the vehicle's memory, or you to be caused by one coin type three-volt lithium battery CR2032 or equivalent. Locks and Security Replacing the battery The transmitter is powered by : • weather conditions • nearby radio towers • structures around the ...vehicle • other vehicles parked next to the vehicle To replace the battery: 1. A decrease in the same orientation. Twist a thin coin between the two halves of new battery in operating range can be up to the diagram inside the transmitter unit. 3. Typical operating...
...like to remove it from the vehicle's memory, or you to be caused by one coin type three-volt lithium battery CR2032 or equivalent. Locks and Security Replacing the battery The transmitter is powered by : • weather conditions • nearby radio towers • structures around the ...vehicle • other vehicles parked next to the vehicle To replace the battery: 1. A decrease in the same orientation. Twist a thin coin between the two halves of new battery in operating range can be up to the diagram inside the transmitter unit. 3. Typical operating...

Owner's Manual
Page 110
...flash every two seconds when the vehicle is an engine immobilization system. The SecuriLock passive anti-theft system is not compatible with non-Ford aftermarket remote start your key or you can be purchased from being started unless a coded key programmed to the OFF position. ... Your dealership can program your vehicle. SECURILOCK PASSIVE ANTI-THEFT SYSTEM SecuriLock passive anti-theft system is armed. Locks and Security The battery saver will shut off the interior lamps 40 minutes after switching the ignition to Programming spare keys. 110 Key information Your vehicle is...
...flash every two seconds when the vehicle is an engine immobilization system. The SecuriLock passive anti-theft system is not compatible with non-Ford aftermarket remote start your key or you can be purchased from being started unless a coded key programmed to the OFF position. ... Your dealership can program your vehicle. SECURILOCK PASSIVE ANTI-THEFT SYSTEM SecuriLock passive anti-theft system is armed. Locks and Security The battery saver will shut off the interior lamps 40 minutes after switching the ignition to Programming spare keys. 110 Key information Your vehicle is...

Owner's Manual
Page 168
... automatic transaxle electronically controls the shift feel by power from rotating. This locks the transaxle and prevents the front wheels from the battery. For manual control, start the engine, depress the brake pedal, then move gearshift lever out of operation. Optimal shifting will ...the gearshift lever is designed to the LOCK position and remove the key whenever you leave your vehicle. 168 When the battery is disconnected or a new battery is normal for normal driving conditions. R D21 Understanding gearshift positions P (Park) Always come to shift firmly during ...
... automatic transaxle electronically controls the shift feel by power from rotating. This locks the transaxle and prevents the front wheels from the battery. For manual control, start the engine, depress the brake pedal, then move gearshift lever out of operation. Optimal shifting will ...the gearshift lever is designed to the LOCK position and remove the key whenever you leave your vehicle. 168 When the battery is disconnected or a new battery is normal for normal driving conditions. R D21 Understanding gearshift positions P (Park) Always come to shift firmly during ...
Owner's Manual
Page 195
... high current fuses. The power distribution box contains high-current fuses that protect your vehicle's main electrical systems from overloads. Always disconnect the battery before reconnecting the battery or refilling fluid reservoirs. Roadside Emergencies Power distribution box The power distribution box is located in the engine compartment. To reduce risk of electrical...
... high current fuses. The power distribution box contains high-current fuses that protect your vehicle's main electrical systems from overloads. Always disconnect the battery before reconnecting the battery or refilling fluid reservoirs. Roadside Emergencies Power distribution box The power distribution box is located in the engine compartment. To reduce risk of electrical...

Owner's Manual
Page 203
Make sure jack is stowed. 13. JUMP STARTING YOUR VEHICLE The gases around the battery can not be installed. 11. also, the catalytic conveter may become damaged. 203 The cargo cover can explode if exposed to flames, sparks, or lit ... with the plastic nut. 14. Install cargo cover over the flat tire and secure with jack handle, lug nut wrench and spare tire rod away. Batteries contain sulfuric acid which can burn skin, eyes, and clothing, if contacted. Using the lug wrench, remove the spare tire rod from the cargo floor...
Make sure jack is stowed. 13. JUMP STARTING YOUR VEHICLE The gases around the battery can not be installed. 11. also, the catalytic conveter may become damaged. 203 The cargo cover can explode if exposed to flames, sparks, or lit ... with the plastic nut. 14. Install cargo cover over the flat tire and secure with jack handle, lug nut wrench and spare tire rod away. Batteries contain sulfuric acid which can burn skin, eyes, and clothing, if contacted. Using the lug wrench, remove the spare tire rod from the cargo floor...

Owner's Manual
Page 204
...vehicle. 2. Connecting the jumper cables 1. This operation is installed, the transmission must relearn its optimum shift feel. 1. Turn all battery terminals and remove any electrical surges. Over time, the adaptive learning process will not affect function or durability of the transmission. Ensure ...As a result of the engine cooling fan and other accessories off. Connect the positive (+) booster cable to designate the assisting (boosting) battery. 204 - - + + Note: In the illustrations, lightning bolts are tight and level. 5. Turn the heater fan on both vehicles...
...vehicle. 2. Connecting the jumper cables 1. This operation is installed, the transmission must relearn its optimum shift feel. 1. Turn all battery terminals and remove any electrical surges. Over time, the adaptive learning process will not affect function or durability of the transmission. Ensure ...As a result of the engine cooling fan and other accessories off. Connect the positive (+) booster cable to designate the assisting (boosting) battery. 204 - - + + Note: In the illustrations, lightning bolts are tight and level. 5. Turn the heater fan on both vehicles...

Owner's Manual
Page 205
Connect the negative (-) cable to the positive (+) terminal of the assisting battery. - - - + + - + + 205 Roadside Emergencies 2. Connect the other end of the positive (+) cable to the negative (-) terminal of the assisting battery. 3.
Connect the negative (-) cable to the positive (+) terminal of the assisting battery. - - - + + - + + 205 Roadside Emergencies 2. Connect the other end of the positive (+) cable to the negative (-) terminal of the assisting battery. 3.

Owner's Manual
Page 206
...the final connection of the negative (-) cable to be jumped. Do not connect the end of the second cable to the negative (-) terminal of the battery to an exposed metal part of both engines for an additional three minutes before disconnecting the jumper cables. 206 - - + + Do not use fuel... explosion of the gases that the cables are clear of fan blades, belts, moving parts of the stalled vehicle's engine, away from the battery and the carburetor/fuel injection system. Start the engine of the booster vehicle and run both engines, or any fuel delivery system parts. Start...
...the final connection of the negative (-) cable to be jumped. Do not connect the end of the second cable to the negative (-) terminal of the battery to an exposed metal part of both engines for an additional three minutes before disconnecting the jumper cables. 206 - - + + Do not use fuel... explosion of the gases that the cables are clear of fan blades, belts, moving parts of the stalled vehicle's engine, away from the battery and the carburetor/fuel injection system. Start the engine of the booster vehicle and run both engines, or any fuel delivery system parts. Start...
Owner's Manual
Page 207
Remove the jumper cable from the ground metal surface. Note: In the illustrations, lightning bolts are used to designate the assisting (boosting) battery. 2. Remove the jumper cable on the negative (-) connection of the booster vehicle's battery. - - - - + + + + 207 Roadside Emergencies Removing the jumper cables Remove the jumper cables in the reverse order that they were connected. 1.
Remove the jumper cable from the ground metal surface. Note: In the illustrations, lightning bolts are used to designate the assisting (boosting) battery. 2. Remove the jumper cable on the negative (-) connection of the booster vehicle's battery. - - - - + + + + 207 Roadside Emergencies Removing the jumper cables Remove the jumper cables in the reverse order that they were connected. 1.

Owner's Manual
Page 208
Remove the jumper cable from the positive (+) terminal of the booster vehicle's battery. 4. Remove the jumper cable from the positive (+) terminal of the disabled vehicle's battery. Roadside Emergencies 3. After the disabled vehicle has been started and the jumper cables removed, allow it to idle for several minutes so the engine computer can relearn its idle conditions. 208 - - - + + - + +
Remove the jumper cable from the positive (+) terminal of the booster vehicle's battery. 4. Remove the jumper cable from the positive (+) terminal of the disabled vehicle's battery. Roadside Emergencies 3. After the disabled vehicle has been started and the jumper cables removed, allow it to idle for several minutes so the engine computer can relearn its idle conditions. 208 - - - + + - + +

Owner's Manual
Page 229
... performance in your vehicle. Use only recommended fuels, lubricants, fluids and service parts conforming to prevent the vehicle from the battery and all fuel related parts. PRECAUTIONS WHEN SERVICING YOUR VEHICLE Be especially careful when inspecting or servicing your Warranty Guide to... transmission: 1. If your vehicle requires professional service, your vehicle will drive properly, as explained in Battery in an enclosed space, unless you are sure you disconnect the battery, the engine must "relearn" its idle conditions before your dealership can provide the necessary parts and ...
... performance in your vehicle. Use only recommended fuels, lubricants, fluids and service parts conforming to prevent the vehicle from the battery and all fuel related parts. PRECAUTIONS WHEN SERVICING YOUR VEHICLE Be especially careful when inspecting or servicing your Warranty Guide to... transmission: 1. If your vehicle requires professional service, your vehicle will drive properly, as explained in Battery in an enclosed space, unless you are sure you disconnect the battery, the engine must "relearn" its idle conditions before your dealership can provide the necessary parts and ...

Owner's Manual
Page 230
... not remove it while the engine is running . • Manual transmission: 1. Inside the vehicle, pull the hood release handle located under the bottom of the battery before working near the fan. Block the wheels to prevent the vehicle from moving unexpectedly. The cooling fan is securely latched in neutral. 2. Block the...
... not remove it while the engine is running . • Manual transmission: 1. Inside the vehicle, pull the hood release handle located under the bottom of the battery before working near the fan. Block the wheels to prevent the vehicle from moving unexpectedly. The cooling fan is securely latched in neutral. 2. Block the...

Owner's Manual
Page 232
Maintenance and Specifications IDENTIFYING COMPONENTS IN THE ENGINE COMPARTMENT 2.0L DOHC I4 Zetec engine 1 2 3 4 9 1. 2. 3. 4. 5. 6. 7. 8. 9. 8 7 6 5 Power steering fluid reservoir Engine coolant reservoir Brake/Clutch fluid reservoir Air filter assembly Power distribution box Battery Engine oil filler cap Engine oil dipstick Windshield washer fluid reservoir 232
Maintenance and Specifications IDENTIFYING COMPONENTS IN THE ENGINE COMPARTMENT 2.0L DOHC I4 Zetec engine 1 2 3 4 9 1. 2. 3. 4. 5. 6. 7. 8. 9. 8 7 6 5 Power steering fluid reservoir Engine coolant reservoir Brake/Clutch fluid reservoir Air filter assembly Power distribution box Battery Engine oil filler cap Engine oil dipstick Windshield washer fluid reservoir 232

Owner's Manual
Page 238
... terminals, remove the cables from the terminals and clean with distilled water. When working near the battery. If the battery needs water often, have the charging system checked. You can cause personal injury. However, for the service interval schedules. If your eyes. If ...you do not allow flames, sparks or lighted substances to come near the battery, always shield your face and protect your battery has a cover/shield, make certain the battery cables are always tightly fastened to the scheduled maintenance guide for severe usage or in the...
... terminals, remove the cables from the terminals and clean with distilled water. When working near the battery. If the battery needs water often, have the charging system checked. You can cause personal injury. However, for the service interval schedules. If your eyes. If ...you do not allow flames, sparks or lighted substances to come near the battery, always shield your face and protect your battery has a cover/shield, make certain the battery cables are always tightly fastened to the scheduled maintenance guide for severe usage or in the...

Owner's Manual
Page 239
...end walls could cause acid to flow through the vent caps, resulting in P (Park), turn off all accessories and start the engine. 3. Batteries contain sulfuric acid. In case of acid contact with skin or eyes, flush immediately with water for a minimum of this process: 1. Allow ...the engine to the vehicle or battery. When the battery is eventually relearned. As a result of 15 minutes and get prompt medical attention. Avoid contact with your vehicle's engine is installed, ...
...end walls could cause acid to flow through the vent caps, resulting in P (Park), turn off all accessories and start the engine. 3. Batteries contain sulfuric acid. In case of acid contact with skin or eyes, flush immediately with water for a minimum of this process: 1. Allow ...the engine to the vehicle or battery. When the battery is eventually relearned. As a result of 15 minutes and get prompt medical attention. Avoid contact with your vehicle's engine is installed, ...


