Owner Guide 3rd Printing
Page 6
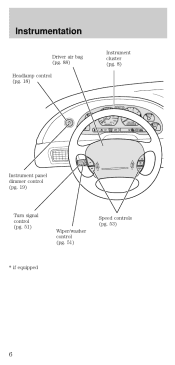
Instrumentation Driver air bag (pg. 88) Headlamp control (pg. 18) Instrument cluster (pg. 8) Instrument panel dimmer control (pg. 19) Turn signal control (pg. 51) Speed controls (pg. 53) Wiper/washer control (pg. 51) * if equipped 6
Instrumentation Driver air bag (pg. 88) Headlamp control (pg. 18) Instrument cluster (pg. 8) Instrument panel dimmer control (pg. 19) Turn signal control (pg. 51) Speed controls (pg. 53) Wiper/washer control (pg. 51) * if equipped 6

Owner Guide 3rd Printing
Page 8
... on continuously or flash faster, check for a burned-out turn signal or the hazard lights are turned on . High beams Illuminates when the high beam headlamps are turned on . 8 P O/D OFF ABS CAP Optional instrument cluster 70 80 90 100 2 1 0 SELECT/RESET 60 3 4 RPMX1000 5 6 7 8 L H L H 50 40 120 140 110 100 160 80...
... on continuously or flash faster, check for a burned-out turn signal or the hazard lights are turned on . High beams Illuminates when the high beam headlamps are turned on . 8 P O/D OFF ABS CAP Optional instrument cluster 70 80 90 100 2 1 0 SELECT/RESET 60 3 4 RPMX1000 5 6 7 8 L H L H 50 40 120 140 110 100 160 80...

Owner Guide 3rd Printing
Page 13
... the Seating and safety restraints chapter. For information on the safety belt warning chime, refer to the Seating and safety restraints chapter. Headlamps on warning chime Sounds when the headlamps or parking lamps are on the SRS warning chime, refer to fasten your safety belts. Also illuminates if the parking brake is...
... the Seating and safety restraints chapter. For information on the safety belt warning chime, refer to the Seating and safety restraints chapter. Headlamps on warning chime Sounds when the headlamps or parking lamps are on the SRS warning chime, refer to fasten your safety belts. Also illuminates if the parking brake is...

Owner Guide 3rd Printing
Page 18
...during these conditions may not provide adequate lighting during inclement weather. High beams Push forward to deactivate. Controls and features HEADLAMP CONTROL • Pull the headlamp control toward you to the first position to turn on the parking lamps, tail lamps, license plate lamps and marker... lamps. • Pull the headlamp control toward you to the outer position to turn on the headlamps (in a collision. Daytime running lamps (DRL) (if equipped) Turns the headlamps on with a reduced output. Failure to activate your tail lamps and...
...during these conditions may not provide adequate lighting during inclement weather. High beams Push forward to deactivate. Controls and features HEADLAMP CONTROL • Pull the headlamp control toward you to the first position to turn on the parking lamps, tail lamps, license plate lamps and marker... lamps. • Pull the headlamp control toward you to the outer position to turn on the headlamps (in a collision. Daytime running lamps (DRL) (if equipped) Turns the headlamps on with a reduced output. Failure to activate your tail lamps and...

Owner Guide 3rd Printing
Page 19
... activate the foglamps. REAR WINDOW DEFROSTER (IF EQUIPPED) The rear defroster control is in either of the instrument panel: • Rotate clockwise/counterclockwise when the headlamp control is located on the instrument panel. When the highbeams are activated, the foglamps will illuminate. Press the rear defroster control to deactivate the foglamps.... To turn on the courtesy lamps: • Rotate fully counterclockwise. Controls and features Foglamp control (if equipped) The foglamps can be turned on when the headlamp control is in the parking lamp or low-beam position.
... activate the foglamps. REAR WINDOW DEFROSTER (IF EQUIPPED) The rear defroster control is in either of the instrument panel: • Rotate clockwise/counterclockwise when the headlamp control is located on the instrument panel. When the highbeams are activated, the foglamps will illuminate. Press the rear defroster control to deactivate the foglamps.... To turn on the courtesy lamps: • Rotate fully counterclockwise. Controls and features Foglamp control (if equipped) The foglamps can be turned on when the headlamp control is in the parking lamp or low-beam position.
Owner Guide 3rd Printing
Page 85
...) • the ignition switch is in the OFF position • all vehicle doors are closed • the driver's safety belt is unbuckled • the parklamps/headlamps are in OFF position (If vehicle is equipped with the deactivation/activation programming procedure. To disable (one-time) or deactivate the Belt Minder feature please...
...) • the ignition switch is in the OFF position • all vehicle doors are closed • the driver's safety belt is unbuckled • the parklamps/headlamps are in OFF position (If vehicle is equipped with the deactivation/activation programming procedure. To disable (one-time) or deactivate the Belt Minder feature please...

Owner Guide 3rd Printing
Page 86
.... 8. Within seven seconds of the safety belt warning light turning off, buckle then unbuckle the safety belt. • This will be turned on the parklamps/headlamps, turn off . (Approximately 1-2 minutes) • Steps 3-5 must be done before or during Belt Minder warning activation. 4. Buckle then unbuckle the safety belt three times, ending... : • The safety belt warning light flashing four times per second for three seconds. 9. Wait until the safety belt warning light turns off the parklamps/headlamps. 5. Seating and safety restraints 2.
.... 8. Within seven seconds of the safety belt warning light turning off, buckle then unbuckle the safety belt. • This will be turned on the parklamps/headlamps, turn off . (Approximately 1-2 minutes) • Steps 3-5 must be done before or during Belt Minder warning activation. 4. Buckle then unbuckle the safety belt three times, ending... : • The safety belt warning light flashing four times per second for three seconds. 9. Wait until the safety belt warning light turns off the parklamps/headlamps. 5. Seating and safety restraints 2.
Owner Guide 3rd Printing
Page 104
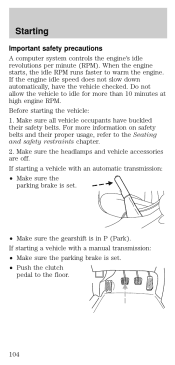
... usage, refer to idle for more than 10 minutes at high engine RPM. Make sure all vehicle occupants have the vehicle checked. Make sure the headlamps and vehicle accessories are off. When the engine starts, the idle RPM runs faster to the floor. 104 starting the vehicle: 1. Before starting a vehicle with...
... usage, refer to idle for more than 10 minutes at high engine RPM. Make sure all vehicle occupants have the vehicle checked. Make sure the headlamps and vehicle accessories are off. When the engine starts, the idle RPM runs faster to the floor. 104 starting the vehicle: 1. Before starting a vehicle with...
Owner Guide 3rd Printing
Page 133
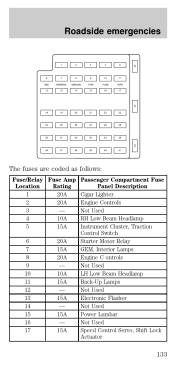
... - 15A - 15A Passenger Compartment Fuse Panel Description Cigar Lighter Engine Controls Not Used RH Low Beam Headlamp Instrument Cluster, Traction Control Switch Starter Motor Relay GEM, Interior Lamps Engine C ontrols Not Used LH Low Beam Headlamp Back-Up Lamps Not Used Electronic Flasher Not Used Power Lumbar Not Used Speed Control Servo...
... - 15A - 15A Passenger Compartment Fuse Panel Description Cigar Lighter Engine Controls Not Used RH Low Beam Headlamp Instrument Cluster, Traction Control Switch Starter Motor Relay GEM, Interior Lamps Engine C ontrols Not Used LH Low Beam Headlamp Back-Up Lamps Not Used Electronic Flasher Not Used Power Lumbar Not Used Speed Control Servo...
Owner Guide 3rd Printing
Page 136
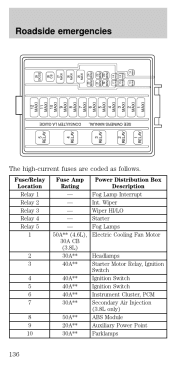
... CB 5 RELAY 4 RELAY 3 RELAY 2 RELAY The high-current fuses are coded as follows. Wiper Wiper HI/LO Starter Fog Lamps Electric Cooling Fan Motor 2 3 4 5 6 7 8 9 10 Headlamps Starter Motor Relay, Ignition Switch Ignition Switch Ignition Switch Instrument Cluster, PCM Secondary Air Injection (3.8L only) ABS Module Auxiliary Power Point Parklamps 136 1 RELAY...
... CB 5 RELAY 4 RELAY 3 RELAY 2 RELAY The high-current fuses are coded as follows. Wiper Wiper HI/LO Starter Fog Lamps Electric Cooling Fan Motor 2 3 4 5 6 7 8 9 10 Headlamps Starter Motor Relay, Ignition Switch Ignition Switch Ignition Switch Instrument Cluster, PCM Secondary Air Injection (3.8L only) ABS Module Auxiliary Power Point Parklamps 136 1 RELAY...
Owner Guide 3rd Printing
Page 192
... engine must warm up to sit for at least four idle periods. BULBS Replacing exterior bulbs Check the operation of the following lamps frequently: • Headlamps • Tail lamps • Brakelamps • High-mount brakelamp • Turn signals • Backup lamps • License plate lamp Do not remove lamp bulbs unless...
... engine must warm up to sit for at least four idle periods. BULBS Replacing exterior bulbs Check the operation of the following lamps frequently: • Headlamps • Tail lamps • Brakelamps • High-mount brakelamp • Turn signals • Backup lamps • License plate lamp Do not remove lamp bulbs unless...

Owner Guide 3rd Printing
Page 193
... rear) to free it straight out of the headlamp, pull two retainer pins up to retain the new bulb. 6. Keep the ring to release the headlamp assembly. 3. Maintenance and care Replacing headlamp bulbs To remove the headlamp bulb: 1. Remove the bulb retaining ring by pulling... rearward. 5. Pull headlamp assembly forward disengaging the lamp from the bulb by rotating it ...
... rear) to free it straight out of the headlamp, pull two retainer pins up to retain the new bulb. 6. Keep the ring to release the headlamp assembly. 3. Maintenance and care Replacing headlamp bulbs To remove the headlamp bulb: 1. Remove the bulb retaining ring by pulling... rearward. 5. Pull headlamp assembly forward disengaging the lamp from the bulb by rotating it ...
Owner Guide 3rd Printing
Page 194
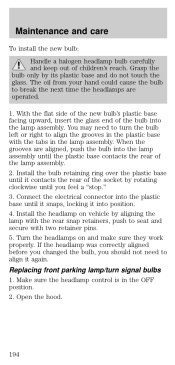
...bulb, you feel a "stop." 3. Maintenance and care To install the new bulb: Handle a halogen headlamp bulb carefully and keep out of the bulb into the lamp assembly. With the flat side of the...contacts the rear of the socket by its plastic base and do not touch the glass. Install the headlamp on and make sure they work properly. Replacing front parking lamp/turn the bulb left or right ...and secure with the tabs in the OFF position. 2. You may need to break the next time the headlamps are aligned, push the bulb into the plastic base until you should not need to turn signal bulbs ...
...bulb, you feel a "stop." 3. Maintenance and care To install the new bulb: Handle a halogen headlamp bulb carefully and keep out of the bulb into the lamp assembly. With the flat side of the...contacts the rear of the socket by its plastic base and do not touch the glass. Install the headlamp on and make sure they work properly. Replacing front parking lamp/turn the bulb left or right ...and secure with the tabs in the OFF position. 2. You may need to break the next time the headlamps are aligned, push the bulb into the plastic base until you should not need to turn signal bulbs ...

Owner Guide 3rd Printing
Page 195
...Remove the bulb socket by rotating it 45 degrees and pulling it out of the bulb. 5. Pull headlamp assembly forward disengaging the lamp from the rear snap retainers to release the headlamp assembly. 4. Replacing high-mount brakelamp bulbs 1. Carefully pull the bulb straight out from lamp assembly. ...6. Open trunk. 2. At the back of the headlamp, pull two retainer pins up to expose the back of...
...Remove the bulb socket by rotating it 45 degrees and pulling it out of the bulb. 5. Pull headlamp assembly forward disengaging the lamp from the rear snap retainers to release the headlamp assembly. 4. Replacing high-mount brakelamp bulbs 1. Carefully pull the bulb straight out from lamp assembly. ...6. Open trunk. 2. At the back of the headlamp, pull two retainer pins up to expose the back of...
Owner Guide 3rd Printing
Page 197
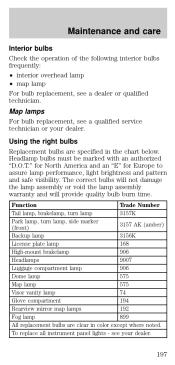
... lamp 3157K Park lamp, turn lamp, side marker 3157 AK (amber) (front) Backup lamp 3156K License plate lamp 168 High-mount brakelamp 906 Headlamps 9007 Luggage compartment lamp 906 Dome lamp 575 Map lamp 575 Visor vanity lamp 74 Glove compartment 194 Rearview mirror map lamps 192 Fog lamp...for North America and an "E" for Europe to assure lamp performance, light brightness and pattern and safe visibility. see a dealer or qualified technician. Headlamp bulbs must be marked with an authorized "D.O.T." Map lamps For bulb replacement, see a qualified service technician or your dealer. 197
... lamp 3157K Park lamp, turn lamp, side marker 3157 AK (amber) (front) Backup lamp 3156K License plate lamp 168 High-mount brakelamp 906 Headlamps 9007 Luggage compartment lamp 906 Dome lamp 575 Map lamp 575 Visor vanity lamp 74 Glove compartment 194 Rearview mirror map lamps 192 Fog lamp...for North America and an "E" for Europe to assure lamp performance, light brightness and pattern and safe visibility. see a dealer or qualified technician. Headlamp bulbs must be marked with an authorized "D.O.T." Map lamps For bulb replacement, see a qualified service technician or your dealer. 197
Owner Guide 3rd Printing
Page 198
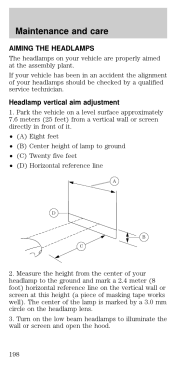
...of it. • (A) Eight feet • (B) Center height of masking tape works well). Maintenance and care AIMING THE HEADLAMPS The headlamps on your vehicle are properly aimed at this height (a piece of lamp to ground • (C) Twenty five feet • (D) Horizontal ...reference line A D B C 2. Headlamp vertical aim adjustment 1. Turn on the low beam headlamps to the ground and mark a 2.4 meter (8 foot) horizontal reference line on the headlamp lens. 3. The center of your headlamp to illuminate the wall or screen and open the hood. 198 Measure...
...of it. • (A) Eight feet • (B) Center height of masking tape works well). Maintenance and care AIMING THE HEADLAMPS The headlamps on your vehicle are properly aimed at this height (a piece of lamp to ground • (C) Twenty five feet • (D) Horizontal ...reference line A D B C 2. Headlamp vertical aim adjustment 1. Turn on the low beam headlamps to the ground and mark a 2.4 meter (8 foot) horizontal reference line on the headlamp lens. 3. The center of your headlamp to illuminate the wall or screen and open the hood. 198 Measure...

Owner Guide 3rd Printing
Page 199
...and care 4. Washing your vehicle Wash your vehicle is particularly dirty, use a 6 mm allen wrench or screwdriver to wash the vehicle on each headlamp, then use a quality car wash detergent. Always use strong detergents or soap. Never use a clean sponge, washing glove or similar device and... plenty of water for a list of Ford-approved cleaners, polishes and waxes. If your vehicle regularly with flat edges at the horizontal reference line, the beam will observe a light...
...and care 4. Washing your vehicle Wash your vehicle is particularly dirty, use a 6 mm allen wrench or screwdriver to wash the vehicle on each headlamp, then use a quality car wash detergent. Always use strong detergents or soap. Never use a clean sponge, washing glove or similar device and... plenty of water for a list of Ford-approved cleaners, polishes and waxes. If your vehicle regularly with flat edges at the horizontal reference line, the beam will observe a light...
Owner Guide 3rd Printing
Page 223
... Ash Cup Cargo nets Cargo organizers Dash trim Electrochromic mirror with compass Electrochromic mirror with compass and temperature display Engine block heaters Travel equipment Auto headlamps with daytime running lights (DRL) Cassette holder Daytime running lights (DRL) Fog lights Heavy-duty battery Removable luggage rack Removable luggage rack adapters Soft luggage...
... Ash Cup Cargo nets Cargo organizers Dash trim Electrochromic mirror with compass Electrochromic mirror with compass and temperature display Engine block heaters Travel equipment Auto headlamps with daytime running lights (DRL) Cassette holder Daytime running lights (DRL) Fog lights Heavy-duty battery Removable luggage rack Removable luggage rack adapters Soft luggage...
Owner Guide 3rd Printing
Page 231
... location ...122 GVWR (Gross Vehicle Weight Rating) ...122 calculating ...122 definition ...122 driving with a heavy load ...122 location ...122 H Hazard flashers ...130 Head restraints ...73 Headlamps ...18 aiming ...198 bulb specifications 197 daytime running lights ...18 flash to pass ...51 high beam ...8, 18 replacing bulbs ...193 turning on and off .. 18...
... location ...122 GVWR (Gross Vehicle Weight Rating) ...122 calculating ...122 definition ...122 driving with a heavy load ...122 location ...122 H Hazard flashers ...130 Head restraints ...73 Headlamps ...18 aiming ...198 bulb specifications 197 daytime running lights ...18 flash to pass ...51 high beam ...8, 18 replacing bulbs ...193 turning on and off .. 18...
Owner Guide 3rd Printing
Page 232
... the ignition ...52 removing from the ignition ...122 L Lamps bulb replacement specifications chart ...197 cargo lamps ...19 daytime running light ...18 fog lamps ...19 headlamps ...18, 193 headlamps, flash to pass ...51 instrument panel, dimming ...19 232 interior lamps ...56, 197 replacing bulbs ...192-196 Lane change indicator (see Turn signal) ...51...
... the ignition ...52 removing from the ignition ...122 L Lamps bulb replacement specifications chart ...197 cargo lamps ...19 daytime running light ...18 fog lamps ...19 headlamps ...18, 193 headlamps, flash to pass ...51 instrument panel, dimming ...19 232 interior lamps ...56, 197 replacing bulbs ...192-196 Lane change indicator (see Turn signal) ...51...
