Owner's Manual
Page 54
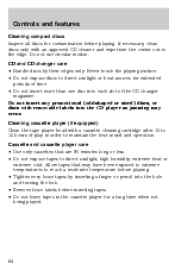
... for contamination before playing. Cassette and cassette player care • Use only cassettes that may occur. Cleaning cassette player (if equipped) Clean the tape player head with a cassette cleaning cartridge after 10 to reach a moderate temperature before inserting tapes. • Do not leave tapes in order to maintain the best sound...
... for contamination before playing. Cassette and cassette player care • Use only cassettes that may occur. Cleaning cassette player (if equipped) Clean the tape player head with a cassette cleaning cartridge after 10 to reach a moderate temperature before inserting tapes. • Do not leave tapes in order to maintain the best sound...
Owner's Manual
Page 66
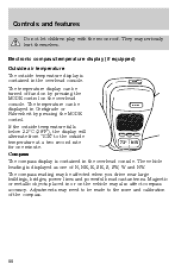
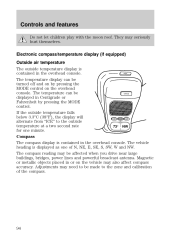
... seriously hurt themselves. Magnetic or metallic objects placed in Centigrade or Fahrenheit by pressing the MODE control on by pressing the MODE control. The vehicle heading is contained in the overhead console. The compass reading may need to be affected when you drive near large buildings, bridges, power lines and powerful...
... seriously hurt themselves. Magnetic or metallic objects placed in Centigrade or Fahrenheit by pressing the MODE control on by pressing the MODE control. The vehicle heading is contained in the overhead console. The compass reading may need to be affected when you drive near large buildings, bridges, power lines and powerful...
Owner's Manual
Page 87
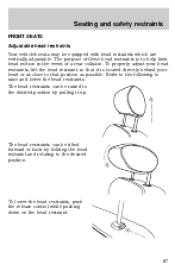
... raise and lower the head restraints. To properly adjust your head or as possible. The head restraints can be tilted forward or back by pulling it is to that it up. The purpose of these head restraints is located directly behind your head restraints, lift the head restraint so that position... as close to help limit head motion in the event of a rear collision. Seating and safety restraints FRONT SEATS...
... raise and lower the head restraints. To properly adjust your head or as possible. The head restraints can be tilted forward or back by pulling it is to that it up. The purpose of these head restraints is located directly behind your head restraints, lift the head restraint so that position... as close to help limit head motion in the event of a rear collision. Seating and safety restraints FRONT SEATS...

Owner's Manual
Page 88
... your seatback upright and the lap belt snug and low across the hips. Always drive and ride with the low back bucket seats and adjustable head restraint, the right front seat will not relatch after the tip slide function for rear seat access has been activated. Do not pile cargo higher...
... your seatback upright and the lap belt snug and low across the hips. Always drive and ride with the low back bucket seats and adjustable head restraint, the right front seat will not relatch after the tip slide function for rear seat access has been activated. Do not pile cargo higher...
Owner's Manual
Page 91
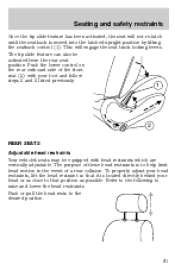
... a rear collision. Refer to the following to the desired position. 91 Push or pull the head rests to raise and lower the head restraints. To properly adjust your head restraints, lift the head restraint so that it is located directly behind your foot and follow steps 2 and 3 listed ...previously. 1 2 REAR SEATS Adjustable head restraints Your vehicle's seats may be activated from the rear seat position. The purpose of these head restraints is moved into the latched upright position by lifting the seatback control (1). This will...
... a rear collision. Refer to the following to the desired position. 91 Push or pull the head rests to raise and lower the head restraints. To properly adjust your head restraints, lift the head restraint so that it is located directly behind your foot and follow steps 2 and 3 listed ...previously. 1 2 REAR SEATS Adjustable head restraints Your vehicle's seats may be activated from the rear seat position. The purpose of these head restraints is moved into the latched upright position by lifting the seatback control (1). This will...
Owner's Manual
Page 92
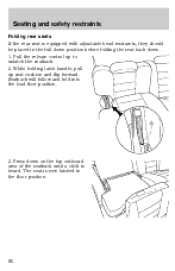
Press down . 1. The seat is now latched in the full down position before folding the seat back down on the top outboard area of the seatback until a click is heard. While holding latch handle, pull up to unlatch the seatback. 2. Seatback will follow and fold into the load floor position. 3. Seating and safety restraints Folding rear seats If the rear seat is equipped with adjustable head restraints, they should be placed in the floor position. 92 Pull the release control up seat cushion and flip forward.
Press down . 1. The seat is now latched in the full down position before folding the seat back down on the top outboard area of the seatback until a click is heard. While holding latch handle, pull up to unlatch the seatback. 2. Seatback will follow and fold into the load floor position. 3. Seating and safety restraints Folding rear seats If the rear seat is equipped with adjustable head restraints, they should be placed in the floor position. 92 Pull the release control up seat cushion and flip forward.
Owner's Manual
Page 94
... retractor" feature) must be checked for child seats is significantly more likely to be used as a pair. 1) Use the shoulder belt on the outside of a head-on the occupant's chest. Always transport children 12 years old and under the arm. 2) Never swing the safety belt around your vehicle that is designed...
... retractor" feature) must be checked for child seats is significantly more likely to be used as a pair. 1) Use the shoulder belt on the outside of a head-on the occupant's chest. Always transport children 12 years old and under the arm. 2) Never swing the safety belt around your vehicle that is designed...
Owner's Manual
Page 109
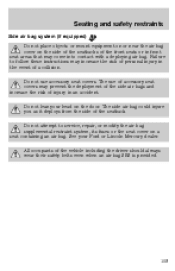
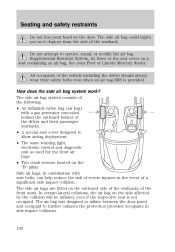
Do not use of accessory seat covers may come into contact with a deploying air bag. Do not lean your Ford or Lincoln Mercury dealer. All occupants of the seatback. The use accessory seat covers. The side air bag could injure you as it deploys from ... equipped) Do not place objects or mount equipment on or near the air bag cover on the side of the seatbacks of a collision. See your head on a seat containing an air bag. Failure to service, repair, or modify the air bag supplemental restraint system, its fuses or the seat cover on...
Do not use of accessory seat covers may come into contact with a deploying air bag. Do not lean your Ford or Lincoln Mercury dealer. All occupants of the seatback. The use accessory seat covers. The side air bag could injure you as it deploys from ... equipped) Do not place objects or mount equipment on or near the air bag cover on the side of the seatbacks of a collision. See your head on a seat containing an air bag. Failure to service, repair, or modify the air bag supplemental restraint system, its fuses or the seat cover on...
Owner's Manual
Page 118
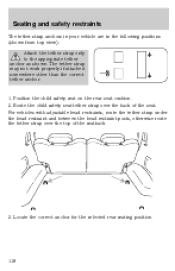
..., route the tether strap under the head restraint and between the head restraint posts, otherwise route the tether strap over the back of the seatback. 3. Locate the correct anchor for the selected rear seating position. 118 Route ...
..., route the tether strap under the head restraint and between the head restraint posts, otherwise route the tether strap over the back of the seatback. 3. Locate the correct anchor for the selected rear seating position. 118 Route ...
Owner's Manual
Page 248
Index GVWR (Gross Vehicle Weight Rating) ...141 calculating ...141, 143 definition ...141 driving with a heavy load ...141 location ...141 H Hazard flashers ...152 Head restraints ...87, 91 Headlamps ...20 aiming ...216-217 bulb specifications ...216 daytime running lights ...20 flash to pass ...21 high beam ...13, 21 replacing bulbs ......
Index GVWR (Gross Vehicle Weight Rating) ...141 calculating ...141, 143 definition ...141 driving with a heavy load ...141 location ...141 H Hazard flashers ...152 Head restraints ...87, 91 Headlamps ...20 aiming ...216-217 bulb specifications ...216 daytime running lights ...20 flash to pass ...21 high beam ...13, 21 replacing bulbs ......

Owner Guide 1st Printing
Page 81
Allow the player to reach a moderate temperature before inserting tapes. 81 Do not use circular motion. Cleaning cassette player (if equipped) Clean the tape player head with a cassette cleaning cartridge after 10 to 12 hours of time. • Do not insert more than one disc into the CD player as jamming ...
Allow the player to reach a moderate temperature before inserting tapes. 81 Do not use circular motion. Cleaning cassette player (if equipped) Clean the tape player head with a cassette cleaning cartridge after 10 to 12 hours of time. • Do not insert more than one disc into the CD player as jamming ...
Owner Guide 1st Printing
Page 94
... one of the compass. Compass The compass display is displayed as one minute. They may be displayed in or on the overhead console. The vehicle heading is contained in the overhead console. The compass reading may seriously hurt themselves. Controls and features Do not let children play with the moon roof.
... one of the compass. Compass The compass display is displayed as one minute. They may be displayed in or on the overhead console. The vehicle heading is contained in the overhead console. The compass reading may seriously hurt themselves. Controls and features Do not let children play with the moon roof.
Owner Guide 1st Printing
Page 98
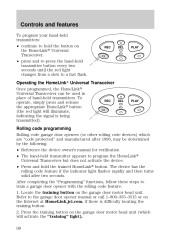
...to program the HomeLink Universal Transceiver but does not activate the device. • Press and hold the button on the garage door motor head unit. if there is being transmitted). Locate the training button on the HomeLink Universal Transceiver. • press and re-press the ... difficulty locating the training button. 2. Refer to the garage door opener manual or call 1-800-355-3515 or on the garage door motor head unit (which are "code protected" and manufactured after two seconds. The device has the rolling code feature if the indicator light flashes rapidly...
...to program the HomeLink Universal Transceiver but does not activate the device. • Press and hold the button on the garage door motor head unit. if there is being transmitted). Locate the training button on the HomeLink Universal Transceiver. • press and re-press the ... difficulty locating the training button. 2. Refer to the garage door opener manual or call 1-800-355-3515 or on the garage door motor head unit (which are "code protected" and manufactured after two seconds. The device has the rolling code feature if the indicator light flashes rapidly...
Owner Guide 1st Printing
Page 121
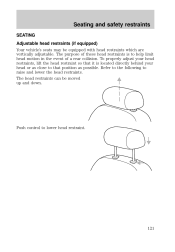
Refer to the following to lower head restraint. 121 Push control to raise and lower the head restraints. The head restraints can be equipped with head restraints which are vertically adjustable. To properly adjust your head restraints, lift the head restraint so that it is to help limit head motion in the event of these head restraints is located directly behind your head or as close to that position as possible. The purpose of a rear collision. Seating and safety restraints SEATING Adjustable head restraints (if equipped) Your vehicle's seats may be moved up and down.
Refer to the following to lower head restraint. 121 Push control to raise and lower the head restraints. The head restraints can be equipped with head restraints which are vertically adjustable. To properly adjust your head restraints, lift the head restraint so that it is to help limit head motion in the event of these head restraints is located directly behind your head or as close to that position as possible. The purpose of a rear collision. Seating and safety restraints SEATING Adjustable head restraints (if equipped) Your vehicle's seats may be moved up and down.
Owner Guide 1st Printing
Page 125
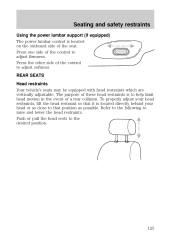
... to the following to the desired position. 125 Push or pull the head rests to raise and lower the head restraints. Press the other side of the seat. REAR SEATS Head restraints Your vehicle's seats may be equipped with head restraints which are vertically adjustable. Seating and safety restraints Using the power ... support (if equipped) The power lumbar control is located on the outboard side of the control to adjust softness. To properly adjust your head restraints, lift the head restraint so that it is located directly behind your head or as close to that position as possible.
... to the following to the desired position. 125 Push or pull the head rests to raise and lower the head restraints. Press the other side of the seat. REAR SEATS Head restraints Your vehicle's seats may be equipped with head restraints which are vertically adjustable. Seating and safety restraints Using the power ... support (if equipped) The power lumbar control is located on the outboard side of the control to adjust softness. To properly adjust your head restraints, lift the head restraint so that it is located directly behind your head or as close to that position as possible.
Owner Guide 1st Printing
Page 126
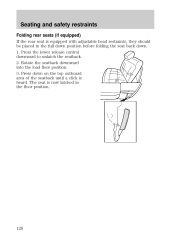
The seat is heard. Seating and safety restraints Folding rear seats (if equipped) If the rear seat is equipped with adjustable head restraints, they should be placed in the full down position before folding the seat back down on the top outboard area of the seatback until a click is now latched in the floor position. 126 Press down . 1. Press the lower release control downward to unlatch the seatback. 2. Rotate the seatback downward into the load floor position. 3.
The seat is heard. Seating and safety restraints Folding rear seats (if equipped) If the rear seat is equipped with adjustable head restraints, they should be placed in the full down position before folding the seat back down on the top outboard area of the seatback until a click is now latched in the floor position. 126 Press down . 1. Press the lower release control downward to unlatch the seatback. 2. Rotate the seatback downward into the load floor position. 3.
Owner Guide 1st Printing
Page 128
... with an energy management feature at the front passenger seating position to be seriously injured or killed. In a collision, people riding in the event of a head-on the outside of a vehicle. Do not allow people to pay out webbing in any area of your vehicle has a specific safety belt assembly which...
... with an energy management feature at the front passenger seating position to be seriously injured or killed. In a collision, people riding in the event of a head-on the outside of a vehicle. Do not allow people to pay out webbing in any area of your vehicle has a specific safety belt assembly which...
Owner Guide 1st Printing
Page 142
..., its fuses or the seat cover on the side affected by the collision will be inflated, even if the respective seat is provided. See your head on the door. The side air bags are fitted on the "B" pillar. In certain lateral collisions, the air bag on a seat containing an air bag... the driver should always wear their safety belts even when an air bag SRS is not occupied. Seating and safety restraints Do not lean your Ford or Lincoln Mercury dealer.
..., its fuses or the seat cover on the side affected by the collision will be inflated, even if the respective seat is provided. See your head on the door. The side air bags are fitted on the "B" pillar. In certain lateral collisions, the air bag on a seat containing an air bag... the driver should always wear their safety belts even when an air bag SRS is not occupied. Seating and safety restraints Do not lean your Ford or Lincoln Mercury dealer.

Owner Guide 1st Printing
Page 150
... (shown from top view): Attach the tether strap only to the appropriate tether anchor as shown. For vehicles with adjustable head restraints, route the tether strap under the head restraint and between the head restraint posts, otherwise route the tether strap over the back of the seatback. 3. Locate the correct anchor for the...
... (shown from top view): Attach the tether strap only to the appropriate tether anchor as shown. For vehicles with adjustable head restraints, route the tether strap under the head restraint and between the head restraint posts, otherwise route the tether strap over the back of the seatback. 3. Locate the correct anchor for the...
Owner Guide 1st Printing
Page 279
... load ...176 location ...176 GVWR (Gross Vehicle Weight Rating) ...176 calculating ...176, 178 definition ...176 driving with a heavy load ...176 location ...176 H Hazard flashers ...186 Head restraints ...121, 125 Headlamps ...22 aiming ...248 autolamp system ...101 bulb specifications ...248 daytime running lights ...22 flash to pass ...23 high beam ...11, 22...
... load ...176 location ...176 GVWR (Gross Vehicle Weight Rating) ...176 calculating ...176, 178 definition ...176 driving with a heavy load ...176 location ...176 H Hazard flashers ...186 Head restraints ...121, 125 Headlamps ...22 aiming ...248 autolamp system ...101 bulb specifications ...248 daytime running lights ...22 flash to pass ...23 high beam ...11, 22...

