Owner's Manual
Page 101
...transmission) or the neutral position (manual transmission). • The ignition switch is in the OFF position. • All vehicle doors are closed. • The driver's safety belt is unbuckled. • The parklamps/headlamps are in OFF position (If vehicle is buckled and then unbuckled during...DO NOT START THE ENGINE.) 2. Buckle then unbuckle the safety belt three times, ending with the safety belt unbuckled. Turn on the parklamps/headlamps, turn off . (Approximately 1-2 minutes.) • Steps 3-5 must be completed within 60 seconds or the procedure will be repeated. 3. ...
...transmission) or the neutral position (manual transmission). • The ignition switch is in the OFF position. • All vehicle doors are closed. • The driver's safety belt is unbuckled. • The parklamps/headlamps are in OFF position (If vehicle is buckled and then unbuckled during...DO NOT START THE ENGINE.) 2. Buckle then unbuckle the safety belt three times, ending with the safety belt unbuckled. Turn on the parklamps/headlamps, turn off . (Approximately 1-2 minutes.) • Steps 3-5 must be completed within 60 seconds or the procedure will be repeated. 3. ...

Owner's Manual
Page 157
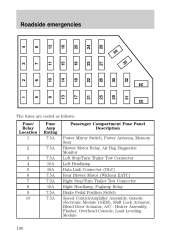
... Generic Electronic Module (GEM), Instrument Cluster, Securi-Lock Battery Saver Relay, Interior Lamp Relay DRL, Backup Lamps Switch, DTR Sensor, Rear Defroster Relay Radio Radio Power Seats Rear Blower Motor Heated Rear Window Switch Headlamps, Daytime Running Lamps (DRL) Module, Instrument Cluster Rear Integrated Control Panel 4X4 Module Trailer Tow Relay 21 22...
... Generic Electronic Module (GEM), Instrument Cluster, Securi-Lock Battery Saver Relay, Interior Lamp Relay DRL, Backup Lamps Switch, DTR Sensor, Rear Defroster Relay Radio Radio Power Seats Rear Blower Motor Heated Rear Window Switch Headlamps, Daytime Running Lamps (DRL) Module, Instrument Cluster Rear Integrated Control Panel 4X4 Module Trailer Tow Relay 21 22...

Owner's Manual
Page 212
...: 1. Remove the bulb retaining ring by pulling rearward. 4. Make sure headlamp switch is removed for an extended period of the headlamp, pry up lamps Do not remove lamp bulbs unless they can be replaced immediately with new ones. At the back of time, contaminants may enter ... from the bulb socket, and slide the ring off the plastic base. If a bulb is in OFF position, then lift hood and lift the plastic headlamp cover. 2. Maintenance and care • Turn signals • License plate lamp • Tail lamps • Back-up and remove the two retainer pins to free...
...: 1. Remove the bulb retaining ring by pulling rearward. 4. Make sure headlamp switch is removed for an extended period of the headlamp, pry up lamps Do not remove lamp bulbs unless they can be replaced immediately with new ones. At the back of time, contaminants may enter ... from the bulb socket, and slide the ring off the plastic base. If a bulb is in OFF position, then lift hood and lift the plastic headlamp cover. 2. Maintenance and care • Turn signals • License plate lamp • Tail lamps • Back-up and remove the two retainer pins to free...
Owner Guide 1st Printing
Page 6
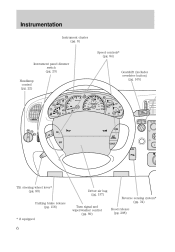
Instrumentation Instrument cluster (pg. 8) Speed controls* (pg. 84) Instrument panel dimmer switch (pg. 23) Headlamp control (pg. 22) CHECK GAGE DOOR AJAR Gearshift (includes overdrive button) (pg. 165) 4 H CHECK ENGINE 5 6 40 50 60 60 70 0 0 0 80 100 120 140 80 ...
Instrumentation Instrument cluster (pg. 8) Speed controls* (pg. 84) Instrument panel dimmer switch (pg. 23) Headlamp control (pg. 22) CHECK GAGE DOOR AJAR Gearshift (includes overdrive button) (pg. 165) 4 H CHECK ENGINE 5 6 40 50 60 60 70 0 0 0 80 100 120 140 80 ...
Owner Guide 1st Printing
Page 102
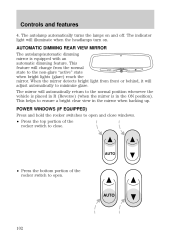
... will automatically return to close windows. • Press the top portion of the rocker switch to ensure a bright clear view in the ON position). POWER WINDOWS (IF EQUIPPED) Press and hold the rocker switches to open . AUTO 102 The indicator light will adjust automatically to the non-glare "active... turns the lamps on . This feature will change from front or behind, it will illuminate when the headlamps turn on and off. AUTO • Press the bottom portion of the rocker switch to the normal position whenever the vehicle is placed in R (Reverse) (when the mirror is equipped...
... will automatically return to close windows. • Press the top portion of the rocker switch to ensure a bright clear view in the ON position). POWER WINDOWS (IF EQUIPPED) Press and hold the rocker switches to open . AUTO 102 The indicator light will adjust automatically to the non-glare "active... turns the lamps on . This feature will change from front or behind, it will illuminate when the headlamps turn on and off. AUTO • Press the bottom portion of the rocker switch to the normal position whenever the vehicle is placed in R (Reverse) (when the mirror is equipped...
Owner Guide 1st Printing
Page 135
... be repeated. 3. Buckle then unbuckle the safety belt three times, ending with the deactivation/activation programming procedure. Turn the ignition switch to avoid the Belt Minder chime. Seating and safety restraints Do not sit on the safety belt will increase the risk of injury... (automatic transmission) or the neutral position (manual transmission). • the ignition switch is in the OFF position • all vehicle doors are closed • the driver's safety belt is unbuckled • the parklamps/headlamps are in an accident. To disable (one-time) or deactivate the Belt Minder...
... be repeated. 3. Buckle then unbuckle the safety belt three times, ending with the deactivation/activation programming procedure. Turn the ignition switch to avoid the Belt Minder chime. Seating and safety restraints Do not sit on the safety belt will increase the risk of injury... (automatic transmission) or the neutral position (manual transmission). • the ignition switch is in the OFF position • all vehicle doors are closed • the driver's safety belt is unbuckled • the parklamps/headlamps are in an accident. To disable (one-time) or deactivate the Belt Minder...
Owner Guide 1st Printing
Page 190
...7.5A 7.5A 10A 7.5A 7.5A Passenger Compartment Fuse Panel Description Power Mirror Switch, Power Antenna, Memory Seat Blower Motor Relay, Air Bag Diagnostic Monitor Left Stop/Turn Trailer Tow Connector Left Headlamp Data Link Connector (DLC) Rear Blower Motor (Without EATC) Right Stop/Turn... Trailer Tow Connector Right Headlamp, Foglamp Relay Brake Pedal Position Switch Speed Control/Amplifier Assembly, Generic electronic Module (GEM), Shift Lock...
...7.5A 7.5A 10A 7.5A 7.5A Passenger Compartment Fuse Panel Description Power Mirror Switch, Power Antenna, Memory Seat Blower Motor Relay, Air Bag Diagnostic Monitor Left Stop/Turn Trailer Tow Connector Left Headlamp Data Link Connector (DLC) Rear Blower Motor (Without EATC) Right Stop/Turn... Trailer Tow Connector Right Headlamp, Foglamp Relay Brake Pedal Position Switch Speed Control/Amplifier Assembly, Generic electronic Module (GEM), Shift Lock...

Owner Guide 1st Printing
Page 244
Make sure headlamp switch is in OFF position, then lift hood and open the hinged headlamp cover. Keep the ring to break the next time the headlamps are operated. 244 LIFT 2. Remove the bulb retaining ring by gently pulling it from the bulb by its plastic base and do not touch.... Disconnect the electrical connector from the bulb socket, and slide the ring off the plastic base. To install the new bulb: Handle a halogen headlamp bulb carefully and keep out of the lamp assembly. Remove the old bulb from the lamp assembly by rotating it counterclockwise (when viewed from your...
Make sure headlamp switch is in OFF position, then lift hood and open the hinged headlamp cover. Keep the ring to break the next time the headlamps are operated. 244 LIFT 2. Remove the bulb retaining ring by gently pulling it from the bulb by its plastic base and do not touch.... Disconnect the electrical connector from the bulb socket, and slide the ring off the plastic base. To install the new bulb: Handle a halogen headlamp bulb carefully and keep out of the lamp assembly. Remove the old bulb from the lamp assembly by rotating it counterclockwise (when viewed from your...


