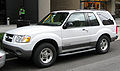
Owner's Manual
Page 1
... photocopying, recording or by any information storage and retrieval system or translation in whole or part is not permitted without incurring obligation. Copyright © 2001 Ford Motor Company 1 Ford may change the contents without notice and without written authorization from Ford Motor Company. Contents Before driving Introduction Instrumentation Controls and features Seating and safety restraints...
... photocopying, recording or by any information storage and retrieval system or translation in whole or part is not permitted without incurring obligation. Copyright © 2001 Ford Motor Company 1 Ford may change the contents without notice and without written authorization from Ford Motor Company. Contents Before driving Introduction Instrumentation Controls and features Seating and safety restraints...
Owner's Manual
Page 3
...vehicle and its equipment. BREAKING-IN YOUR VEHICLE There are no particular guidelines for more information. This is recommended to give the moving parts a chance to others, your vehicle. INFORMATION ABOUT THIS GUIDE The information found in this subject. Refer to locate the appropriate section which... provide information which will provide you more information. Indicates that this Owner Guide contains information on this guide was in . Ford may reduce the risk of personal injury and prevent possible damage to break in effect at the time of driving, vary speeds frequently.
...vehicle and its equipment. BREAKING-IN YOUR VEHICLE There are no particular guidelines for more information. This is recommended to give the moving parts a chance to others, your vehicle. INFORMATION ABOUT THIS GUIDE The information found in this subject. Refer to locate the appropriate section which... provide information which will provide you more information. Indicates that this Owner Guide contains information on this guide was in . Ford may reduce the risk of personal injury and prevent possible damage to break in effect at the time of driving, vary speeds frequently.
Owner's Manual
Page 69
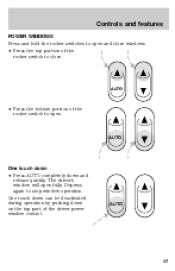
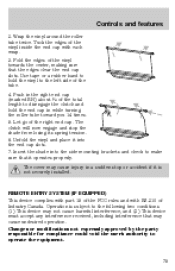
The driver's window will open . AUTO 69 AUTO • Press the bottom portion of the rocker switch to open fully. One touch down can be deactivated during operation by pushing down and release quickly. Depress again to stop window operation. AUTO One touch down • Press AUTO completely down on the top part of the rocker switch to close windows. • Press the top portion of the driver power window control. Controls and features POWER WINDOWS Press and hold the rocker switches to open and close .
The driver's window will open . AUTO 69 AUTO • Press the bottom portion of the rocker switch to open fully. One touch down can be deactivated during operation by pushing down and release quickly. Depress again to stop window operation. AUTO One touch down • Press AUTO completely down on the top part of the rocker switch to close windows. • Press the top portion of the driver power window control. Controls and features POWER WINDOWS Press and hold the rocker switches to open and close .
Owner's Manual
Page 75
... you 14 times. 5. Push in the right end cap (marked RH) about 1⁄4 of Industry Canada. REMOTE ENTRY SYSTEM (IF EQUIPPED) This device complies with part 15 of the tube. 4. Operation is not securely installed. Wrap the vinyl around the roller tube twice. Insert the shade into the end cap slots...
... you 14 times. 5. Push in the right end cap (marked RH) about 1⁄4 of Industry Canada. REMOTE ENTRY SYSTEM (IF EQUIPPED) This device complies with part 15 of the tube. 4. Operation is not securely installed. Wrap the vinyl around the roller tube twice. Insert the shade into the end cap slots...
Owner's Manual
Page 77
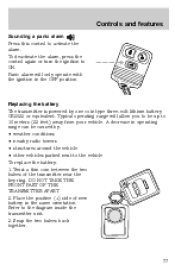
... transmitter unit. 3. Panic alarm will allow you to ON. Place the positive (+) side of the transmitter near the key ring. DO NOT TAKE THE FRONT PART OF THE TRANSMITTER APART. 2. To deactivate the alarm, press the control again or turn the ignition to be caused by one coin type three-volt...
... transmitter unit. 3. Panic alarm will allow you to ON. Place the positive (+) side of the transmitter near the key ring. DO NOT TAKE THE FRONT PART OF THE TRANSMITTER APART. 2. To deactivate the alarm, press the control again or turn the ignition to be caused by one coin type three-volt...
Owner's Manual
Page 98
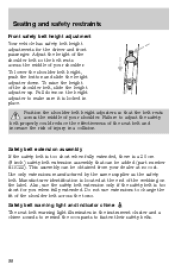
... adjustments for you when fully extended. This assembly can be obtained from your shoulder. Position the shoulder belt height adjusters so that can be added (part number 611C22). Safety belt extension assembly If the safety belt is too short when fully extended, there is located at no cost. Manufacturer identification is...
... adjustments for you when fully extended. This assembly can be obtained from your shoulder. Position the shoulder belt height adjusters so that can be added (part number 611C22). Safety belt extension assembly If the safety belt is too short when fully extended, there is located at no cost. Manufacturer identification is...
Owner's Manual
Page 164
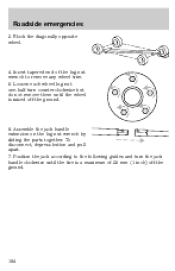
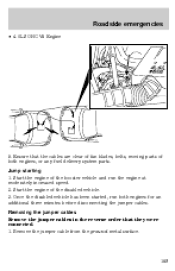
Block the diagonally opposite wheel. 4. Position the jack according to remove any wheel trim. 5. Assemble the jack handle extension on the lug nut wrench by sliding the parts together. Loosen each wheel lug nut one-half turn the jack handle clockwise until the wheel is a maximum of 25 mm (1 inch) off the ground. 6. To disconnect, depress button and pull apart. 7. Insert tapered end of the lug nut wrench to the following guides and turn counterclockwise but do not remove them until the tire is raised off the ground. 164 Roadside emergencies 3.
Block the diagonally opposite wheel. 4. Position the jack according to remove any wheel trim. 5. Assemble the jack handle extension on the lug nut wrench by sliding the parts together. Loosen each wheel lug nut one-half turn the jack handle clockwise until the wheel is a maximum of 25 mm (1 inch) off the ground. 6. To disconnect, depress button and pull apart. 7. Insert tapered end of the lug nut wrench to the following guides and turn counterclockwise but do not remove them until the tire is raised off the ground. 164 Roadside emergencies 3.
Owner's Manual
Page 166
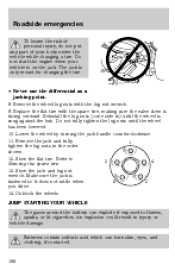
... for changing the tire. • Never use the differential as a jacking point. 8. Roadside emergencies To lessen the risk of personal injury, do not put any part of your vehicle is on the jack. Do not fully tighten the lug nuts until the wheel is snug against the hub. Remove the jack...
... for changing the tire. • Never use the differential as a jacking point. 8. Roadside emergencies To lessen the risk of personal injury, do not put any part of your vehicle is on the jack. Do not fully tighten the lug nuts until the wheel is snug against the hub. Remove the jack...
Owner's Manual
Page 167
... booster vehicle close to designate the assisting (boosting) battery. - - + + 167 Connecting the jumper cables 1. also, the catalytic conveter may shift firmly. Check all other moving parts. 4. Set the parking brake on in both vehicles and stay clear of the disabled vehicle making sure the two vehicles do not have push-start...
... booster vehicle close to designate the assisting (boosting) battery. - - + + 167 Connecting the jumper cables 1. also, the catalytic conveter may shift firmly. Check all other moving parts. 4. Set the parking brake on in both vehicles and stay clear of the disabled vehicle making sure the two vehicles do not have push-start...

Owner's Manual
Page 168
... the carburetor/fuel injection system. Do not connect the end of the second cable to the negative (-) terminal of the battery to an exposed metal part of the assisting battery. 4. Roadside emergencies 2. Make the final connection of the gases that surround the battery. 168 - - - + + - + +
... the carburetor/fuel injection system. Do not connect the end of the second cable to the negative (-) terminal of the battery to an exposed metal part of the assisting battery. 4. Roadside emergencies 2. Make the final connection of the gases that surround the battery. 168 - - - + + - + +
Owner's Manual
Page 169
... cable from the ground metal surface. - - + + 169 Jump starting 1. Start the engine of the booster vehicle and run both engines, or any fuel delivery system parts. Once the disabled vehicle has been started, run the engine at moderately increased speed. 2. Removing the jumper cables Remove the jumper cables in the reverse...
... cable from the ground metal surface. - - + + 169 Jump starting 1. Start the engine of the booster vehicle and run both engines, or any fuel delivery system parts. Once the disabled vehicle has been started, run the engine at moderately increased speed. 2. Removing the jumper cables Remove the jumper cables in the reverse...

Owner's Manual
Page 174
...vehicle: • We highlight do-it-yourself items in the engine compartment for easy location. • We provide a scheduled maintenance guide which parts and services are covered. Set the parking brake and ensure the gearshift is securely latched in P (Park). 2. Block the wheels to find...routine service easy. Set the parking brake and ensure the gearshift is securely latched in P (Park). 2. Check your dealership can provide the necessary parts and service. Maintenance and care SERVICE RECOMMENDATIONS To help you service your vehicle. • Do not work on a hot engine. • ...
...vehicle: • We highlight do-it-yourself items in the engine compartment for easy location. • We provide a scheduled maintenance guide which parts and services are covered. Set the parking brake and ensure the gearshift is securely latched in P (Park). 2. Block the wheels to find...routine service easy. Set the parking brake and ensure the gearshift is securely latched in P (Park). 2. Check your dealership can provide the necessary parts and service. Maintenance and care SERVICE RECOMMENDATIONS To help you service your vehicle. • Do not work on a hot engine. • ...

Owner's Manual
Page 179
... supplemental engine oil additives, oil treatments or engine treatments. Do not use oils "Certified For Gasoline Engines" by your warranty. Ford production and aftermarket (Motorcraft) oil filters are unnecessary and could, under certain conditions, lead to the appropriate schedule listed in the... scheduled maintenance guide. Use Motorcraft (Part: XO-5W30-QSP U.S.) or an equivalent oil meeting Ford specifications) for your engine oil and filter according to engine damage which is not covered by the American...
... supplemental engine oil additives, oil treatments or engine treatments. Do not use oils "Certified For Gasoline Engines" by your warranty. Ford production and aftermarket (Motorcraft) oil filters are unnecessary and could, under certain conditions, lead to the appropriate schedule listed in the... scheduled maintenance guide. Use Motorcraft (Part: XO-5W30-QSP U.S.) or an equivalent oil meeting Ford specifications) for your engine oil and filter according to engine damage which is not covered by the American...
Owner's Manual
Page 182
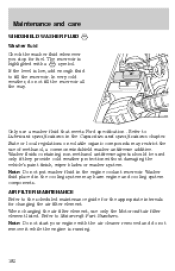
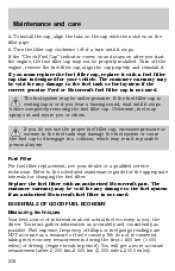
... cooling system components. Note: Do not start your engine with a symbol. SHER FL WA ONLY UID RADIATOR COOLANT ONLY Only use a washer fluid that meets Ford specification . AIR FILTER MAINTENANCE Refer to Motorcraft Part Numbers. The reservoir is low, add enough fluid to Lubricant specifications in the engine coolant reservoir.
... cooling system components. Note: Do not start your engine with a symbol. SHER FL WA ONLY UID RADIATOR COOLANT ONLY Only use a washer fluid that meets Ford specification . AIR FILTER MAINTENANCE Refer to Motorcraft Part Numbers. The reservoir is low, add enough fluid to Lubricant specifications in the engine coolant reservoir.
Owner's Manual
Page 183
If the level falls below 40% or above 60%, the engine parts could become damaged or not work properly. When the engine is possible with a 50/50 engine coolant and water concentration. SHER FL WA ONLY UID ...
If the level falls below 40% or above 60%, the engine parts could become damaged or not work properly. When the engine is possible with a 50/50 engine coolant and water concentration. SHER FL WA ONLY UID ...
Owner's Manual
Page 184
... in your vehicle is low or empty, add engine coolant to the reservoir. Also, you can burn you spill coolant on hot engine parts. If sprayed on the type of engine coolant and distilled water. To determine your vehicle's coolant type (color), check your coolant reservoir.... vehicle location. If the reservoir is filled with either green-colored Motorcraft Premium Engine Coolant meeting Ford specification ESE-M97B44-A or yellow-colored Motorcraft Premium Gold Engine Coolant meeting Ford Specification WSS-M97B51-A1. If the engine coolant has not been checked at the recommended interval,...
... in your vehicle is low or empty, add engine coolant to the reservoir. Also, you can burn you spill coolant on hot engine parts. If sprayed on the type of engine coolant and distilled water. To determine your vehicle's coolant type (color), check your coolant reservoir.... vehicle location. If the reservoir is filled with either green-colored Motorcraft Premium Engine Coolant meeting Ford specification ESE-M97B44-A or yellow-colored Motorcraft Premium Gold Engine Coolant meeting Ford Specification WSS-M97B51-A1. If the engine coolant has not been checked at the recommended interval,...

Owner's Manual
Page 195
... has set. U.S. Those grades represent the tire's ability to stop on wet pavement as defined in Title 49 Code of Transportation requires Ford to 12 inches or limited production tires as measured under controlled conditions on a specified government test course. For example: • Treadwear... A, B, and C. Tire Quality Grades apply to new pneumatic tires for more information on rear wiper blades. Department of Federal Regulations Part 575.104(c)(2). Department of 195 The relative performance of tires depends upon the actual conditions of 10 to give you the following information ...
... has set. U.S. Those grades represent the tire's ability to stop on wet pavement as defined in Title 49 Code of Transportation requires Ford to 12 inches or limited production tires as measured under controlled conditions on a specified government test course. For example: • Treadwear... A, B, and C. Tire Quality Grades apply to new pneumatic tires for more information on rear wiper blades. Department of Federal Regulations Part 575.104(c)(2). Department of 195 The relative performance of tires depends upon the actual conditions of 10 to give you the following information ...
Owner's Manual
Page 206
... the fuel filler cap. If the fuel filler cap is designed for any damage to the fuel tank or fuel system if the correct genuine Ford or Motorcraft fuel filler cap is you or others. Replace the fuel filter with the notches on the cap with an authorized Motorcraft... part. Fuel expense, frequency of fillups or fuel gauge readings are NOT accurate as possible. To install the cap, align the tabs on the filler pipe. 5. ...
... the fuel filler cap. If the fuel filler cap is designed for any damage to the fuel tank or fuel system if the correct genuine Ford or Motorcraft fuel filler cap is you or others. Replace the fuel filter with the notches on the cap with an authorized Motorcraft... part. Fuel expense, frequency of fillups or fuel gauge readings are NOT accurate as possible. To install the cap, align the tabs on the filler pipe. 5. ...
Owner's Manual
Page 210
... system. These numbers represent the Range of components affecting emission control, such non-Ford parts should be equivalent to the life and performance of the window sticker. If other than Ford, Motorcraft or Ford-authorized parts are essential to genuine Ford Motor Company parts in dry grass or other emission control components continue to work properly: •...
... system. These numbers represent the Range of components affecting emission control, such non-Ford parts should be equivalent to the life and performance of the window sticker. If other than Ford, Motorcraft or Ford-authorized parts are essential to genuine Ford Motor Company parts in dry grass or other emission control components continue to work properly: •...
Owner's Manual
Page 219
... debris may be repaired with a clean cloth to wash the vehicle on any tar spots. Repairing paint chips Minor scratches or paint damage from the Ford Car Care Chemicals line. Inspect for road damage. Use only carnauba or synthetic-based waxes. Underbody Flush the complete underside of dirt and road salt... the wiper blades and windshield as described in Cleaning the wiper blades and windshield. Maintenance and care During winter months, it is recommended that the part numbers (shown as XXXX above) will reduce minor scratches and paint damage.
... debris may be repaired with a clean cloth to wash the vehicle on any tar spots. Repairing paint chips Minor scratches or paint damage from the Ford Car Care Chemicals line. Inspect for road damage. Use only carnauba or synthetic-based waxes. Underbody Flush the complete underside of dirt and road salt... the wiper blades and windshield as described in Cleaning the wiper blades and windshield. Maintenance and care During winter months, it is recommended that the part numbers (shown as XXXX above) will reduce minor scratches and paint damage.


