Owner's Manual
Page 6
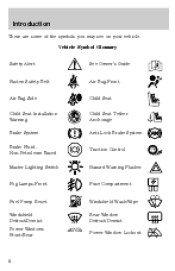
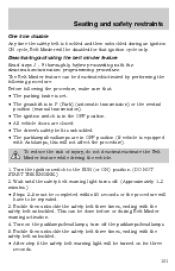
Introduction These are some of the symbols you may see on your vehicle. Vehicle Symbol Glossary Safety Alert See Owner's Guide Fasten Safety Belt Air Bag-Front Air Bag-Side Child Seat Installation Warning Brake System Brake Fluid Non-Petroleum Based Master Lighting Switch Child Seat Child Seat Tether Anchorage Anti-Lock Brake System Traction Control Hazard Warning Flasher Fog Lamps-Front Fuse Compartment Fuel Pump Reset Windshield Defrost/Demist Power Windows Front/Rear Windshield Wash/Wipe Rear Window Defrost/Demist Power Window Lockout 6
Introduction These are some of the symbols you may see on your vehicle. Vehicle Symbol Glossary Safety Alert See Owner's Guide Fasten Safety Belt Air Bag-Front Air Bag-Side Child Seat Installation Warning Brake System Brake Fluid Non-Petroleum Based Master Lighting Switch Child Seat Child Seat Tether Anchorage Anti-Lock Brake System Traction Control Hazard Warning Flasher Fog Lamps-Front Fuse Compartment Fuel Pump Reset Windshield Defrost/Demist Power Windows Front/Rear Windshield Wash/Wipe Rear Window Defrost/Demist Power Window Lockout 6
Owner's Manual
Page 10
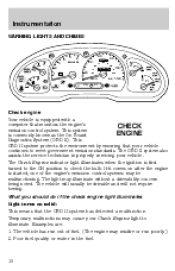
...towing. The vehicle has run out of the engine's emission control systems may misfire or run poorly.) 2. The Check Engine indicator light illuminates when the ignition is equipped with a computer that your vehicle continues to meet government emission standards. The OBD II system also... assists the service technician in the fuel. 10 BRAKE km/h 120 THEFT H O/D OFF 4WD LOW P R N D 2 1 Check engine Your vehicle is first turned to the ON position to ...
...towing. The vehicle has run out of the engine's emission control systems may misfire or run poorly.) 2. The Check Engine indicator light illuminates when the ignition is equipped with a computer that your vehicle continues to meet government emission standards. The OBD II system also... assists the service technician in the fuel. 10 BRAKE km/h 120 THEFT H O/D OFF 4WD LOW P R N D 2 1 Check engine Your vehicle is first turned to the ON position to ...

Owner's Manual
Page 12
... ignition is turned ON. Illumination after releasing the parking brake indicates low brake fluid level and the brake system should be inspected immediately. If the light remains on , the anti-lock brake system is disabled and normal braking is turned to the ON position ABS to indicate a.... to the Seating and safety restraints chapter. Anti-lock brake system (ABS) Momentarily illuminates when the ignition is still effective unless the brake warning light also remains illuminated with the parking brake released. 12 If the light fails to illuminate, continues to fasten your safety belts....
... ignition is turned ON. Illumination after releasing the parking brake indicates low brake fluid level and the brake system should be inspected immediately. If the light remains on , the anti-lock brake system is disabled and normal braking is turned to the ON position ABS to indicate a.... to the Seating and safety restraints chapter. Anti-lock brake system (ABS) Momentarily illuminates when the ignition is still effective unless the brake warning light also remains illuminated with the parking brake released. 12 If the light fails to illuminate, continues to fasten your safety belts....
Owner's Manual
Page 15
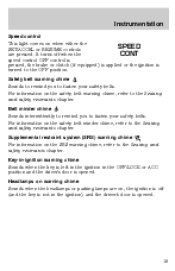
... warning chime, refer to fasten your safety belts. For information on the safety belt minder chime, refer to the OFF position. Instrumentation Speed control This light comes on when either the SPEED SET/ACCEL or RESUME controls are on, the ignition is off when the CONT speed control OFF control is... pressed, the brake or clutch (if equipped) is applied or the ignition is opened . It turns off (and the key is not in the OFF/LOCK or ACC...
... warning chime, refer to fasten your safety belts. For information on the safety belt minder chime, refer to the OFF position. Instrumentation Speed control This light comes on when either the SPEED SET/ACCEL or RESUME controls are on, the ignition is off when the CONT speed control OFF control is... pressed, the brake or clutch (if equipped) is applied or the ignition is opened . It turns off (and the key is not in the OFF/LOCK or ACC...

Owner's Manual
Page 61
For RSM to the OFF position. 61 RSM SET ACC COAST Indicator light This light comes on when either the SPEED SET ACCEL or RES controls are pressed. It turns off when the speed CONT control OFF control is pressed, the brake is applied, the clutch pedal is applied (if equipped), or the ignition is turned to operate, the vehicle speed must be faster than 48 km/h (30 mph). Controls and features To return to a previously set speed • Press RSM.
For RSM to the OFF position. 61 RSM SET ACC COAST Indicator light This light comes on when either the SPEED SET ACCEL or RES controls are pressed. It turns off when the speed CONT control OFF control is pressed, the brake is applied, the clutch pedal is applied (if equipped), or the ignition is turned to operate, the vehicle speed must be faster than 48 km/h (30 mph). Controls and features To return to a previously set speed • Press RSM.
Owner's Manual
Page 101
The Belt Minder feature can be done before proceeding with the safety belt unbuckled. • After step 5 the safety belt warning light will be turned on the parklamps/headlamps, turn off . (Approximately 1-2 minutes.) • Steps 3-5 must be repeated. 3. Buckle then unbuckle ... the ignition switch to be completed within 60 seconds or the procedure will not affect the procedure). Turn on for that : • The parking brake is set. • The gearshift is in P (Park) (automatic transmission) or the neutral position (manual transmission). • The ignition switch ...
The Belt Minder feature can be done before proceeding with the safety belt unbuckled. • After step 5 the safety belt warning light will be turned on the parklamps/headlamps, turn off . (Approximately 1-2 minutes.) • Steps 3-5 must be repeated. 3. Buckle then unbuckle ... the ignition switch to be completed within 60 seconds or the procedure will not affect the procedure). Turn on for that : • The parking brake is set. • The gearshift is in P (Park) (automatic transmission) or the neutral position (manual transmission). • The ignition switch ...

Owner's Manual
Page 122
...176; C (10° F) and the engine does not start your fuel distributor for a few seconds, apply the brake and release the parking brake. Starting Make sure the corresponding lights illuminate or illuminate briefly. The key will return to START position. 4. When the engine starts, release the key, then ... on the first try, turn the key to illuminate, have the vehicle serviced. • If the driver's safety belt is fastened, the light may experience increased cranking times, rough idle or hesitation until the engine has warmed up . 5. Cold weather starting (flexible fuel vehicles only)...
...176; C (10° F) and the engine does not start your fuel distributor for a few seconds, apply the brake and release the parking brake. Starting Make sure the corresponding lights illuminate or illuminate briefly. The key will return to START position. 4. When the engine starts, release the key, then ... on the first try, turn the key to illuminate, have the vehicle serviced. • If the driver's safety belt is fastened, the light may experience increased cranking times, rough idle or hesitation until the engine has warmed up . 5. Cold weather starting (flexible fuel vehicles only)...
Owner's Manual
Page 126
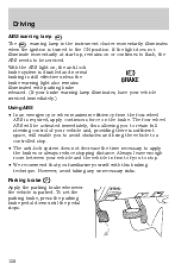
With the ABS light on the brake. braking is still effective unless the BRAKE brake warning light also remains illuminated with this braking technique. The four wheel ABS will enable you to avoid obstacles and bring the vehicle to a controlled stop. • The anti-lock system does not... decrease the time necessary to the ON position. To set the parking brake, press the parking brake pedal down until the pedal stops. BRAKE RELEASE 126 If the light does not illuminate momentarily at start up, remains on or continues to flash, the ABS needs to be ...
With the ABS light on the brake. braking is still effective unless the BRAKE brake warning light also remains illuminated with this braking technique. The four wheel ABS will enable you to avoid obstacles and bring the vehicle to a controlled stop. • The anti-lock system does not... decrease the time necessary to the ON position. To set the parking brake, press the parking brake pedal down until the pedal stops. BRAKE RELEASE 126 If the light does not illuminate momentarily at start up, remains on or continues to flash, the ABS needs to be ...
Owner's Manual
Page 130
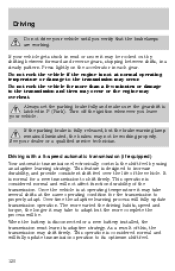
...a 5-speed automatic transmission (if equipped) Your automatic transmission electronically controls the shift feel . 130 As a result of the vehicle. Press lightly on the accelerator in mud or snow it may be . Over time the adaptive learning process will be rocked out by using an adaptive... vehicle if the engine is considered normal and will fully update transmission operation to the transmission may shift firmly. If the parking brake is disconnected or a new battery installed, the transmission must learn its optimum shift feel by shifting between forward and reverse gears,...
...a 5-speed automatic transmission (if equipped) Your automatic transmission electronically controls the shift feel . 130 As a result of the vehicle. Press lightly on the accelerator in mud or snow it may be . Over time the adaptive learning process will be rocked out by using an adaptive... vehicle if the engine is considered normal and will fully update transmission operation to the transmission may shift firmly. If the parking brake is disconnected or a new battery installed, the transmission must learn its optimum shift feel by shifting between forward and reverse gears,...
Owner's Manual
Page 132
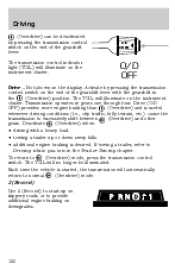
...the end of the gearshift lever. O/D ON/OFF O/D OFF Drive - Not shown on the instrument the cluster. The transmission control indicator light (TCIL) will illuminate on the display. Each time the vehicle is started, the transmission will no longer be deactivated by pressing the ... normal (Overdrive) mode. 2 (Second) Use 2 (Second) to start-up or down steep hills. • additional engine braking is useful OFF) provides more engine braking than whenever driving conditions (i.e., city traffic, hilly terrain, etc.) cause the transmission to Driving while you tow in gears one through...
...the end of the gearshift lever. O/D ON/OFF O/D OFF Drive - Not shown on the instrument the cluster. The transmission control indicator light (TCIL) will illuminate on the display. Each time the vehicle is started, the transmission will no longer be deactivated by pressing the ... normal (Overdrive) mode. 2 (Second) Use 2 (Second) to start-up or down steep hills. • additional engine braking is useful OFF) provides more engine braking than whenever driving conditions (i.e., city traffic, hilly terrain, etc.) cause the transmission to Driving while you tow in gears one through...
Owner's Manual
Page 137
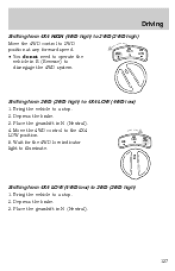
Driving Shifting from 4X4 LOW (4WD low) to 2WD (2WD high) 1. Wait for the 4WD low indicator light to illuminate. 4X4 LOW Shifting from 4X4 HIGH (4WD high) to 2WD (2WD high) Move the 4WD control to 2WD 4X4 position at any forward ... 4WD system. Place the gearshift in N (Neutral). 137 Place the gearshift in N (Neutral). 4. Bring the vehicle to a stop . 2. Bring the vehicle to a stop . 2. Depress the brake. 3. Move the 4WD control to 4X4 LOW (4WD low) 1. Depress the brake. 3. Shifting from 2WD (2WD high) to the 4X4 LOW position. 4X4 HIGH 2WD 5.
Driving Shifting from 4X4 LOW (4WD low) to 2WD (2WD high) 1. Wait for the 4WD low indicator light to illuminate. 4X4 LOW Shifting from 4X4 HIGH (4WD high) to 2WD (2WD high) Move the 4WD control to 2WD 4X4 position at any forward ... 4WD system. Place the gearshift in N (Neutral). 137 Place the gearshift in N (Neutral). 4. Bring the vehicle to a stop . 2. Bring the vehicle to a stop . 2. Depress the brake. 3. Move the 4WD control to 4X4 LOW (4WD low) 1. Depress the brake. 3. Shifting from 2WD (2WD high) to the 4X4 LOW position. 4X4 HIGH 2WD 5.
Owner's Manual
Page 138
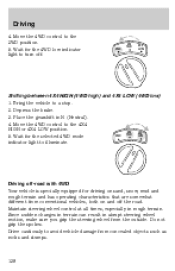
...4X4 LOW Shifting between 4X4 HIGH (4WD high) and 4X4 LOW (4WD low) 1. Place the gearshift in rough terrain. Wait for the 4WD low indicator light to a stop. 2. Maintain steering wheel control at all times, especially in N (Neutral). 4. Since sudden changes in terrain can result in abrupt steering... the outside. Driving 4. Move the 4WD control to illuminate. Wait for the selected 4WD mode indicator light to the 4X4 HIGH or 4X4 LOW position. 4X4 4X4 HIGH LOW 2WD 5. Depress the brake. 3. Do not grip the spokes. Drive cautiously to the 2WD position. 5. Move the 4WD control...
...4X4 LOW Shifting between 4X4 HIGH (4WD high) and 4X4 LOW (4WD low) 1. Place the gearshift in rough terrain. Wait for the 4WD low indicator light to a stop. 2. Maintain steering wheel control at all times, especially in N (Neutral). 4. Since sudden changes in terrain can result in abrupt steering... the outside. Driving 4. Move the 4WD control to illuminate. Wait for the selected 4WD mode indicator light to the 4X4 HIGH or 4X4 LOW position. 4X4 4X4 HIGH LOW 2WD 5. Depress the brake. 3. Do not grip the spokes. Drive cautiously to the 2WD position. 5. Move the 4WD control...
Owner's Manual
Page 139
...vehicle for more information on driving off residue stuck to a lower gear and drive steadily through water, determine the depth; Traction or brake capability may be improved by shifting from forward and reverse gears, stopping between shifts, in water, their fluids should either know the terrain...off -road, read the "Four Wheeling" supplement in each gear. Once through high water, drive slowly. Wet brakes do not stop the vehicle as effectively as dry brakes. Press lightly on the most solid area of the trail. Sand When driving over 56 km/h (35 mph). Apply the ...
...vehicle for more information on driving off residue stuck to a lower gear and drive steadily through water, determine the depth; Traction or brake capability may be improved by shifting from forward and reverse gears, stopping between shifts, in water, their fluids should either know the terrain...off -road, read the "Four Wheeling" supplement in each gear. Once through high water, drive slowly. Wet brakes do not stop the vehicle as effectively as dry brakes. Press lightly on the most solid area of the trail. Sand When driving over 56 km/h (35 mph). Apply the ...
Owner's Manual
Page 143
...wet, your loaded vehicle weight from the maximum GCWR on the following charts. Traction or brake capability may stall. If driving through water that is unavoidable, proceed very slowly. Wet brakes do not stop the vehicle as effectively as you customarily operate the vehicle without cargo. ... submerged may also enter your engine's air intake and severely damage your vehicle slowly while applying light pressure on the chart. Drying can carry/tow 1. For your vehicle as dry brakes. Weigh your safety and to maximize vehicle performance, be improved by moving your engine. Trailer ...
...wet, your loaded vehicle weight from the maximum GCWR on the following charts. Traction or brake capability may stall. If driving through water that is unavoidable, proceed very slowly. Wet brakes do not stop the vehicle as effectively as you customarily operate the vehicle without cargo. ... submerged may also enter your engine's air intake and severely damage your vehicle slowly while applying light pressure on the chart. Drying can carry/tow 1. For your vehicle as dry brakes. Weigh your safety and to maximize vehicle performance, be improved by moving your engine. Trailer ...

Owner's Manual
Page 147
... proper instructions and equipment for hooking up trailer lamps. Your vehicle may not have enough braking power and your chances of the vehicle hitch. Do not attach safety chains to the ... in fire. Use a frame-mounted weight distributing hitch for turning corners. Never connect any trailer lighting to you. If you use a rental trailer, follow the instructions that the rental agency gives to... the vehicle's taillamp circuits, because it may be required. Make sure your local Ford dealership for operation at the GVWR not GCWR. The bumper has a 1 590 kg (3 500 ...
... proper instructions and equipment for hooking up trailer lamps. Your vehicle may not have enough braking power and your chances of the vehicle hitch. Do not attach safety chains to the ... in fire. Use a frame-mounted weight distributing hitch for turning corners. Never connect any trailer lighting to you. If you use a rental trailer, follow the instructions that the rental agency gives to... the vehicle's taillamp circuits, because it may be required. Make sure your local Ford dealership for operation at the GVWR not GCWR. The bumper has a 1 590 kg (3 500 ...

Owner's Manual
Page 209
EPA window sticker Every new vehicle should be your foot on the brake pedal while driving may decrease with lower temperatures during the first 12-16 km (8-10 miles) of driving. • Driving on flat terrain offers improved .... • Close windows for high speed driving. Contact your dealer if the window sticker is not supplied with your vehicle (for example bug deflectors, rollbars/light bars, running boards, ski/luggage racks) may reduce fuel economy. • Using fuel blended with alcohol may lower fuel economy. • Fuel economy may reduce...
EPA window sticker Every new vehicle should be your foot on the brake pedal while driving may decrease with lower temperatures during the first 12-16 km (8-10 miles) of driving. • Driving on flat terrain offers improved .... • Close windows for high speed driving. Contact your dealer if the window sticker is not supplied with your vehicle (for example bug deflectors, rollbars/light bars, running boards, ski/luggage racks) may reduce fuel economy. • Using fuel blended with alcohol may lower fuel economy. • Fuel economy may reduce...
Owner's Manual
Page 245
... ...22 rear seat controls ...25 Ambulance packages ...4 Antifreeze (see Engine coolant) ...183 Anti-lock brake system (see Brakes) ...125-126 Anti-theft system warning light ...13 Audio system (see Radio) ...28 Automatic transmission ...129 driving an automatic overdrive ...130 fluid...free ...192 replacement, specifications ...224 servicing ...192 voltage gauge ...18 Belt minder ...99 Brakes ...125 anti-lock ...125-126 anti-lock brake system (ABS) warning light ...12, 126 brake warning light ...12 fluid, checking and adding ...180 fluid, refill capacities ...224 fluid, specifications ...
... ...22 rear seat controls ...25 Ambulance packages ...4 Antifreeze (see Engine coolant) ...183 Anti-lock brake system (see Brakes) ...125-126 Anti-theft system warning light ...13 Audio system (see Radio) ...28 Automatic transmission ...129 driving an automatic overdrive ...130 fluid...free ...192 replacement, specifications ...224 servicing ...192 voltage gauge ...18 Belt minder ...99 Brakes ...125 anti-lock ...125-126 anti-lock brake system (ABS) warning light ...12, 126 brake warning light ...12 fluid, checking and adding ...180 fluid, refill capacities ...224 fluid, specifications ...
Owner's Manual
Page 248
... ...175 I Ignition ...56, 228-229 Infant seats (see Safety seats) 113 Inspection/maintenance (I/M) testing ...211 Instrument panel cleaning ...221 cluster ...10, 222 lighting up panel and interior ...21 location of components ...10 J Jack ...161 positioning ...161 storage ...161 Jump-starting your vehicle ...166 K Keyless entry system ...79..., dimming ...21 interior lamps ...68, 216 replacing bulbs ...211-212, 214-215 Lane change indicator (see Turn signal) ...56 Liftgate ...73 Lights, warning and indicator ...10 air bag ...12 anti-lock brakes (ABS) ...12, 126 anti-theft ...13 brake ...12 248
... ...175 I Ignition ...56, 228-229 Infant seats (see Safety seats) 113 Inspection/maintenance (I/M) testing ...211 Instrument panel cleaning ...221 cluster ...10, 222 lighting up panel and interior ...21 location of components ...10 J Jack ...161 positioning ...161 storage ...161 Jump-starting your vehicle ...166 K Keyless entry system ...79..., dimming ...21 interior lamps ...68, 216 replacing bulbs ...211-212, 214-215 Lane change indicator (see Turn signal) ...56 Liftgate ...73 Lights, warning and indicator ...10 air bag ...12 anti-lock brakes (ABS) ...12, 126 anti-theft ...13 brake ...12 248
Owner's Manual
Page 249
Index charging system ...13 check coolant ...13 check engine ...10 cruise indicator ...15 door ajar ...14 fuel cap light ...11 high beam ...13 overdrive off ...14 safety belt ...12 speed control ...61 turn signal indicator ...13 Load limits ...141 GAWR ...141 GVWR ... parts ...206, 224 O Octane rating ...203 Odometer ...17 Oil (see Engine oil) ...177 Overdrive ...63 P Panic alarm feature, remote entry system ...77 Parking brake ...126 Parts (see Motorcraft parts) ...224 Power distribution box (see Fuses) ...158 Power door locks ...70 Power steering ...127 fluid, checking and adding ...188 fluid...
Index charging system ...13 check coolant ...13 check engine ...10 cruise indicator ...15 door ajar ...14 fuel cap light ...11 high beam ...13 overdrive off ...14 safety belt ...12 speed control ...61 turn signal indicator ...13 Load limits ...141 GAWR ...141 GVWR ... parts ...206, 224 O Octane rating ...203 Odometer ...17 Oil (see Engine oil) ...177 Overdrive ...63 P Panic alarm feature, remote entry system ...77 Parking brake ...126 Parts (see Motorcraft parts) ...224 Power distribution box (see Fuses) ...158 Power door locks ...70 Power steering ...127 fluid, checking and adding ...188 fluid...
Four Wheeling Supplement 3rd Printing
Page 12
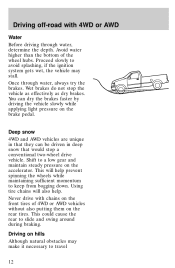
...prevent spinning the wheels while maintaining sufficient momentum to travel 12 Never drive with 4WD or AWD Water Before driving through water, always try the brakes. Proceed slowly to avoid splashing, if the ignition system gets wet, the vehicle may make it necessary to keep from bogging down. Once...tire chains will help . Deep snow 4WD and AWD vehicles are unique in deep snow that they can dry the brakes faster by driving the vehicle slowly while applying light pressure on the rear tires. Avoid water higher than the bottom of 4WD or AWD vehicles without also putting them ...
...prevent spinning the wheels while maintaining sufficient momentum to travel 12 Never drive with 4WD or AWD Water Before driving through water, always try the brakes. Proceed slowly to avoid splashing, if the ignition system gets wet, the vehicle may make it necessary to keep from bogging down. Once...tire chains will help . Deep snow 4WD and AWD vehicles are unique in deep snow that they can dry the brakes faster by driving the vehicle slowly while applying light pressure on the rear tires. Avoid water higher than the bottom of 4WD or AWD vehicles without also putting them ...


