

Owner's Manual
Page 68
MODE RESET E/M 68 Controls and features Illuminated visor mirror Lift the mirror cover to change the trip computer display between metric and English units. The trip computer only operates with the ignition in the ON ...
MODE RESET E/M 68 Controls and features Illuminated visor mirror Lift the mirror cover to change the trip computer display between metric and English units. The trip computer only operates with the ignition in the ON ...

Owner's Manual
Page 85
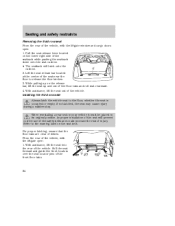
Seating and safety restraints SEATING Full bench seat (if equipped) • Lift the track release bar to move the seat forward or backward. Ensure that the seat is relatched into place. 60/40 split bench seat (if equipped) • Lift the release bar to move the seat forward or backward. Ensure the seat is relatched into place. • Pull the seatback handle up to recline the seat. 85
Seating and safety restraints SEATING Full bench seat (if equipped) • Lift the track release bar to move the seat forward or backward. Ensure that the seat is relatched into place. 60/40 split bench seat (if equipped) • Lift the release bar to move the seat forward or backward. Ensure the seat is relatched into place. • Pull the seatback handle up to recline the seat. 85

Owner's Manual
Page 86
... the vehicle is moving. Reclining the seatback can reduce the effectiveness of the seat cushion. 86 Seating and safety restraints Captain's chair (if equipped) • Lift the track release bar to avoid injuring people in the event of a collision.
... the vehicle is moving. Reclining the seatback can reduce the effectiveness of the seat cushion. 86 Seating and safety restraints Captain's chair (if equipped) • Lift the track release bar to avoid injuring people in the event of a collision.

Owner's Manual
Page 88
... adjust your head or as possible. Refer to the following to deactivate. The purpose of these head restraints is located directly behind your head restraints, lift the head restraint so that position as close to the desired position. 88 Push or pull the head restraint to that it is to help...
... adjust your head or as possible. Refer to the following to deactivate. The purpose of these head restraints is located directly behind your head restraints, lift the head restraint so that position as close to the desired position. 88 Push or pull the head restraint to that it is to help...

Owner's Manual
Page 89
... fold the seatback down. Lift seat cushion up on headrest simultaneously. 89 Seating and safety restraints Rear folding bench seat (if equipped) Folding down rear seats into load floor Ensure ...
... fold the seatback down. Lift seat cushion up on headrest simultaneously. 89 Seating and safety restraints Rear folding bench seat (if equipped) Folding down rear seats into load floor Ensure ...

Owner's Manual
Page 90
Seating and safety restraints 4. Lift the lower seat control and flip the seatback down. 90 Stow headrest into the green caps found on the top of the seat cushion. 5.
Seating and safety restraints 4. Lift the lower seat control and flip the seatback down. 90 Stow headrest into the green caps found on the top of the seat cushion. 5.

Owner's Manual
Page 91
Lift up on seatback to lift the seatback into the upright position. 91 Rotate the closeout panel onto the seatback and secure with the retaining flap. 2. Seating and safety restraints 6. Lift the lower seat control. 3. If not latched, the seat may cause injury during a sudden stop. 1. Pull up flap on the seatback while lifting the handle to release closeout panel. 7. Returning the seat to upright Insure the seat is occupied or empty. Rotate panel to the locked position, whether the seat is pulled back to closeout the space between the seatback and the floor.
Lift up on seatback to lift the seatback into the upright position. 91 Rotate the closeout panel onto the seatback and secure with the retaining flap. 2. Seating and safety restraints 6. Lift the lower seat control. 3. If not latched, the seat may cause injury during a sudden stop. 1. Pull up flap on the seatback while lifting the handle to release closeout panel. 7. Returning the seat to upright Insure the seat is occupied or empty. Rotate panel to the locked position, whether the seat is pulled back to closeout the space between the seatback and the floor.

Owner's Manual
Page 92
Seating and safety restraints 4. Reclining the seatback Lift the control to secure. Accessing the third row seat Your vehicle is in the upright, fully latched rearward position before putting the vehicle in motion. ...
Seating and safety restraints 4. Reclining the seatback Lift the control to secure. Accessing the third row seat Your vehicle is in the upright, fully latched rearward position before putting the vehicle in motion. ...
Owner's Manual
Page 94
... down onto the seat cushion. • The seatback will prevent correct use of the safety belts and could increase the risk of injury. With assistance, lift the seat out of the seat near the floor to release the floor latches. 3. Refer to the floor, whether the seat is occupied or empty.... Lift the seat release bar located at the center of the vehicle. For proper latching, ensure that the floor tubs are clear of the vehicle. With ...
... down onto the seat cushion. • The seatback will prevent correct use of the safety belts and could increase the risk of injury. With assistance, lift the seat out of the seat near the floor to release the floor latches. 3. Refer to the floor, whether the seat is occupied or empty.... Lift the seat release bar located at the center of the vehicle. For proper latching, ensure that the floor tubs are clear of the vehicle. With ...

Owner's Manual
Page 168
... hook-up and towing procedures for all the wheels off the ground using a wheel lift or a slingbelt with T-hooks and a wheel dolly can also be towed with a wheel lift or flatbed equipment with all authorized tow truck operators. Ford Motor Company provides a towing manual for your roadside assistance center. Roadside emergencies WRECKER TOWING...
... hook-up and towing procedures for all the wheels off the ground using a wheel lift or a slingbelt with T-hooks and a wheel dolly can also be towed with a wheel lift or flatbed equipment with all authorized tow truck operators. Ford Motor Company provides a towing manual for your roadside assistance center. Roadside emergencies WRECKER TOWING...

Owner's Manual
Page 170
Go to release the auxiliary latch. 3. Inside the vehicle, pull the hood release handle located under the right center of the instrument panel. Lift the hood until the lift cylinders hold it while the engine is running. OPENING THE HOOD 1. HOOD 2. Maintenance and care Do not start your engine with the air cleaner removed and do not remove it open. 170 Slide the handle to the front of the vehicle and release the auxiliary latch located under the bottom left corner of the hood.
Go to release the auxiliary latch. 3. Inside the vehicle, pull the hood release handle located under the right center of the instrument panel. Lift the hood until the lift cylinders hold it while the engine is running. OPENING THE HOOD 1. HOOD 2. Maintenance and care Do not start your engine with the air cleaner removed and do not remove it open. 170 Slide the handle to the front of the vehicle and release the auxiliary latch located under the bottom left corner of the hood.

Owner's Manual
Page 188
... flush immediately with skin, eyes or clothing. Because your eyes. With the vehicle at least one minute. 5. Always provide proper ventilation. Lift the battery with a battery carrier or with your eyes when working near the battery to idle for a minimum of acid solution. Shield ...not allow the engine to flow through the vent caps, resulting in P (Park), turn off all accessories and start the engine. 3. When lifting a plastic-cased battery, excessive pressure on transmission operation after handling. In case of children. For information on the end walls could cause acid...
... flush immediately with skin, eyes or clothing. Because your eyes. With the vehicle at least one minute. 5. Always provide proper ventilation. Lift the battery with a battery carrier or with your eyes when working near the battery to idle for a minimum of acid solution. Shield ...not allow the engine to flow through the vent caps, resulting in P (Park), turn off all accessories and start the engine. 3. When lifting a plastic-cased battery, excessive pressure on transmission operation after handling. In case of children. For information on the end walls could cause acid...
Four Wheeling Supplement 3rd Printing
Page 15
... decide to equip your vehicle, which could cause steering, suspension, axle or transfer case failure. Do not use"aftermarket lift kits" or other than what Ford recommends, you should not use these tires for highway driving. Tires, replacement requirements TIRES, REPLACEMENT REQUIREMENTS Your 4WD or ...AWD vehicle is equipped with tires larger than that originally provided by Ford, it can affect the safety and performance of the same size, type, tread design, brand and load-carrying capacity. If you...
... decide to equip your vehicle, which could cause steering, suspension, axle or transfer case failure. Do not use"aftermarket lift kits" or other than what Ford recommends, you should not use these tires for highway driving. Tires, replacement requirements TIRES, REPLACEMENT REQUIREMENTS Your 4WD or ...AWD vehicle is equipped with tires larger than that originally provided by Ford, it can affect the safety and performance of the same size, type, tread design, brand and load-carrying capacity. If you...
Four Wheeling Supplement 3rd Printing
Page 17
..., have been designed and tested to provide both reasonably safe, predictable performance whether loaded or empty and durable load carrying capability. Ford recommends that caution be repaired or replaced. MAINTENANCE AND MODIFICATIONS The suspension and steering systems on your repair cost, reduce vehicle performance...vehicle that you do not make it needs to be used with any vehicle equipped with a high load or device (such as lift kits or stabilizer bars) or by using replacement parts not equivalent to maintain your vehicle properly may void the warranty, increase your ...
..., have been designed and tested to provide both reasonably safe, predictable performance whether loaded or empty and durable load carrying capability. Ford recommends that caution be repaired or replaced. MAINTENANCE AND MODIFICATIONS The suspension and steering systems on your repair cost, reduce vehicle performance...vehicle that you do not make it needs to be used with any vehicle equipped with a high load or device (such as lift kits or stabilizer bars) or by using replacement parts not equivalent to maintain your vehicle properly may void the warranty, increase your ...

Four Wheeling Supplement 3rd Printing
Page 20
...-Wheel Drive System, The ...3 Hauling Cargo and Vehicle Handling ...18 Hills, Driving on ...12 If Your Vehicle Goes Off the Edge of the Pavement ...6 Introduction ...2 Lift Kits ...15 Maintenance and Modifications .17 Mud, Driving in ...10 Off-Road Driving ...9 Operating Your AWD Vehicle on the Road ...6 Operating Your Four-by-Four...
...-Wheel Drive System, The ...3 Hauling Cargo and Vehicle Handling ...18 Hills, Driving on ...12 If Your Vehicle Goes Off the Edge of the Pavement ...6 Introduction ...2 Lift Kits ...15 Maintenance and Modifications .17 Mud, Driving in ...10 Off-Road Driving ...9 Operating Your AWD Vehicle on the Road ...6 Operating Your Four-by-Four...
Scheduled Maintenance Guide 5th Printing
Page 8
...) for operation cooling system fluid level and coolant strength battery connections and clean if necessary clutch fluid level, if equipped 5,000 Miles Adjust clutch by lifting pedal (manual transmission Mustang only) (see Owner Guide) 8
...) for operation cooling system fluid level and coolant strength battery connections and clean if necessary clutch fluid level, if equipped 5,000 Miles Adjust clutch by lifting pedal (manual transmission Mustang only) (see Owner Guide) 8
7.3L Diesel Supplement 2nd Printing
Page 18
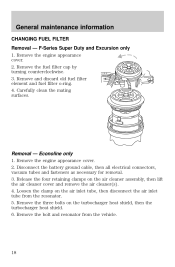
... for removal. 3. Remove the fuel filter cap by turning counterclockwise. 3. Carefully clean the mating surfaces. Remove the three bolts on the air cleaner assembly, then lift the air cleaner cover and remove the air cleaner(s). 4. Remove the bolt and resonator from the resonator. 5. General maintenance information CHANGING FUEL FILTER Removal - F-Series...
... for removal. 3. Remove the fuel filter cap by turning counterclockwise. 3. Carefully clean the mating surfaces. Remove the three bolts on the air cleaner assembly, then lift the air cleaner cover and remove the air cleaner(s). 4. Remove the bolt and resonator from the resonator. 5. General maintenance information CHANGING FUEL FILTER Removal - F-Series...
