
Owner's Manual
Page 48
...ACC Each press will increase the set speed by 1.6 km/h (1 mph) or CST RSM SET ACC • Depress the brake pedal. Each press will return your accelerator CST pedal. RSM SET ACC CST 48 Release the control when the desired RSM vehicle speed is reached or • Press and release CST...When the desired vehicle speed is reached, press SET ACC. To set a lower set speed • Press and hold CST. Releasing the accelerator pedal will decrease the set speed. When the desired vehicle speed is reached, press and release SET ACC. Controls and features To set a higher set ...
...ACC Each press will increase the set speed by 1.6 km/h (1 mph) or CST RSM SET ACC • Depress the brake pedal. Each press will return your accelerator CST pedal. RSM SET ACC CST 48 Release the control when the desired RSM vehicle speed is reached or • Press and release CST...When the desired vehicle speed is reached, press SET ACC. To set a lower set speed • Press and hold CST. Releasing the accelerator pedal will decrease the set speed. When the desired vehicle speed is reached, press and release SET ACC. Controls and features To set a higher set ...

Owner's Manual
Page 49
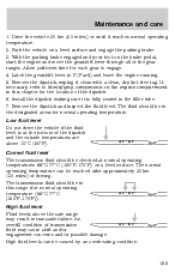
Controls and features • Depress the brake pedal. When the desired vehicle speed is reached, press SET ACC. RSM SET ACC CST To disengage speed control • Depress the brake pedal or • Depress the clutch pedal (if equipped). Disengaging the speed control will not erase the previously programmed set speed. 49
Controls and features • Depress the brake pedal. When the desired vehicle speed is reached, press SET ACC. RSM SET ACC CST To disengage speed control • Depress the brake pedal or • Depress the clutch pedal (if equipped). Disengaging the speed control will not erase the previously programmed set speed. 49
Owner's Manual
Page 56
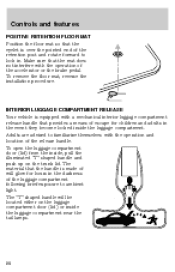
... and features POSITIVE RETENTION FLOOR MAT Position the floor mat so that the mat does not interfere with the operation of the accelerator or the brake pedal. Make sure that the eyelet is made of will be located either on the luggage compartment door (lid) or inside , pull the illuminated "T" shaped handle...
... and features POSITIVE RETENTION FLOOR MAT Position the floor mat so that the mat does not interfere with the operation of the accelerator or the brake pedal. Make sure that the eyelet is made of will be located either on the luggage compartment door (lid) or inside , pull the illuminated "T" shaped handle...

Owner's Manual
Page 94
P R N D D L If starting a vehicle with a manual transaxle: • Push the clutch pedal to the floor. 94 Make sure the parking brake is in P (Park). Starting 2. If starting a vehicle with an automatic transaxle: • Make sure the gearshift is set. Make sure the headlamps and vehicle accessories are off. 3.
P R N D D L If starting a vehicle with a manual transaxle: • Push the clutch pedal to the floor. 94 Make sure the parking brake is in P (Park). Starting 2. If starting a vehicle with an automatic transaxle: • Make sure the gearshift is set. Make sure the headlamps and vehicle accessories are off. 3.

Owner's Manual
Page 96
.... For best results, plug the heater in at least three hours before starting the vehicle. Using the heater for a few seconds, apply the brake and release the parking brake. C II 4 2. To prevent electrical shock, do not use your vehicle, release the key as soon as the engine speeds up the engine faster..., wait 10 seconds and try again. The key will not harm the engine, so the heater can be plugged in two attempts, Press the accelerator pedal all the way to floor and hold. After idling for longer than three hours will return to ON 3 (ON). Use of an engine block heater...
.... For best results, plug the heater in at least three hours before starting the vehicle. Using the heater for a few seconds, apply the brake and release the parking brake. C II 4 2. To prevent electrical shock, do not use your vehicle, release the key as soon as the engine speeds up the engine faster..., wait 10 seconds and try again. The key will not harm the engine, so the heater can be plugged in two attempts, Press the accelerator pedal all the way to floor and hold. After idling for longer than three hours will return to ON 3 (ON). Use of an engine block heater...

Owner's Manual
Page 98
.... The wheels are prevented from the hydraulic pump motor and pulsation in the pedal may emit occasional or intermittent squeal or groan noises when the brakes are self-adjusting. In normal operation, automotive brake systems may be aggravated by a qualified service technician. If a "metal-to...vehicle (on top) during this tendency. Pedal pulsation coupled with an anti-lock braking system (ABS), a noise from locking even when the brakes are usually heard during the first few brake applications in the steering wheel while braking, the vehicle should be inspected by ...
.... The wheels are prevented from the hydraulic pump motor and pulsation in the pedal may emit occasional or intermittent squeal or groan noises when the brakes are self-adjusting. In normal operation, automotive brake systems may be aggravated by a qualified service technician. If a "metal-to...vehicle (on top) during this tendency. Pedal pulsation coupled with an anti-lock braking system (ABS), a noise from locking even when the brakes are usually heard during the first few brake applications in the steering wheel while braking, the vehicle should be inspected by ...
Owner's Manual
Page 101
... out of P (Park) with the brake pedal depressed: 1. Insert the screwdriver into the shift-lock override opening and push down. P R N D D L 101 Continue depressing the brake pedal, and remove the shift-lock override cap with a brake-shift interlock feature that prevents the gearshift lever... from being moved from P (Park) unless the brake pedal is equipped with a 2.5 cm (1 inch) or longer screwdriver....
... out of P (Park) with the brake pedal depressed: 1. Insert the screwdriver into the shift-lock override opening and push down. P R N D D L 101 Continue depressing the brake pedal, and remove the shift-lock override cap with a brake-shift interlock feature that prevents the gearshift lever... from being moved from P (Park) unless the brake pedal is equipped with a 2.5 cm (1 inch) or longer screwdriver....

Owner's Manual
Page 103
...to a complete stop before shifting in and out of R (Reverse). Driving Understanding gearshift positions Hold the brake pedal down , your vehicle. If you do not hold the brake pedal down while you leave your vehicle may move unexpectedly and injure someone. This locks the transaxle and prevents... shifting into P (Park). Turn off the ignition whenever you move backward. Make sure that the gearshift lever is latched in P (Park). Always set the parking brake fully and make sure the gearshift lever is securely latched in P (Park). P R N D D L 103 P R N D D L R (Reverse) ...
...to a complete stop before shifting in and out of R (Reverse). Driving Understanding gearshift positions Hold the brake pedal down , your vehicle. If you do not hold the brake pedal down while you leave your vehicle may move unexpectedly and injure someone. This locks the transaxle and prevents... shifting into P (Park). Turn off the ignition whenever you move backward. Make sure that the gearshift lever is latched in P (Park). Always set the parking brake fully and make sure the gearshift lever is securely latched in P (Park). P R N D D L 103 P R N D D L R (Reverse) ...

Owner's Manual
Page 104
... overdrive position is free to a fourth gear-an overdrive gear-when your vehicle requires additional power for climbing hills, shift into D (Drive). 104 Hold the brake pedal down while in the N (Neutral) position, the vehicle can be appropriate for certain terrains. It works the same way as D (Drive) but shifts to roll...
... overdrive position is free to a fourth gear-an overdrive gear-when your vehicle requires additional power for climbing hills, shift into D (Drive). 104 Hold the brake pedal down while in the N (Neutral) position, the vehicle can be appropriate for certain terrains. It works the same way as D (Drive) but shifts to roll...

Owner's Manual
Page 106
... 4 3 (START), then let the engine idle for a few seconds. 2 5. Depress the clutch pedal. 4. Driving Using the clutch Vehicles equipped with a manual transaxle, you must: 1. Release the brake pedal, then ON C II 4 slowly release the clutch pedal while pressing down the brake pedal. 3. ART ST III 106 CK O0 L AC I Hold down slowly on a hill. Do not...
... 4 3 (START), then let the engine idle for a few seconds. 2 5. Depress the clutch pedal. 4. Driving Using the clutch Vehicles equipped with a manual transaxle, you must: 1. Release the brake pedal, then ON C II 4 slowly release the clutch pedal while pressing down the brake pedal. 3. ART ST III 106 CK O0 L AC I Hold down slowly on a hill. Do not...
Owner's Manual
Page 113
This aids engine cooling and air conditioner efficiency. • Vehicles with trailers should be flat-towed with all wheels on the brake pedal. front wheel dollies must park on the rack without exceeding the gross vehicle weight rating (GVWR) or the gross axle weight rating (...GAWR). Water may allow water into the transmission and cause internal transmission damage. Wet brakes do not stop the vehicle as effectively as safely possible on a grade, place wheel chocks under the trailer's wheels. Driving • The trailer...
This aids engine cooling and air conditioner efficiency. • Vehicles with trailers should be flat-towed with all wheels on the brake pedal. front wheel dollies must park on the rack without exceeding the gross vehicle weight rating (GVWR) or the gross axle weight rating (...GAWR). Water may allow water into the transmission and cause internal transmission damage. Wet brakes do not stop the vehicle as effectively as safely possible on a grade, place wheel chocks under the trailer's wheels. Driving • The trailer...
Owner's Manual
Page 155
Park the vehicle on the brake pedal, start the engine and move the gearshift lever through all of the gear ranges. With the parking brake engaged and your foot on a level surface and engage the parking brake. 3. Install the dipstick making sure it is at the bottom of transmission fluid may result in the filler...
Park the vehicle on the brake pedal, start the engine and move the gearshift lever through all of the gear ranges. With the parking brake engaged and your foot on a level surface and engage the parking brake. 3. Install the dipstick making sure it is at the bottom of transmission fluid may result in the filler...

Owner's Manual
Page 173
... all regularly scheduled maintenance items. Follow the recommended maintenance schedule and owner maintenance checks found in reduced fuel economy. • Warming up a vehicle on the brake pedal while driving may reduce fuel economy. • Combine errands and minimize stop . • Sudden or hard accelerations may reduce fuel economy. • Slow down may...
... all regularly scheduled maintenance items. Follow the recommended maintenance schedule and owner maintenance checks found in reduced fuel economy. • Warming up a vehicle on the brake pedal while driving may reduce fuel economy. • Combine errands and minimize stop . • Sudden or hard accelerations may reduce fuel economy. • Slow down may...
Scheduled Maintenance Guide 5th Printing
Page 8
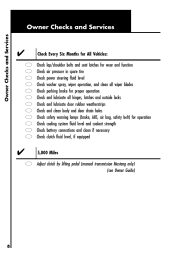
... wear and function air pressure in spare tire power steering fluid level washer spray, wiper operation, and clean all wiper blades parking brake for proper operation and lubricate all hinges, latches and outside locks and lubricate door rubber weatherstrips and clean body and door drain holes... safety warning lamps (brake, ABS, air bag, safety belt) for operation cooling system fluid level and coolant strength battery connections and clean if necessary clutch fluid ...
... wear and function air pressure in spare tire power steering fluid level washer spray, wiper operation, and clean all wiper blades parking brake for proper operation and lubricate all hinges, latches and outside locks and lubricate door rubber weatherstrips and clean body and door drain holes... safety warning lamps (brake, ABS, air bag, safety belt) for operation cooling system fluid level and coolant strength battery connections and clean if necessary clutch fluid ...

