
Owner's Manual
Page 34
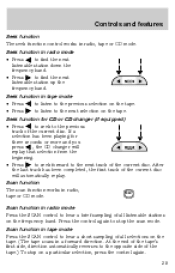
...) Press this control to move through the remaining discs. Hold the control to stop CD play and begin radio play . Hold the control to continue reversing through the frequencies quickly. • Press to move to select AM or FM frequency bands. Hold the control • Press to switch between AM, FM1...
...) Press this control to move through the remaining discs. Hold the control to stop CD play and begin radio play . Hold the control to continue reversing through the frequencies quickly. • Press to move to select AM or FM frequency bands. Hold the control • Press to switch between AM, FM1...
Owner's Manual
Page 35
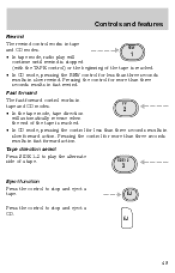
... the current disc. Scan function The scan function works in radio, tape or CD mode. At the end of the tape's first side, direction automatically reverses to the next track of all listenable stations on the tape. • Press Seek function for three seconds or more and you , the CD changer...
... the current disc. Scan function The scan function works in radio, tape or CD mode. At the end of the tape's first side, direction automatically reverses to the next track of all listenable stations on the tape. • Press Seek function for three seconds or more and you , the CD changer...
Owner's Manual
Page 39
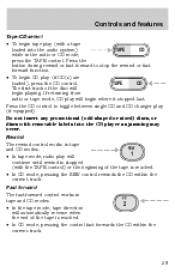
... single CD and CD changer play (if CD(s) are loaded), press the CD control. If returning from radio or tape mode, CD play will automatically reverse when the end of the tape is reached. • In CD mode, pressing the control fast forwards the CD within the current track. Rewind The...
... single CD and CD changer play (if CD(s) are loaded), press the CD control. If returning from radio or tape mode, CD play will automatically reverse when the end of the tape is reached. • In CD mode, pressing the control fast forwards the CD within the current track. Rewind The...

Owner's Manual
Page 44
... in radio mode • Press to move through the disc. Hold the control to fast-forward through the remaining discs. Hold the control to continue reversing through the frequencies quickly. SEEK TUNE SEEK TUNE Tune adjust for CD changer (if equipped) • Press to find the next listenable station down the...
... in radio mode • Press to move through the disc. Hold the control to fast-forward through the remaining discs. Hold the control to continue reversing through the frequencies quickly. SEEK TUNE SEEK TUNE Tune adjust for CD changer (if equipped) • Press to find the next listenable station down the...
Owner's Manual
Page 45
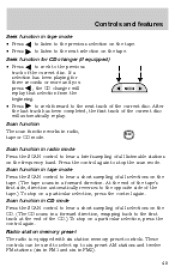
... to the first track at the end of the tape.) To stop the scan mode. At the end of the tape's first side, direction automatically reverses to the opposite side of the CD.) To stop on a particular selection, press the control again. Scan function The scan function works in FM2). 45...
... to the first track at the end of the tape.) To stop the scan mode. At the end of the tape's first side, direction automatically reverses to the opposite side of the CD.) To stop on a particular selection, press the control again. Scan function The scan function works in FM2). 45...
Owner's Manual
Page 49
... tape REW and CD modes. 1 • In tape mode, radio play the alternate side of a tape. Tape direction select Press SIDE 1-2 to play will automatically reverse when the end of the tape is reached. • In CD mode, pressing the REW control for more than three seconds results in fast rewind...
... tape REW and CD modes. 1 • In tape mode, radio play the alternate side of a tape. Tape direction select Press SIDE 1-2 to play will automatically reverse when the end of the tape is reached. • In CD mode, pressing the REW control for more than three seconds results in fast rewind...

Owner's Manual
Page 56
... the control to move through the frequencies quickly. • Press to move to the next frequency down the frequency band. Hold the control to continue reversing through the remaining discs. Seek function in radio or CD mode. SEEK DOWN will display. • Press to find the next listenable station down the...
... the control to move through the frequencies quickly. • Press to move to the next frequency down the frequency band. Hold the control to continue reversing through the remaining discs. Seek function in radio or CD mode. SEEK DOWN will display. • Press to find the next listenable station down the...

Owner's Manual
Page 146
... brake is maintained by power from P (Park) with an automatic overdrive transaxle Your automatic transaxle electronically controls the shift feel by shifting between forward and reverse gears, stopping between shifts, in mud or snow it is possible that the brakelamps are not operating properly. Driving with the brake pedal depressed, it...
... brake is maintained by power from P (Park) with an automatic overdrive transaxle Your automatic transaxle electronically controls the shift feel by shifting between forward and reverse gears, stopping between shifts, in mud or snow it is possible that the brakelamps are not operating properly. Driving with the brake pedal depressed, it...

Owner's Manual
Page 147
... backward. R D21 ODO Always set the parking brake fully and make sure the gearshift is securely latched in P (Park). R (Reverse) With the gearshift lever in D (Overdrive) gives the best fuel economy for normal driving conditions. Your automatic overdrive transaxle provides fully ...automatic operation in OVERDRIVE OFF/ON either D (Overdrive) or with the gearshift lever in R (Reverse), the vehicle will resume within a few hundred kilometers (miles) of operation. Driving with the O/D OFF switch depressed. This locks the...
... backward. R D21 ODO Always set the parking brake fully and make sure the gearshift is securely latched in P (Park). R (Reverse) With the gearshift lever in D (Overdrive) gives the best fuel economy for normal driving conditions. Your automatic overdrive transaxle provides fully ...automatic operation in OVERDRIVE OFF/ON either D (Overdrive) or with the gearshift lever in R (Reverse), the vehicle will resume within a few hundred kilometers (miles) of operation. Driving with the O/D OFF switch depressed. This locks the...
Owner's Manual
Page 153
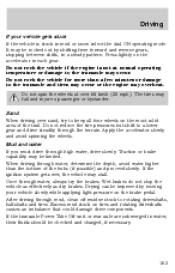
.... Apply the accelerator slowly and avoid spinning the wheels. Once through water, always try to the transaxle may be improved by shifting from forward and reverse gears, stopping between shifts, in water, their fluids should be checked and changed, if necessary. 153 Sand When driving over 56 km/h (35 mph). Driving...
.... Apply the accelerator slowly and avoid spinning the wheels. Once through water, always try to the transaxle may be improved by shifting from forward and reverse gears, stopping between shifts, in water, their fluids should be checked and changed, if necessary. 153 Sand When driving over 56 km/h (35 mph). Driving...

Owner's Manual
Page 178
... Control Module, Cluster (Restraints Control Warning) ABS Unit (EVAC & FILL), ASC Unit, Restraints Control Module, ASC Main SW to ASC Unit Flasher Unit, Left reversing Lamp, Right Reversing Lamp Passive Anti-theft Transceiver (PATS), Restraints Control Module Cluster, Shift Lock Relay (coil), O/D signal to PCM PCM Relay (coil), Fan Relay 1, 2, 3 (coil), A/C Relay...
... Control Module, Cluster (Restraints Control Warning) ABS Unit (EVAC & FILL), ASC Unit, Restraints Control Module, ASC Main SW to ASC Unit Flasher Unit, Left reversing Lamp, Right Reversing Lamp Passive Anti-theft Transceiver (PATS), Restraints Control Module Cluster, Shift Lock Relay (coil), O/D signal to PCM PCM Relay (coil), Fan Relay 1, 2, 3 (coil), A/C Relay...
Owner's Manual
Page 184
... follow these precautions, the tire could fail, causing you change a tire, be sure the parking brake is set, then block (in P (Park) (automatic transaxle) or R (Reverse) (manual transaxle).
... follow these precautions, the tire could fail, causing you change a tire, be sure the parking brake is set, then block (in P (Park) (automatic transaxle) or R (Reverse) (manual transaxle).

Owner's Manual
Page 185
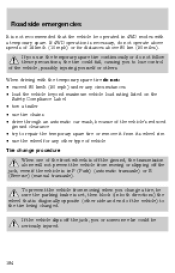
Loosen each wheel lug nut one-half turn engine OFF. 3. Block the diagonally opposite wheel. 4. Lift the cargo cover and remove the tool bag with jack handle, lug nut wrench and long spare tire rod and spare tire from the wheel well. 5. Set the parking brake and turn counterclockwise but do not remove them until the wheel is raised off the ground. 185 Roadside emergencies 1. Park on a level surface, activate hazard flashers and place gearshift lever in P (Park) (automatic transmission) or R (Reverse) (manual transmission). 2.
Loosen each wheel lug nut one-half turn engine OFF. 3. Block the diagonally opposite wheel. 4. Lift the cargo cover and remove the tool bag with jack handle, lug nut wrench and long spare tire rod and spare tire from the wheel well. 5. Set the parking brake and turn counterclockwise but do not remove them until the wheel is raised off the ground. 185 Roadside emergencies 1. Park on a level surface, activate hazard flashers and place gearshift lever in P (Park) (automatic transmission) or R (Reverse) (manual transmission). 2.

Owner's Manual
Page 192
Roadside emergencies Removing the jumper cables Remove the jumper cables in the reverse order that they were connected. 1. Note: In the illustrations, lightning bolts are used to designate the assisting (boosting) battery. 2. Remove the jumper cable on the negative (-) connection of the booster vehicle's battery. 192 - - - - + + + + Remove the jumper cable from the ground metal surface.
Roadside emergencies Removing the jumper cables Remove the jumper cables in the reverse order that they were connected. 1. Note: In the illustrations, lightning bolts are used to designate the assisting (boosting) battery. 2. Remove the jumper cable on the negative (-) connection of the booster vehicle's battery. 192 - - - - + + + + Remove the jumper cable from the ground metal surface.

Owner's Manual
Page 238
... and move the lamp assembly away from the socket and push in the new bulb. 4. Replacing license plate lamp bulbs 1. Install the bulb socket in reverse order. To install, press the lamp assembly in the new bulb. 6. Remove the license plate lamp assembly from the lamp assembly by turning counterclockwise. 3. Remove...
... and move the lamp assembly away from the socket and push in the new bulb. 4. Replacing license plate lamp bulbs 1. Install the bulb socket in reverse order. To install, press the lamp assembly in the new bulb. 6. Remove the license plate lamp assembly from the lamp assembly by turning counterclockwise. 3. Remove...

Owner's Manual
Page 239
... or qualified technician. Pull the bulb straight out of the socket and push in the chart below. To complete installation, follow the removal procedure in reverse order. Replacing front parking lamp/turn lamps Backup lamp Foglamp (front) Number of the following interior bulbs frequently: • interior overhead lamp • map lamp...
... or qualified technician. Pull the bulb straight out of the socket and push in the chart below. To complete installation, follow the removal procedure in reverse order. Replacing front parking lamp/turn lamps Backup lamp Foglamp (front) Number of the following interior bulbs frequently: • interior overhead lamp • map lamp...
Owner's Manual
Page 265
... bike rack Interior mount bike rack Mirror I/S electrochromic compass with and without temperature display Pet guard Removable luggage rack (Track riders) Removable luggage rack adapters Reverse parking aid Running boards and running bars Soft luggage cover Speed control Trailer hitch (Class II) Trailer hitch bars and balls Trailer hitch wiring adaptor...
... bike rack Interior mount bike rack Mirror I/S electrochromic compass with and without temperature display Pet guard Removable luggage rack (Track riders) Removable luggage rack adapters Reverse parking aid Running boards and running bars Soft luggage cover Speed control Trailer hitch (Class II) Trailer hitch bars and balls Trailer hitch wiring adaptor...
Four Wheeling Supplement 3rd Printing
Page 4
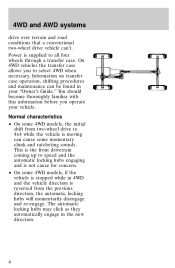
... the transfer case allows you operate your "Owner's Guide." You should become thoroughly familiar with this information before you to 4x4 while the vehicle is reversed from two-wheel drive to select 4WD when necessary. 4WD and AWD systems drive over terrain and road conditions that a conventional two-wheel drive vehicle...
... the transfer case allows you operate your "Owner's Guide." You should become thoroughly familiar with this information before you to 4x4 while the vehicle is reversed from two-wheel drive to select 4WD when necessary. 4WD and AWD systems drive over terrain and road conditions that a conventional two-wheel drive vehicle...
Four Wheeling Supplement 3rd Printing
Page 9
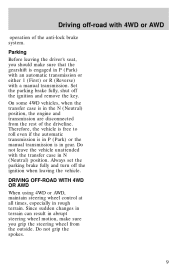
... gear. Do not grip the spokes. 9 On some 4WD vehicles, when the transfer case is in P (Park) with an automatic transmission or either 1 (First) or R (Reverse) with a manual transmission. Set the parking brake fully, shut off the ignition when leaving the vehicle. Always set the parking brake fully and turn off...
... gear. Do not grip the spokes. 9 On some 4WD vehicles, when the transfer case is in P (Park) with an automatic transmission or either 1 (First) or R (Reverse) with a manual transmission. Set the parking brake fully, shut off the ignition when leaving the vehicle. Always set the parking brake fully and turn off...
Four Wheeling Supplement 3rd Printing
Page 13
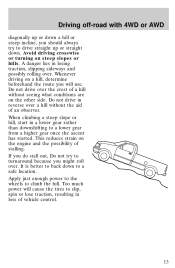
... AWD diagonally up or down a hill or steep incline, you might roll over. Avoid driving crosswise or turning on the other side. A danger lies in reverse over a hill without seeing what conditions are on steep slopes or hills. Apply just enough power to the wheels to drive straight up or straight...
... AWD diagonally up or down a hill or steep incline, you might roll over. Avoid driving crosswise or turning on the other side. A danger lies in reverse over a hill without seeing what conditions are on steep slopes or hills. Apply just enough power to the wheels to drive straight up or straight...


