Owner's Manual
Page 3
This is recommended to give the moving parts a chance to -Bumper Coverage, Safety Restraint Coverage, Corrosion Coverage, and 7.3L Power Stroke Diesel Engine Coverage. INFORMATION ABOUT THIS GUIDE The information found in this guide was in effect at the time of personal...what is not covered, refer to the Warranty Guide that is eligible for breaking-in . For a detailed description of driving, vary speeds frequently. Ford may reduce the risk of printing. In addition, your vehicle is provided to others, your vehicle. EMISSION WARRANTY The New Vehicle Limited Warranty includes...
This is recommended to give the moving parts a chance to -Bumper Coverage, Safety Restraint Coverage, Corrosion Coverage, and 7.3L Power Stroke Diesel Engine Coverage. INFORMATION ABOUT THIS GUIDE The information found in this guide was in effect at the time of personal...what is not covered, refer to the Warranty Guide that is eligible for breaking-in . For a detailed description of driving, vary speeds frequently. Ford may reduce the risk of printing. In addition, your vehicle is provided to others, your vehicle. EMISSION WARRANTY The New Vehicle Limited Warranty includes...
Owner's Manual
Page 6
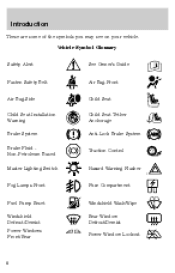
Introduction These are some of the symbols you may see on your vehicle. Vehicle Symbol Glossary Safety Alert See Owner's Guide Fasten Safety Belt Air Bag-Front Air Bag-Side Child Seat Installation Warning Brake System Brake Fluid Non-Petroleum Based Master Lighting Switch Child Seat Child Seat Tether Anchorage Anti-Lock Brake System Traction Control Hazard Warning Flasher Fog Lamps-Front Fuse Compartment Fuel Pump Reset Windshield Defrost/Demist Power Windows Front/Rear Windshield Wash/Wipe Rear Window Defrost/Demist Power Window Lockout 6
Introduction These are some of the symbols you may see on your vehicle. Vehicle Symbol Glossary Safety Alert See Owner's Guide Fasten Safety Belt Air Bag-Front Air Bag-Side Child Seat Installation Warning Brake System Brake Fluid Non-Petroleum Based Master Lighting Switch Child Seat Child Seat Tether Anchorage Anti-Lock Brake System Traction Control Hazard Warning Flasher Fog Lamps-Front Fuse Compartment Fuel Pump Reset Windshield Defrost/Demist Power Windows Front/Rear Windshield Wash/Wipe Rear Window Defrost/Demist Power Window Lockout 6
Owner's Manual
Page 7
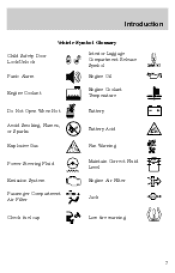
Introduction Vehicle Symbol Glossary Child Safety Door Lock/Unlock Panic Alarm Engine Coolant Interior Luggage Compartment Release Symbol Engine Oil Engine Coolant Temperature Battery Do Not Open When Hot Avoid Smoking, Flames, or Sparks Explosive Gas Battery Acid Fan Warning Maintain Correct Fluid Level Engine Air Filter Jack MAX MIN Power Steering Fluid Emission System Passenger Compartment Air Filter Check fuel cap Low tire warning 7
Introduction Vehicle Symbol Glossary Child Safety Door Lock/Unlock Panic Alarm Engine Coolant Interior Luggage Compartment Release Symbol Engine Oil Engine Coolant Temperature Battery Do Not Open When Hot Avoid Smoking, Flames, or Sparks Explosive Gas Battery Acid Fan Warning Maintain Correct Fluid Level Engine Air Filter Jack MAX MIN Power Steering Fluid Emission System Passenger Compartment Air Filter Check fuel cap Low tire warning 7
Owner's Manual
Page 8
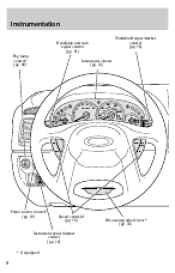
Instrumentation Headlamp and turn signal control (pg. 81) Fog lamp control* (pg. 82) Instrument cluster (pg. 10) Windshield wiper/washer control (pg. 76) 4 3 2 H C 5 6 RPM X 1000 7 60 8 40 60 40 80 100 80 120 140 160 100 180 km/h 4x4 F E 1 20 20 MPH 120 ON RSM SET ACC OFF CST Power mirror control* (pg. 19) Speed controls* (pg. 73) Tilt steering wheel lever* (pg. 72) Instrument panel dimmer control (pg. 19) * if equipped 8
Instrumentation Headlamp and turn signal control (pg. 81) Fog lamp control* (pg. 82) Instrument cluster (pg. 10) Windshield wiper/washer control (pg. 76) 4 3 2 H C 5 6 RPM X 1000 7 60 8 40 60 40 80 100 80 120 140 160 100 180 km/h 4x4 F E 1 20 20 MPH 120 ON RSM SET ACC OFF CST Power mirror control* (pg. 19) Speed controls* (pg. 73) Tilt steering wheel lever* (pg. 72) Instrument panel dimmer control (pg. 19) * if equipped 8
Owner's Manual
Page 19
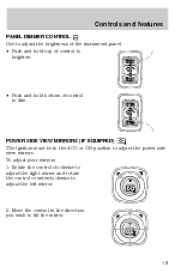
POWER SIDE VIEW MIRRORS (IF EQUIPPED) The ignition must be in the direction you wish to adjust the power side view mirrors. Move the control in the ACC or ON position to tilt the mirror. 19 Controls and features PANEL DIMMER CONTROL Use to adjust the brightness of the instrument panel. • Push and hold top of control to brighten. • Push and hold bottom of control to adjust the left mirror. 2. Rotate the control clockwise to adjust the right mirror and rotate the control counterclockwise to dim. To adjust your mirrors: 1.
POWER SIDE VIEW MIRRORS (IF EQUIPPED) The ignition must be in the direction you wish to adjust the power side view mirrors. Move the control in the ACC or ON position to tilt the mirror. 19 Controls and features PANEL DIMMER CONTROL Use to adjust the brightness of the instrument panel. • Push and hold top of control to brighten. • Push and hold bottom of control to adjust the left mirror. 2. Rotate the control clockwise to adjust the right mirror and rotate the control counterclockwise to dim. To adjust your mirrors: 1.
Owner's Manual
Page 33
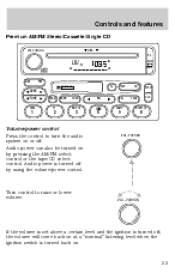
... is turned off, the volume will come back on at a "nominal" listening level when the ignition switch is turned off . Audio power is turned back on by using the volume/power control. VOL - PUSH ON Turn control to turn the audio system on or off by pressing the AM/FM select control... RF MUTE AM SEEK TUNE REW FM DOLBY B NR EJ TAPE CD AUTO CLK SCAN FF BASS TREB SIDE 1-2 SEL BAL COMP FADE SHUFFLE 1 2 3 4 5 6 Volume/power control Press the control to raise or lower volume.
... is turned off, the volume will come back on at a "nominal" listening level when the ignition switch is turned off . Audio power is turned back on by using the volume/power control. VOL - PUSH ON Turn control to turn the audio system on or off by pressing the AM/FM select control... RF MUTE AM SEEK TUNE REW FM DOLBY B NR EJ TAPE CD AUTO CLK SCAN FF BASS TREB SIDE 1-2 SEL BAL COMP FADE SHUFFLE 1 2 3 4 5 6 Volume/power control Press the control to raise or lower volume.
Owner's Manual
Page 43
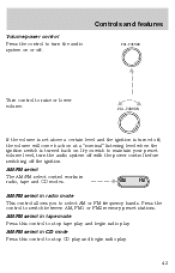
... select in radio, tape and CD modes. VOL - Press the control to switch between AM, FM1 or FM2 memory preset stations. Controls and features Volume/power control Press the control to turn the audio system off with the...
... select in radio, tape and CD modes. VOL - Press the control to switch between AM, FM1 or FM2 memory preset stations. Controls and features Volume/power control Press the control to turn the audio system off with the...

Owner's Manual
Page 55
... bands. AM FM CD AM/FM select in radio or CD mode. 55 Press the control to raise or lower volume. Controls and features Volume/power control Press the control to turn the audio system on . If the volume is set above a certain level and the ignition is turned off, the...
... bands. AM FM CD AM/FM select in radio or CD mode. 55 Press the control to raise or lower volume. Controls and features Volume/power control Press the control to turn the audio system on . If the volume is set above a certain level and the ignition is turned off, the...
Owner's Manual
Page 70
... signal travels, the weaker it will improve the reception of a station normally received in a given area. This range can be caused on AM stations by power lines, electric fences, traffic lights and thunderstorms. Moving away from an interfering structure (out of the average FM station is . Controls and features CD and...
... signal travels, the weaker it will improve the reception of a station normally received in a given area. This range can be caused on AM stations by power lines, electric fences, traffic lights and thunderstorms. Moving away from an interfering structure (out of the average FM station is . Controls and features CD and...
Owner's Manual
Page 82
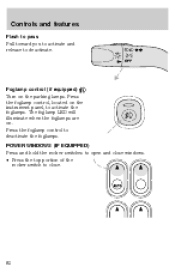
Press the foglamp control, located on the instrument panel, to close windows. • Press the top portion of the rocker switch to activate the foglamps. POWER WINDOWS (IF EQUIPPED) Press and hold the rocker switches to open and close . 82 Press the foglamp control to deactivate. The foglamp LED will illuminate when the foglamps are on the parking lamps. Controls and features Flash to pass Pull toward you to activate and release to deactivate the foglamps. OFF Foglamp control (if equipped) Turn on .
Press the foglamp control, located on the instrument panel, to close windows. • Press the top portion of the rocker switch to activate the foglamps. POWER WINDOWS (IF EQUIPPED) Press and hold the rocker switches to open and close . 82 Press the foglamp control to deactivate. The foglamp LED will illuminate when the foglamps are on the parking lamps. Controls and features Flash to pass Pull toward you to activate and release to deactivate the foglamps. OFF Foglamp control (if equipped) Turn on .
Owner's Manual
Page 83
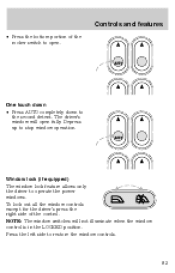
Window lock (if equipped) The window lock feature allows only the driver to restore the window controls. 83 Press the left side to operate the power windows. Depress up to the second detent. To lock out all the window controls except for the driver's press the right side of the rocker ...
Window lock (if equipped) The window lock feature allows only the driver to restore the window controls. 83 Press the left side to operate the power windows. Depress up to the second detent. To lock out all the window controls except for the driver's press the right side of the rocker ...
Owner's Manual
Page 84
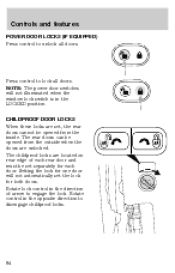
... cannot be set the lock for each rear door and must be opened from the inside. Press control to lock all doors. Controls and features POWER DOOR LOCKS (IF EQUIPPED) Press control to unlock all doors. Setting the lock for one door will not illuminated when the window lock switch is...
... cannot be set the lock for each rear door and must be opened from the inside. Press control to lock all doors. Controls and features POWER DOOR LOCKS (IF EQUIPPED) Press control to unlock all doors. Setting the lock for one door will not illuminated when the window lock switch is...
Owner's Manual
Page 85
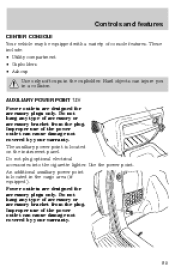
...injure you in a collision. Do not hang any type of accessory or accessory bracket from the plug. The auxiliary power point is located in the cupholder. An additional auxiliary power point is located on the instrument panel. Controls and features CENTER CONSOLE Your vehicle may be equipped with a variety of... the power outlet can cause damage not covered by your warranty. 85 These include: • Utility compartment • Cupholders • Ashcup Use only soft ...
...injure you in a collision. Do not hang any type of accessory or accessory bracket from the plug. The auxiliary power point is located in the cupholder. An additional auxiliary power point is located on the instrument panel. Controls and features CENTER CONSOLE Your vehicle may be equipped with a variety of... the power outlet can cause damage not covered by your warranty. 85 These include: • Utility compartment • Cupholders • Ashcup Use only soft ...

Owner's Manual
Page 91
Controls and features Replacing the battery The transmitter is powered by : • weather conditions • nearby radio towers • structures around the vehicle • other vehicles parked next to 10 meters (33 feet) away from ...
Controls and features Replacing the battery The transmitter is powered by : • weather conditions • nearby radio towers • structures around the vehicle • other vehicles parked next to 10 meters (33 feet) away from ...
Owner's Manual
Page 99
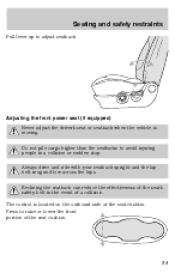
... and low across the hips. Reclining the seatback can reduce the effectiveness of the seat's safety belt in a collision or sudden stop. Adjusting the front power seat (if equipped) Never adjust the driver's seat or seatback when the vehicle is located on the outboard side of the seat cushion. Press to...
... and low across the hips. Reclining the seatback can reduce the effectiveness of the seat's safety belt in a collision or sudden stop. Adjusting the front power seat (if equipped) Never adjust the driver's seat or seatback when the vehicle is located on the outboard side of the seat cushion. Press to...

Owner's Manual
Page 122
... the supplemental air bag electrical system warning (including the impact sensors), the system wiring, the air bag system readiness light, the air bag back up power and the air bag ignitors. After air bag deployment, it is designed to notice a smoke-like, powdery residue or smell the burnt propellant. Thus, it...
... the supplemental air bag electrical system warning (including the impact sensors), the system wiring, the air bag system readiness light, the air bag back up power and the air bag ignitors. After air bag deployment, it is designed to notice a smoke-like, powdery residue or smell the burnt propellant. Thus, it...
Owner's Manual
Page 144
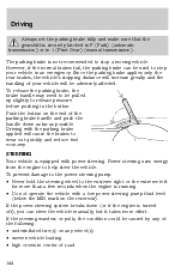
... parking brake applies only the rear brakes, the vehicle's stopping distance will increase greatly and the handling of your vehicle in the button. Power steering uses energy from the engine to stop your vehicle will cause the brakes to the extreme right or the extreme left for more effort.... Push the button on the reservoir). Driving with power steering. If the power steering system breaks down as far as possible. To release the parking brake, the brake handle may need to be used to ...
... parking brake applies only the rear brakes, the vehicle's stopping distance will increase greatly and the handling of your vehicle in the button. Power steering uses energy from the engine to stop your vehicle will cause the brakes to the extreme right or the extreme left for more effort.... Push the button on the reservoir). Driving with power steering. If the power steering system breaks down as far as possible. To release the parking brake, the brake handle may need to be used to ...

Owner's Manual
Page 146
Do not rock the vehicle for your vehicle until the adaptive strategy has been learned. If the parking brake is maintained by power from the battery. Driving with an automatic overdrive transaxle Your automatic transaxle electronically controls the shift feel by shifting between forward and reverse gears, stopping ...
Do not rock the vehicle for your vehicle until the adaptive strategy has been learned. If the parking brake is maintained by power from the battery. Driving with an automatic overdrive transaxle Your automatic transaxle electronically controls the shift feel by shifting between forward and reverse gears, stopping ...
Owner's Manual
Page 148
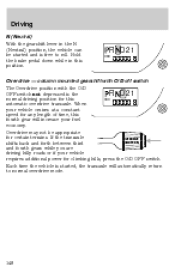
... vehicle cruises at a constant speed for climbing hills, press the O/D OFF switch. Overdrive may not be started , the transaxle will increase your vehicle requires additional power for any length of time, this position. Each time the vehicle is started and is the R D21 normal driving position for certain terrains. If the...
... vehicle cruises at a constant speed for climbing hills, press the O/D OFF switch. Overdrive may not be started , the transaxle will increase your vehicle requires additional power for any length of time, this position. Each time the vehicle is started and is the R D21 normal driving position for certain terrains. If the...
Owner's Manual
Page 150
...First) Use 1 (First) for your vehicle in this gear. If you leave your vehicle unattended while it is securely latched in place of the Power Take-Off Unit and rear axle refer to ascend any grade without any time. FOUR WHEEL DRIVE (4X4) SYSTEM (IF EQUIPPED) 4x4 system general information.... When parking, do not take these precautions, your vehicle over terrain and road conditions not normally traveled by two-wheel drive vehicles. Power is always supplied to the front wheels and to drive your current driving conditions. ODO The automatic transaxle will shift to the proper gear...
...First) Use 1 (First) for your vehicle in this gear. If you leave your vehicle unattended while it is securely latched in place of the Power Take-Off Unit and rear axle refer to ascend any grade without any time. FOUR WHEEL DRIVE (4X4) SYSTEM (IF EQUIPPED) 4x4 system general information.... When parking, do not take these precautions, your vehicle over terrain and road conditions not normally traveled by two-wheel drive vehicles. Power is always supplied to the front wheels and to drive your current driving conditions. ODO The automatic transaxle will shift to the proper gear...


