
Owner's Manual
Page 108
... a retractor assembly that the "automatic locking retractor" feature for proper function. Make sure the tongue is coming from) until you hear a snap and feel it latch. BELT AND RETRACTOR ASSEMBLY MUST BE REPLACED if the safety belt assembly "automatic locking retractor" feature or any vehicle collision, the safety belt system at...
... a retractor assembly that the "automatic locking retractor" feature for proper function. Make sure the tongue is coming from) until you hear a snap and feel it latch. BELT AND RETRACTOR ASSEMBLY MUST BE REPLACED if the safety belt assembly "automatic locking retractor" feature or any vehicle collision, the safety belt system at...
Owner's Manual
Page 117
...), shoulder belt height adjusters (if equipped), shoulder belt guide on seatback (if equipped), child safety seat tether bracket assemblies (if equipped), LATCH child seat tether anchors and lower anchors (if equipped), and attaching hardware, should also be turned on the parklamps/headlamps, turn off ...seconds. 8. Confirmation of disabling BeltMinderis provided by flashing the safety belt warning light four times per second for three seconds again. 9. Ford Motor Company recommends that the belts do not show damage and continue to operate properly, they work properly and are no nicks, ...
...), shoulder belt height adjusters (if equipped), shoulder belt guide on seatback (if equipped), child safety seat tether bracket assemblies (if equipped), LATCH child seat tether anchors and lower anchors (if equipped), and attaching hardware, should also be turned on the parklamps/headlamps, turn off ...seconds. 8. Confirmation of disabling BeltMinderis provided by flashing the safety belt warning light four times per second for three seconds again. 9. Ford Motor Company recommends that the belts do not show damage and continue to operate properly, they work properly and are no nicks, ...
Owner's Manual
Page 129
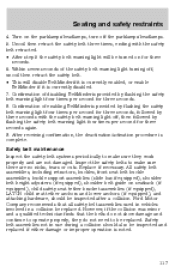
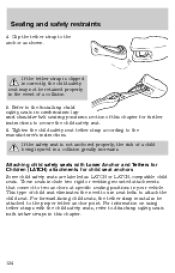
...button pointing up and away from ). • Insert the belt tongue into the proper buckle until you put in a sudden stop or collision. Ford recommends the use the safety seat properly, the child may be removed when using a child seat. 129 in the automatic locking mode. If ... a child safety seat: • Review and follow all of the manufacturer's instructions included with the safety seat you hear a snap and feel it latch. Installing child safety seats in this chapter. Refer to Automatic locking mode (passenger side front and outboard rear seating positions) (if equipped) section in...
...button pointing up and away from ). • Insert the belt tongue into the proper buckle until you put in a sudden stop or collision. Ford recommends the use the safety seat properly, the child may be removed when using a child seat. 129 in the automatic locking mode. If ... a child safety seat: • Review and follow all of the manufacturer's instructions included with the safety seat you hear a snap and feel it latch. Installing child safety seats in this chapter. Refer to Automatic locking mode (passenger side front and outboard rear seating positions) (if equipped) section in...
Owner's Manual
Page 131
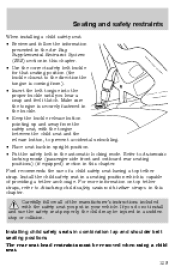
Allow the belt to the child seat manufacturer's instructions. Be sure the belt webbing is latched securely by pulling on it. 5. Make sure the tongue is not twisted. 4. The belt will click as it is coming from) for that seating position ... the tongue is in the automatic locking mode, grasp the shoulder portion of the belt and pull downward until you hear a snap and feel the latch engage. To put the retractor in the automatic locking mode. 131 Seating and safety restraints 3. While holding the shoulder and lap belt portions together, route...
Allow the belt to the child seat manufacturer's instructions. Be sure the belt webbing is latched securely by pulling on it. 5. Make sure the tongue is not twisted. 4. The belt will click as it is coming from) for that seating position ... the tongue is in the automatic locking mode, grasp the shoulder portion of the belt and pull downward until you hear a snap and feel the latch engage. To put the retractor in the automatic locking mode. 131 Seating and safety restraints 3. While holding the shoulder and lap belt portions together, route...
Owner's Manual
Page 134
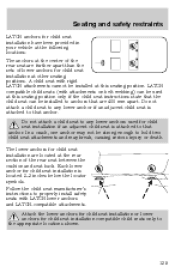
... tether straps in combination lap and shoulder belt seating positions section of child seat eliminates the need to use seat belts to the anchor as LATCH or LATCH-compatible child seats. For information on using tether straps with the child safety seats, refer to Attaching safety seats with Lower Anchor and Tethers...
... tether straps in combination lap and shoulder belt seating positions section of child seat eliminates the need to use seat belts to the anchor as LATCH or LATCH-compatible child seats. For information on using tether straps with the child safety seats, refer to Attaching safety seats with Lower Anchor and Tethers...
Owner's Manual
Page 135
... a child seat to any lower anchors used at this seating position only if the child seat instructions state that anchor. LATCH compatible child seats (with rigid LATCH attachments cannot be installed to that the child seat can be strong enough to properly install safety seats with... attached to the appropriate locations shown. 135 The lower anchors for child seat installation at other seating positions. Seating and safety restraints LATCH anchors for child seat installation have been provided in your vehicle at the following locations: The anchors at the center of the rear...
... a child seat to any lower anchors used at this seating position only if the child seat instructions state that anchor. LATCH compatible child seats (with rigid LATCH attachments cannot be installed to that the child seat can be strong enough to properly install safety seats with... attached to the appropriate locations shown. 135 The lower anchors for child seat installation at other seating positions. Seating and safety restraints LATCH anchors for child seat installation have been provided in your vehicle at the following locations: The anchors at the center of the rear...
Owner's Manual
Page 136
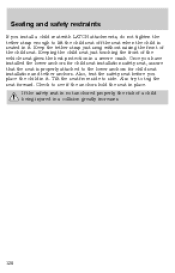
... crash. Keeping the child seat just touching the front of a child being injured in place. Seating and safety restraints If you install a child seat with LATCH attachments, do not tighten the tether strap enough to lift the child seat off the seat when the child is properly attached to see if...
... crash. Keeping the child seat just touching the front of a child being injured in place. Seating and safety restraints If you install a child seat with LATCH attachments, do not tighten the tether strap enough to lift the child seat off the seat when the child is properly attached to see if...
Owner's Manual
Page 144
... brakes to stop your vehicle in 1 (First Gear) (manual transmission). Driving Always set the parking brake fully and make sure that the gearshift is securely latched in P (Park) (automatic transmission) or in an emergency. Since the parking brake applies only the rear brakes, the vehicle's stopping distance will increase greatly and...
... brakes to stop your vehicle in 1 (First Gear) (manual transmission). Driving Always set the parking brake fully and make sure that the gearshift is securely latched in P (Park) (automatic transmission) or in an emergency. Since the parking brake applies only the rear brakes, the vehicle's stopping distance will increase greatly and...

Owner's Manual
Page 146
... smoothness. Optimal 146 Refer to Fuses and relays in each gear. Driving with the brake pedal depressed, it may occur. The adaptive learning strategy is latched in mud or snow it is installed, the transaxle must relearn its adaptive strategy. See your vehicle. When the battery is disconnected or a new battery...
... smoothness. Optimal 146 Refer to Fuses and relays in each gear. Driving with the brake pedal depressed, it may occur. The adaptive learning strategy is latched in mud or snow it is installed, the transaxle must relearn its adaptive strategy. See your vehicle. When the battery is disconnected or a new battery...

Owner's Manual
Page 147
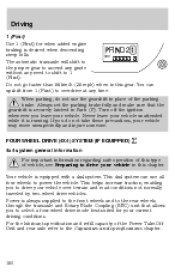
...(Park). R D21 Understanding gearshift positions P (Park) Always come to a complete stop before shifting into and out of operation. Make sure the gearshift lever is latched in 1 (First) and then shift manually. R D21 ODO Always set the parking brake fully and make sure the gearshift is securely... latched in OVERDRIVE OFF/ON either D (Overdrive) or with the gearshift lever in R (Reverse), the vehicle will resume within a few hundred kilometers (miles) of R (...
...(Park). R D21 Understanding gearshift positions P (Park) Always come to a complete stop before shifting into and out of operation. Make sure the gearshift lever is latched in 1 (First) and then shift manually. R D21 ODO Always set the parking brake fully and make sure the gearshift is securely... latched in OVERDRIVE OFF/ON either D (Overdrive) or with the gearshift lever in R (Reverse), the vehicle will resume within a few hundred kilometers (miles) of R (...
Owner's Manual
Page 150
... overdrive at any need to shift to the Capacities and specifications chapter. 150 Power is desired when descending R D21 steep hills. Your vehicle is securely latched in this gear. Always set the parking brake fully and make sure that allows you do not use all four wheels to ascend any grade...
... overdrive at any need to shift to the Capacities and specifications chapter. 150 Power is desired when descending R D21 steep hills. Your vehicle is securely latched in this gear. Always set the parking brake fully and make sure that allows you do not use all four wheels to ascend any grade...

Owner's Manual
Page 196
... lit cigarettes, open flames and other lit material away from moving parts. • Do not work on a hot engine. • When the engine is securely latched in 1 (First). 196 Maintenance and care SERVICE RECOMMENDATIONS To help you service your vehicle will drive properly, as explained in Battery in this chapter. If...
... lit cigarettes, open flames and other lit material away from moving parts. • Do not work on a hot engine. • When the engine is securely latched in 1 (First). 196 Maintenance and care SERVICE RECOMMENDATIONS To help you service your vehicle will drive properly, as explained in Battery in this chapter. If...
Owner's Manual
Page 197
... running . • Manual transmission: 1. Note: Do not start your engine with the air cleaner removed and do not remove it while the engine is securely latched in neutral. 2. Set the parking brake and ensure the gearshift is running . Inside the vehicle, pull the hood release handle located under the bottom of...
... running . • Manual transmission: 1. Note: Do not start your engine with the air cleaner removed and do not remove it while the engine is securely latched in neutral. 2. Set the parking brake and ensure the gearshift is running . Inside the vehicle, pull the hood release handle located under the bottom of...

Owner's Manual
Page 198
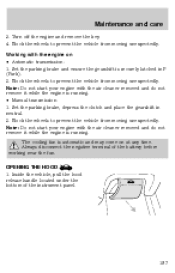
Lift the hood open and secure it with the prop rod. 198 At the front of the vehicle, lift up on the auxiliary latch handle located in the center between the hood and the grille. 3. Maintenance and care 2.
Lift the hood open and secure it with the prop rod. 198 At the front of the vehicle, lift up on the auxiliary latch handle located in the center between the hood and the grille. 3. Maintenance and care 2.

Owner's Manual
Page 201
... the hood. Set the parking brake and ensure the gearshift is on level ground. 2. Protect yourself from engine heat. 5. Make sure the vehicle is securely latched in P (Park) (automatic transmissions) or 1 (First) (manual transmissions). 4.
... the hood. Set the parking brake and ensure the gearshift is on level ground. 2. Protect yourself from engine heat. 5. Make sure the vehicle is securely latched in P (Park) (automatic transmissions) or 1 (First) (manual transmissions). 4.

Owner's Manual
Page 214
To obtain an accurate fluid check, drive the vehicle until it reaches normal operating temperature. 2. Latch the gearshift lever in city traffic during hot weather or pulling a trailer, the vehicle should be turned off for an extended period at the bottom ...
To obtain an accurate fluid check, drive the vehicle until it reaches normal operating temperature. 2. Latch the gearshift lever in city traffic during hot weather or pulling a trailer, the vehicle should be turned off for an extended period at the bottom ...
Owner's Manual
Page 250
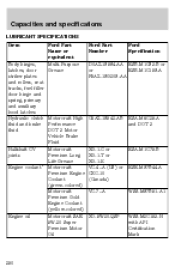
Capacities and specifications LUBRICANT SPECIFICATIONS Item Ford Part Name or equivalent Multi-Purpose Grease Ford Part Number Ford Specification Body hinges, latches, door striker plates and rollers, seat tracks, fuel filler door hinge and spring, primary and auxiliary hood latches Hydraulic clutch Motorcraft High fluid and brake Perfromance fluid DOT 3 Motor Vehicle Brake Fluid Halfshaft CV...
Capacities and specifications LUBRICANT SPECIFICATIONS Item Ford Part Name or equivalent Multi-Purpose Grease Ford Part Number Ford Specification Body hinges, latches, door striker plates and rollers, seat tracks, fuel filler door hinge and spring, primary and auxiliary hood latches Hydraulic clutch Motorcraft High fluid and brake Perfromance fluid DOT 3 Motor Vehicle Brake Fluid Halfshaft CV...

Owner's Manual
Page 254
... your vehicle identification number.) XXXXXXXXXXXXXXXXX Engine number The engine number (the last eight numbers of the vehicle identification number) is located on the front door latch pillar on the driver's side. Vehicle identification number The vehicle identification number is attached to a metal tag and is located on the driver side instrument...
... your vehicle identification number.) XXXXXXXXXXXXXXXXX Engine number The engine number (the last eight numbers of the vehicle identification number) is located on the front door latch pillar on the driver's side. Vehicle identification number The vehicle identification number is attached to a metal tag and is located on the driver side instrument...
Owner's Manual
Page 270
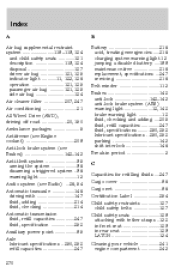
... Child safety restraints ...127 child safety belts ...127 Child safety seats ...128 attaching with tether straps ..132 in front seat ...129 in rear seat ...129 LATCH ...134 Cleaning your vehicle ...241 engine compartment ...243
... Child safety restraints ...127 child safety belts ...127 Child safety seats ...128 attaching with tether straps ..132 in front seat ...129 in rear seat ...129 LATCH ...134 Cleaning your vehicle ...241 engine compartment ...243

Four Wheeling Supplement 3rd Printing
Page 16
For your safety, tires that are more likely to the left front door lock facing or door latch post pillar. Check tire pressure with a tire gauge every few weeks (including spare). If one looks lower than the maximum pressure allowed for holes or ... be used for highway driving because they are neither underinflated nor overloaded. Each day before you drive, check your vehicle handles. Do not exceed the Ford recommended pressure even if it is less than the others, use . Failure to check pressure of all tires, and adjust if required. Tires can adversely...
For your safety, tires that are more likely to the left front door lock facing or door latch post pillar. Check tire pressure with a tire gauge every few weeks (including spare). If one looks lower than the maximum pressure allowed for holes or ... be used for highway driving because they are neither underinflated nor overloaded. Each day before you drive, check your vehicle handles. Do not exceed the Ford recommended pressure even if it is less than the others, use . Failure to check pressure of all tires, and adjust if required. Tires can adversely...


