Owner's Manual
Page 5
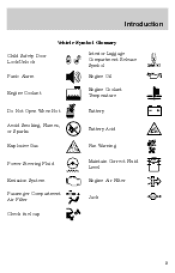
Introduction Vehicle Symbol Glossary Child Safety Door Lock/Unlock Panic Alarm Engine Coolant Interior Luggage Compartment Release Symbol Engine Oil Engine Coolant Temperature Battery Do Not Open When Hot Avoid Smoking, Flames, or Sparks Explosive Gas Battery Acid Fan Warning Maintain Correct Fluid Level Engine Air Filter Jack MAX MIN Power Steering Fluid Emission System Passenger Compartment Air Filter Check fuel cap 5
Introduction Vehicle Symbol Glossary Child Safety Door Lock/Unlock Panic Alarm Engine Coolant Interior Luggage Compartment Release Symbol Engine Oil Engine Coolant Temperature Battery Do Not Open When Hot Avoid Smoking, Flames, or Sparks Explosive Gas Battery Acid Fan Warning Maintain Correct Fluid Level Engine Air Filter Jack MAX MIN Power Steering Fluid Emission System Passenger Compartment Air Filter Check fuel cap 5

Owner's Manual
Page 16
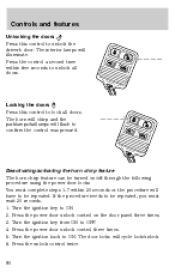
... the key is left in the ignition in the ignition) and the driver's door is opened . 16 For information on , the ignition is off (and the key is not in the OFF/LOCK or ACC position and the driver's door is opened . Belt minder chime Sounds intermittently to remind you to the Seating...
... the key is left in the ignition in the ignition) and the driver's door is opened . 16 For information on , the ignition is off (and the key is not in the OFF/LOCK or ACC position and the driver's door is opened . Belt minder chime Sounds intermittently to remind you to the Seating...

Owner's Manual
Page 79
... OFF control is pressed, the brake is applied or the ignition is turned to operate garage doors, entry gates, security systems, entry door locks, and home or office lighting. When programming your HomeLink Universal Transceiver, to a garage door or gate be sure that lacks safety stop and reverse, does not meet current U.S. For more...
... OFF control is pressed, the brake is applied or the ignition is turned to operate garage doors, entry gates, security systems, entry door locks, and home or office lighting. When programming your HomeLink Universal Transceiver, to a garage door or gate be sure that lacks safety stop and reverse, does not meet current U.S. For more...

Owner's Manual
Page 85
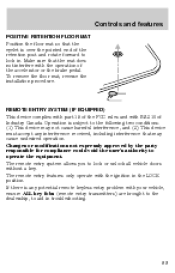
The compass is equipped with a locking fuel door. To open the fuel filler door. 85 Drive the vehicle slowly (less than 5 km/h [3 mph]) in the mirror display. 3. FUEL DOOR RELEASE Your vehicle is now calibrated. Press and hold the COMP side of the control for approximately six seconds until the display... reads a direction. 4. TRUNK FUEL NW COMP MIRROR Fuel filler door override release If the remote release is inoperative, open the trunk, then pull the override release handle located inside the trunk to open...
The compass is equipped with a locking fuel door. To open the fuel filler door. 85 Drive the vehicle slowly (less than 5 km/h [3 mph]) in the mirror display. 3. FUEL DOOR RELEASE Your vehicle is now calibrated. Press and hold the COMP side of the control for approximately six seconds until the display... reads a direction. 4. TRUNK FUEL NW COMP MIRROR Fuel filler door override release If the remote release is inoperative, open the trunk, then pull the override release handle located inside the trunk to open...
Owner's Manual
Page 87
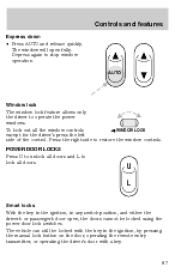
... in any switch position, and either the driver's or passenger's door open fully. POWER DOOR LOCKS Press U to unlock all the window controls WINDOW LOCK except for the driver's press the left side of the control. The vehicle can still be locked using the power door lock switches. Controls and features Express down • Press AUTO and...
... in any switch position, and either the driver's or passenger's door open fully. POWER DOOR LOCKS Press U to unlock all the window controls WINDOW LOCK except for the driver's press the left side of the control. The vehicle can still be locked using the power door lock switches. Controls and features Express down • Press AUTO and...

Owner's Manual
Page 88
... mirror or to engage the childproof lock. CHILDPROOF DOOR LOCKS When these locks are unlocked. Move lock control up to adjust the right mirror. 2. Setting the lock for one door will not automatically set separately for both doors. Move control down to the rear seating positions (heat only) 88 The rear doors can be opened from the outside when...
... mirror or to engage the childproof lock. CHILDPROOF DOOR LOCKS When these locks are unlocked. Move lock control up to adjust the right mirror. 2. Setting the lock for one door will not automatically set separately for both doors. Move control down to the rear seating positions (heat only) 88 The rear doors can be opened from the outside when...
Owner's Manual
Page 89
Changes or modifications not expressly approved by the party responsible for compliance could void the user's authority to lock or unlock all vehicle doors without a key. The remote entry features only operate with the operation of Industry Canada. Operation is subject to the following two conditions:...15 of the FCC rules and with your vehicle, ensure ALL key fobs (remote entry transmitters) are brought to the dealership, to lock in the LOCK position. Make sure that may not cause harmful interference, and (2) This device must accept any potential remote keyless entry problem with ...
Changes or modifications not expressly approved by the party responsible for compliance could void the user's authority to lock or unlock all vehicle doors without a key. The remote entry features only operate with the operation of Industry Canada. Operation is subject to the following two conditions:...15 of the FCC rules and with your vehicle, ensure ALL key fobs (remote entry transmitters) are brought to the dealership, to lock in the LOCK position. Make sure that may not cause harmful interference, and (2) This device must accept any potential remote keyless entry problem with ...
Owner's Manual
Page 90
...ignition key to OFF. 4. The horn will chirp and the parklamps/taillamps will cycle lock/unlock. 6. Deactivating/activating the horn chirp feature The horn chirp feature can be repeated. The door locks will flash to confirm the control was pressed. If the procedure needs to be repeated... you must complete steps 1-7 within five seconds to ON. Press the power door unlock control on /off through the following procedure using the power door locks: You must wait 30 seconds. 1. Press the power door unlock control three times. 5. Press the control a second time within 30 ...
...ignition key to OFF. 4. The horn will chirp and the parklamps/taillamps will cycle lock/unlock. 6. Deactivating/activating the horn chirp feature The horn chirp feature can be repeated. The door locks will flash to confirm the control was pressed. If the procedure needs to be repeated... you must complete steps 1-7 within five seconds to ON. Press the power door unlock control on /off through the following procedure using the power door locks: You must wait 30 seconds. 1. Press the power door unlock control three times. 5. Press the control a second time within 30 ...

Owner's Manual
Page 91
... keypad factory code. 2. Release 7/8 control. Within 5 seconds, press and hold 7/8 control. 3. Turn the ignition to be repeated, you shift into any door, except the drivers, is opened then closed . Automatic door locks can also be repeated. Enter the keyless entry keypad factory-set code. 2. Controls and features 7. This feature can be turned on...
... keypad factory code. 2. Release 7/8 control. Within 5 seconds, press and hold 7/8 control. 3. Turn the ignition to be repeated, you shift into any door, except the drivers, is opened then closed . Automatic door locks can also be repeated. Enter the keyless entry keypad factory-set code. 2. Controls and features 7. This feature can be turned on...

Owner's Manual
Page 92
... Ensure that the trunk is closed and latched before driving your vehicle. Automatic door locks can be repeated. Turn the ignition key from ON to be turned on the door panel three times. 3. This feature will lock/unlock to confirm successful programming. 7. After a five to ten second delay...the feature can also be repeated, you must complete steps 1-7 within 30 seconds or the procedure will lock/unlock to confirm the feature has been disabled. Press the power door unlock control three times. 5. Press the unlock control once. Opening the trunk Press the control once...
... Ensure that the trunk is closed and latched before driving your vehicle. Automatic door locks can be repeated. Turn the ignition key from ON to be turned on the door panel three times. 3. This feature will lock/unlock to confirm successful programming. 7. After a five to ten second delay...the feature can also be repeated, you must complete steps 1-7 within 30 seconds or the procedure will lock/unlock to confirm the feature has been disabled. Press the power door unlock control three times. 5. Press the unlock control once. Opening the trunk Press the control once...
Owner's Manual
Page 95
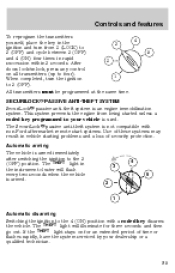
This system prevents the engine from 2 (LOCK) to 3 (OFF) and cycle between 3 (OFF) and 4 (ON) four times in the instrument cluster ... passive anti-theft system is armed. 4 3 5 2 1 Automatic disarming Switching the ignition to the 4 (ON) position with non-Ford aftermarket remote start systems. Use of these systems may result in vehicle starting problems and a loss of time or flashes rapidly, have the...reprogram the transmitters 4 yourself, place the key in the 3 ignition and turn the ignition to 3 (OFF). After doors lock/unlock, press any control on for three seconds and then go out.
This system prevents the engine from 2 (LOCK) to 3 (OFF) and cycle between 3 (OFF) and 4 (ON) four times in the instrument cluster ... passive anti-theft system is armed. 4 3 5 2 1 Automatic disarming Switching the ignition to the 4 (ON) position with non-Ford aftermarket remote start systems. Use of these systems may result in vehicle starting problems and a loss of time or flashes rapidly, have the...reprogram the transmitters 4 yourself, place the key in the 3 ignition and turn the ignition to 3 (OFF). After doors lock/unlock, press any control on for three seconds and then go out.

Owner's Manual
Page 98
...3 3 (OFF) to 4 (ON) (maintain ignition in this procedure from the ignition. 5. This step will program your dealership to 3 (OFF) then 2 2 (LOCK) and remove the first coded key from 3 (OFF) to a coded key. 6. If not successful, the new coded key(s) will not start the vehicle's engine and... the theft indicator will flash on and off and you can: 1 2 3 4 5 6 7 8 9 0 • lock or unlock the vehicle doors without using the key • open trunk • disable/enable horn chirp • disable/enable autolock See also Remote entry system in 4 (ON...
...3 3 (OFF) to 4 (ON) (maintain ignition in this procedure from the ignition. 5. This step will program your dealership to 3 (OFF) then 2 2 (LOCK) and remove the first coded key from 3 (OFF) to a coded key. 6. If not successful, the new coded key(s) will not start the vehicle's engine and... the theft indicator will flash on and off and you can: 1 2 3 4 5 6 7 8 9 0 • lock or unlock the vehicle doors without using the key • open trunk • disable/enable horn chirp • disable/enable autolock See also Remote entry system in 4 (ON...

Owner's Manual
Page 99
All of the vehicle doors will illuminate when pressed). 2. You can program up to three personal codes to confirm programming of the new code. These codes do not replace the ... figure out these types of the previous one. Enter the factory-set a code that the dealership gave you. 99 Do not set code (keypad will lock and unlock to unlock your own 5-digit personal entry code. Press the 1/2 control within five seconds of codes.
All of the vehicle doors will illuminate when pressed). 2. You can program up to three personal codes to confirm programming of the new code. These codes do not replace the ... figure out these types of the previous one. Enter the factory-set a code that the dealership gave you. 99 Do not set code (keypad will lock and unlock to unlock your own 5-digit personal entry code. Press the 1/2 control within five seconds of codes.

Owner's Manual
Page 100
... trunk (press 5/6) as long as the controls are pressed within 5 seconds of prior digit). Press and hold 1/2 for two seconds. All of the vehicle doors will illuminate. The interior lamps will lock and then unlock to a vehicle: 1. Unlocking the doors and releasing the trunk with the keyless entry system To unlock the driver...
... trunk (press 5/6) as long as the controls are pressed within 5 seconds of prior digit). Press and hold 1/2 for two seconds. All of the vehicle doors will illuminate. The interior lamps will lock and then unlock to a vehicle: 1. Unlocking the doors and releasing the trunk with the keyless entry system To unlock the driver...

Owner's Manual
Page 101
... the operation and location of the luggage compartment following brief exposure to locking all doors. The material that provides a means of escape for hours in the event they become locked inside the luggage compartment near the tail lamps. 101 To lock the doors: Press 7/8 and 9/0 at the same time. 1 2 3 4 5 6 7...) from the inside, pull the illuminated "T" shaped handle and push up on the luggage compartment door (lid) or inside the luggage compartment. Controls and features Locking doors with the keyless entry system It is not necessary to enter the factory-set code prior to ...
... the operation and location of the luggage compartment following brief exposure to locking all doors. The material that provides a means of escape for hours in the event they become locked inside the luggage compartment near the tail lamps. 101 To lock the doors: Press 7/8 and 9/0 at the same time. 1 2 3 4 5 6 7...) from the inside, pull the illuminated "T" shaped handle and push up on the luggage compartment door (lid) or inside the luggage compartment. Controls and features Locking doors with the keyless entry system It is not necessary to enter the factory-set code prior to ...

Owner's Manual
Page 102
Controls and features Keep vehicle doors and luggage compartment locked and keep keys out of people or animals to play in an open trunk and risk injury. Unsupervised children could lock themselves in vehicles. Exposure of a child's reach. Children should be taught not to these high temperatures for even a short time can rise very quickly. Small children are particularly at risk. 102 On hot days, the temperature in the trunk or vehicle interior can cause death or serious heat-related injuries, including brain damage.
Controls and features Keep vehicle doors and luggage compartment locked and keep keys out of people or animals to play in an open trunk and risk injury. Unsupervised children could lock themselves in vehicles. Exposure of a child's reach. Children should be taught not to these high temperatures for even a short time can rise very quickly. Small children are particularly at risk. 102 On hot days, the temperature in the trunk or vehicle interior can cause death or serious heat-related injuries, including brain damage.
Owner's Manual
Page 158
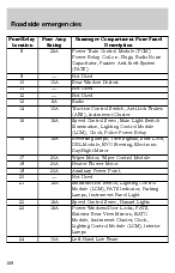
...Noise Capacitator, Passive Anti-theft System (PATS) Not Used Rear Window Defrost Not Used Not Used Radio Traction Control Switch, Anti-lock Brakes (ABS), Instrument Cluster Speed Control Servo, Main Light Switch Illumination, Lighting Control Module (LCM), Clock, Police Power Relay Reversing ...Used Multifunction Switch, Lighting Control Module (LCM), PATS Indicator, Parking Lamps, Instrument Panel Light Speed Control Servo, Hazard Lights Power Windows/Door Locks, PATS, Exterior Rear View Mirrors, EATC Module, Instrument Cluster, Clock, Lighting Control Module (LCM), Interior Lamps Left Hand Low Beam...
...Noise Capacitator, Passive Anti-theft System (PATS) Not Used Rear Window Defrost Not Used Not Used Radio Traction Control Switch, Anti-lock Brakes (ABS), Instrument Cluster Speed Control Servo, Main Light Switch Illumination, Lighting Control Module (LCM), Clock, Police Power Relay Reversing ...Used Multifunction Switch, Lighting Control Module (LCM), PATS Indicator, Parking Lamps, Instrument Panel Light Speed Control Servo, Hazard Lights Power Windows/Door Locks, PATS, Exterior Rear View Mirrors, EATC Module, Instrument Cluster, Clock, Lighting Control Module (LCM), Interior Lamps Left Hand Low Beam...
Owner's Manual
Page 160
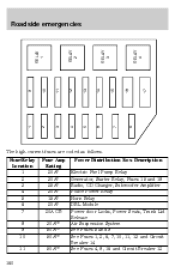
... Description Electric Fuel Pump Relay Generator, Starter Relay, Fuses 15 and 18 Radio, CD Changer, Subwoofer Amplifier Police Power Relay Horn Relay DRL Module Power door Locks, Power Seats, Trunk Lid Release Air Suspension System See Fuses 5 and 9 See Fuses 1, 2, 6, 7, 10, 11, 13 and Circuit Breaker 14 See Fuses 4, 8, 16 and Circuit...
... Description Electric Fuel Pump Relay Generator, Starter Relay, Fuses 15 and 18 Radio, CD Changer, Subwoofer Amplifier Police Power Relay Horn Relay DRL Module Power door Locks, Power Seats, Trunk Lid Release Air Suspension System See Fuses 5 and 9 See Fuses 1, 2, 6, 7, 10, 11, 13 and Circuit Breaker 14 See Fuses 4, 8, 16 and Circuit...

Owner's Manual
Page 223
...Performance DOT 3 Motor Vehicle Brake Fluid 1 Silicone Lubricant Ford part number C6AZ-19542-AB Ford specification ESA-M6C25-A and DOT 3 Door weatherstrips Engine coolant Engine oil Hinges, latches, striker plates, fuel filler door hinge and seat tracks Lock cylinders Power steering fluid Automatic transmission (4R70W) Rear ...Motor Certification Oil Mark Multi-Purpose DOAZ-19584-AA ESB-M1C93-B or Grease or ESR-M1C159-A F5AZ-19G209-AA Penetrating and Lock Lubricant Motorcraft MERCON ATF Motorcraft MERCON V ATF3 Motorcraft SAE 80W-90 Premium Rear Axle Lubricant Motorcraft XL-1 XT-2-QDX XT-5-...
...Performance DOT 3 Motor Vehicle Brake Fluid 1 Silicone Lubricant Ford part number C6AZ-19542-AB Ford specification ESA-M6C25-A and DOT 3 Door weatherstrips Engine coolant Engine oil Hinges, latches, striker plates, fuel filler door hinge and seat tracks Lock cylinders Power steering fluid Automatic transmission (4R70W) Rear ...Motor Certification Oil Mark Multi-Purpose DOAZ-19584-AA ESB-M1C93-B or Grease or ESR-M1C159-A F5AZ-19G209-AA Penetrating and Lock Lubricant Motorcraft MERCON ATF Motorcraft MERCON V ATF3 Motorcraft SAE 80W-90 Premium Rear Axle Lubricant Motorcraft XL-1 XT-2-QDX XT-5-...
Owner's Manual
Page 245
...) ...220 Passenger Occupant Classification Sensor ...109 Pedals (see Power adjustable foot pedals) ...71 Power distribution box (see Fuses) ...159 Power door locks ...87, 91 Power steering ...142 fluid, checking and adding ...187 fluid, refill capacity ...221 fluid, specifications ...223-224 R Radio ......38 Rear window defroster ...38 Relays ...156, 161 Remote entry system ...89, 93 illuminated entry ...93 locking/unlocking doors ...90 opening the trunk ...92 panic alarm ...93 replacement/additional transmitters ...94 replacing the batteries ...93 S Safety belts (see Safety ...
...) ...220 Passenger Occupant Classification Sensor ...109 Pedals (see Power adjustable foot pedals) ...71 Power distribution box (see Fuses) ...159 Power door locks ...87, 91 Power steering ...142 fluid, checking and adding ...187 fluid, refill capacity ...221 fluid, specifications ...223-224 R Radio ......38 Rear window defroster ...38 Relays ...156, 161 Remote entry system ...89, 93 illuminated entry ...93 locking/unlocking doors ...90 opening the trunk ...92 panic alarm ...93 replacement/additional transmitters ...94 replacing the batteries ...93 S Safety belts (see Safety ...


