
Owner Guide 1st Printing
Page 123
Seating and safety restraints Adjusting rear seats Lift control to move seat forward or backward. • 2nd row bucket seat • 2nd / 3rd row bench seat Pull control up to adjust seatback position. 123
Seating and safety restraints Adjusting rear seats Lift control to move seat forward or backward. • 2nd row bucket seat • 2nd / 3rd row bench seat Pull control up to adjust seatback position. 123

Owner Guide 1st Printing
Page 124
... the vehicle is in the forward flat position. If your vehicle has an adjustable 2nd row bench seat, it can be in position. Never attempt to use this feature when the seatback is latched securely in an upright position, as shown, for the ...system to adjust seatback forward. Push seatback toward front of objects that the seat and seatback is folded in motion. 124 The seatback must be adjusted to allow seatback to flip forward. 2. Check to the 3rd row...
... the vehicle is in the forward flat position. If your vehicle has an adjustable 2nd row bench seat, it can be in position. Never attempt to use this feature when the seatback is latched securely in an upright position, as shown, for the ...system to adjust seatback forward. Push seatback toward front of objects that the seat and seatback is folded in motion. 124 The seatback must be adjusted to allow seatback to flip forward. 2. Check to the 3rd row...

Owner Guide 1st Printing
Page 125
Seating and safety restraints Bench seat To remove the seats: 1. (For 2nd row bench seat only.) Disengage the lap/shoulder belt from the side of the seat belt detach anchors (if equipped) by inserting the seatbelt tongue or a key into the slot in the detachable anchor and lifting upward. 125
Seating and safety restraints Bench seat To remove the seats: 1. (For 2nd row bench seat only.) Disengage the lap/shoulder belt from the side of the seat belt detach anchors (if equipped) by inserting the seatbelt tongue or a key into the slot in the detachable anchor and lifting upward. 125

Owner Guide 1st Printing
Page 126
... release controls to clear the floor latches and then pull the seat rearward until the front hooks have come out of the seat, releasing the rear floor latches. 4. Remove the seat. 126 Seating and safety restraints 2. (For 2nd row bench seat only.) Using the clip attached to the end of the shoulder...of the shoulder belt coming out of the shoulder belt must be clipped in the full down position to make removing the seat easier. 3. If your bench seat is equipped with the forward fold down seatback, position the seatback in order to keep it from striking anything during vehicle operation...
... release controls to clear the floor latches and then pull the seat rearward until the front hooks have come out of the seat, releasing the rear floor latches. 4. Remove the seat. 126 Seating and safety restraints 2. (For 2nd row bench seat only.) Using the clip attached to the end of the shoulder...of the shoulder belt coming out of the shoulder belt must be clipped in the full down position to make removing the seat easier. 3. If your bench seat is equipped with the forward fold down seatback, position the seatback in order to keep it from striking anything during vehicle operation...

Owner Guide 1st Printing
Page 127
The second row bench seat may be indexed to be purchased as an accessory from the floor to expose the seat mounts. • To remove the tub cover(s), use a screwdriver to either the far left 127 Seating and safety restraints To install the seat: 1. The left side of the figure is the front of the vehicle... floor tub then press down on the other side of the vehicle. (4-door vehicles only). Remove (if necessary) tub covers from your dealer.) 2. Position the seat in the vehicle.
The second row bench seat may be indexed to be purchased as an accessory from the floor to expose the seat mounts. • To remove the tub cover(s), use a screwdriver to either the far left 127 Seating and safety restraints To install the seat: 1. The left side of the figure is the front of the vehicle... floor tub then press down on the other side of the vehicle. (4-door vehicles only). Remove (if necessary) tub covers from your dealer.) 2. Position the seat in the vehicle.

Owner Guide 1st Printing
Page 128
...row position. 3. Be sure that the seat is not twisted, then insert the seat belt tongue into detachable anchor (if equipped) until both front and back. 4. Align seat front hooks to front tub pins, lower back of seat into place. If not latched, the seat may cause injury during a sudden stop.... 128 Always latch the vehicle seat to far right The 3rd row bench seat can be placed in place both release controls ...
...row position. 3. Be sure that the seat is not twisted, then insert the seat belt tongue into detachable anchor (if equipped) until both front and back. 4. Align seat front hooks to front tub pins, lower back of seat into place. If not latched, the seat may cause injury during a sudden stop.... 128 Always latch the vehicle seat to far right The 3rd row bench seat can be placed in place both release controls ...
Owner Guide 1st Printing
Page 133
...Use the shoulder belt on collision. • This seat belt system has a retractor assembly that are fastened in the seat belt, the combination lap/shoulder belt with an energy management feature at the driver seating position and second row bench seat belt assemblies adjacent to a sliding door to help further... reduce the risk of injury in the event of a head-on the outside shoulder only. Energy Management Feature • This vehicle has a seat belt system with a...
...Use the shoulder belt on collision. • This seat belt system has a retractor assembly that are fastened in the seat belt, the combination lap/shoulder belt with an energy management feature at the driver seating position and second row bench seat belt assemblies adjacent to a sliding door to help further... reduce the risk of injury in the event of a head-on the outside shoulder only. Energy Management Feature • This vehicle has a seat belt system with a...
Owner Guide 1st Printing
Page 139
...safety belt assemblies used in vehicles involved in the event of this chapter. Safety belt assemblies not in the Replacing the second row bench seat belt assemblies after a collision. After receiving confirmation, the deactivation/activation procedure is provided by three seconds with the safety belt warning light... the safety belt. • This will disable Belt Minder if it is currently enabled, or enable Belt Minder if it is noted. Ford recommends that the belts do not show damage and continue to be replaced, except as described in use during a collision should be inspected...
...safety belt assemblies used in vehicles involved in the event of this chapter. Safety belt assemblies not in the Replacing the second row bench seat belt assemblies after a collision. After receiving confirmation, the deactivation/activation procedure is provided by three seconds with the safety belt warning light... the safety belt. • This will disable Belt Minder if it is currently enabled, or enable Belt Minder if it is noted. Ford recommends that the belts do not show damage and continue to be replaced, except as described in use during a collision should be inspected...
Owner Guide 1st Printing
Page 140
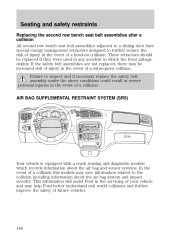
... result in severe personal injuries in the event of a head-on collision. Seating and safety restraints Replacing the second row bench seat belt assemblies after a collision All second row bench seat belt assemblies adjacent to a sliding door have special energy management retractors designed to... OFF REAR CONT A/C Your vehicle is equipped with a crash sensing and diagnostic module which the front airbags deploy. This information will assist Ford in which records information about the air bag and sensor systems. In the event of future vehicles. 140 If the safety belt assemblies are...
... result in severe personal injuries in the event of a head-on collision. Seating and safety restraints Replacing the second row bench seat belt assemblies after a collision All second row bench seat belt assemblies adjacent to a sliding door have special energy management retractors designed to... OFF REAR CONT A/C Your vehicle is equipped with a crash sensing and diagnostic module which the front airbags deploy. This information will assist Ford in which records information about the air bag and sensor systems. In the event of future vehicles. 140 If the safety belt assemblies are...

Owner Guide 1st Printing
Page 157
Rear seating positions Follow steps 1-8 as described above for the following available seats: • 2nd row bucket • 2nd row bench 157 Tighten the child safety seat tether strap according to the manufacturer's instructions. Seating and safety restraints 8.
Rear seating positions Follow steps 1-8 as described above for the following available seats: • 2nd row bucket • 2nd row bench 157 Tighten the child safety seat tether strap according to the manufacturer's instructions. Seating and safety restraints 8.
Owner Guide 1st Printing
Page 158
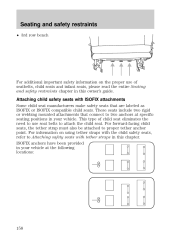
... attached to proper tether anchor point. Seating and safety restraints • 3rd row bench For additional important safety information on using tether straps with the child safety seats, refer to Attaching safety seats with ISOFIX attachments Some child seat manufacturers make safety seats that connect to two anchors at specific seating positions in your vehicle at the...
... attached to proper tether anchor point. Seating and safety restraints • 3rd row bench For additional important safety information on using tether straps with the child safety seats, refer to Attaching safety seats with ISOFIX attachments Some child seat manufacturers make safety seats that connect to two anchors at specific seating positions in your vehicle at the...

