
Warranty Guide 1st Printing
Page 9
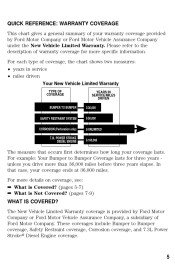
... Company or Ford Motor Vehicle Assurance Company under the New Vehicle Limited Warranty. The New Vehicle Limited Warranty coverage is Not Covered? (pages 7-9) WHAT IS COVERED? In that occurs first determines how long your coverage ends at 36,000 miles. These coverages ... lasts. QUICK REFERENCE: WARRANTY COVERAGE This chart gives a general summary of your warranty coverage provided by Ford Motor Company or Ford Motor Vehicle Assurance Company, a subsidiary of Ford Motor Company. Please refer to Bumper coverage, Safety Restraint coverage, Corrosion coverage, and 7.3L Power Stroke...
... Company or Ford Motor Vehicle Assurance Company under the New Vehicle Limited Warranty. The New Vehicle Limited Warranty coverage is Not Covered? (pages 7-9) WHAT IS COVERED? In that occurs first determines how long your coverage ends at 36,000 miles. These coverages ... lasts. QUICK REFERENCE: WARRANTY COVERAGE This chart gives a general summary of your warranty coverage provided by Ford Motor Company or Ford Motor Vehicle Assurance Company, a subsidiary of Ford Motor Company. Please refer to Bumper coverage, Safety Restraint coverage, Corrosion coverage, and 7.3L Power Stroke...
Warranty Guide 1st Printing
Page 11
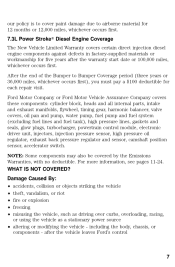
After the end of the Bumper to airborne material for 12 months or ... Emissions Warranties, with no deductible. WHAT IS NOT COVERED? including the body, chassis, or components - Ford Motor Company or Ford Motor Vehicle Assurance Company covers these components: cylinder block, heads and all internal parts, intake and exhaust manifolds...years or 36,000 miles, whichever occurs first), you must pay a $100 deductible for five years after the vehicle leaves Ford's control 7 Damage Caused By: • accidents, collision or objects striking the vehicle • theft, vandalism, or riot...
After the end of the Bumper to airborne material for 12 months or ... Emissions Warranties, with no deductible. WHAT IS NOT COVERED? including the body, chassis, or components - Ford Motor Company or Ford Motor Vehicle Assurance Company covers these components: cylinder block, heads and all internal parts, intake and exhaust manifolds...years or 36,000 miles, whichever occurs first), you must pay a $100 deductible for five years after the vehicle leaves Ford's control 7 Damage Caused By: • accidents, collision or objects striking the vehicle • theft, vandalism, or riot...
Warranty Guide 1st Printing
Page 14
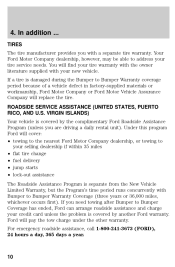
... first). 4. You will pay the tow charge under the other warranty. VIRGIN ISLANDS) Your vehicle is covered by the complimentary Ford Roadside Assistance Program (unless you are driving a daily rental unit). In addition ...TIRES The tire manufacturer provides you need towing after... workmanship, Ford Motor Company or Ford Motor Vehicle Assurance Company will replace the tire. For emergency roadside assistance, call 1-800-241-3673 (FORD), 24 hours a day, 365 days a year. 10 Your Ford Motor Company dealership, however, may be able to Bumper Coverage has ended, Ford can arrange...
... first). 4. You will pay the tow charge under the other warranty. VIRGIN ISLANDS) Your vehicle is covered by the complimentary Ford Roadside Assistance Program (unless you are driving a daily rental unit). In addition ...TIRES The tire manufacturer provides you need towing after... workmanship, Ford Motor Company or Ford Motor Vehicle Assurance Company will replace the tire. For emergency roadside assistance, call 1-800-241-3673 (FORD), 24 hours a day, 365 days a year. 10 Your Ford Motor Company dealership, however, may be able to Bumper Coverage has ended, Ford can arrange...

Owner Guide 1st Printing
Page 27
... shift sound to the left speakers. Push only slightly when inserting a cassette tape (with the open edge to rewind the tape. Once the • Press end of the tape is stopped.
... shift sound to the left speakers. Push only slightly when inserting a cassette tape (with the open edge to rewind the tape. Once the • Press end of the tape is stopped.

Owner Guide 1st Printing
Page 34
... minutes. to activate (and deactivate) Press the Dolby noise reduction. Controls and features Press the control to stop and eject a tape. FF Once the end of the tape plays. Tape eject Press the control to fast forward the tape. control to set the hours. CLOCK SEEK 34
... minutes. to activate (and deactivate) Press the Dolby noise reduction. Controls and features Press the control to stop and eject a tape. FF Once the end of the tape plays. Tape eject Press the control to fast forward the tape. control to set the hours. CLOCK SEEK 34

Owner Guide 1st Printing
Page 35
When the CD reaches the end, the disc player automatically returns to the radio or tape mode. The CD player will illuminate. Scan function Press the SCAN control SCAN to resume ...
When the CD reaches the end, the disc player automatically returns to the radio or tape mode. The CD player will illuminate. Scan function Press the SCAN control SCAN to resume ...

Owner Guide 1st Printing
Page 36
... on your CD player allows you press the SCAN control a second time or eject the CD. This continues until the end of the CD is released, the player will show the end time of the AMS control to locate a previous selection, or the right side to activate (and deactivate) compression adjust. While...
... on your CD player allows you press the SCAN control a second time or eject the CD. This continues until the end of the CD is released, the player will show the end time of the AMS control to locate a previous selection, or the right side to activate (and deactivate) compression adjust. While...

Owner Guide 1st Printing
Page 40
... intervals and downward for slow intervals. The bars of the stalk to the desired interval, low or high speed position. Push the control on the end of varying length are for a longer wash cycle. The wipers will automatically shut off after ten seconds of the windshield wipers, push and release the...
... intervals and downward for slow intervals. The bars of the stalk to the desired interval, low or high speed position. Push the control on the end of varying length are for a longer wash cycle. The wipers will automatically shut off after ten seconds of the windshield wipers, push and release the...

Owner Guide 1st Printing
Page 53
... overdrive. When you to normal (Overdrive) mode. POSITIVE RETENTION FLOOR MAT (IF EQUIPPED) Position the floor mat so that the eyelet is over the pointed end of the retention post and rotate forward to the Automatic Transmission Operation section of the accelerator or the brake pedal. REMOTE ENTRY SYSTEM The remote...
... overdrive. When you to normal (Overdrive) mode. POSITIVE RETENTION FLOOR MAT (IF EQUIPPED) Position the floor mat so that the eyelet is over the pointed end of the retention post and rotate forward to the Automatic Transmission Operation section of the accelerator or the brake pedal. REMOTE ENTRY SYSTEM The remote...

Owner Guide 1st Printing
Page 56
... vehicle 56 All transmitters must be up to 10 meters (33 feet) away from OFF to ON eight times in rapid succession (within 10 seconds) ending in ON. Replacing the batteries The transmitter is required. Typical operating range will allow you purchase additional transmitters (up to confirm programming. A decrease in operating...
... vehicle 56 All transmitters must be up to 10 meters (33 feet) away from OFF to ON eight times in rapid succession (within 10 seconds) ending in ON. Replacing the batteries The transmitter is required. Typical operating range will allow you purchase additional transmitters (up to confirm programming. A decrease in operating...

Owner Guide 1st Printing
Page 70
..., use extensions to change the fit of the shoulder belt across the torso. Safety belt extension assemblies can be obtained from your dealer at the end of operation If...The driver's safety belt is not buckled before the ignition switch is turned to the ON position...The driver's safety belt is...
..., use extensions to change the fit of the shoulder belt across the torso. Safety belt extension assemblies can be obtained from your dealer at the end of operation If...The driver's safety belt is not buckled before the ignition switch is turned to the ON position...The driver's safety belt is...

Owner Guide 1st Printing
Page 74
...assemblies, including retractors, buckles, 74 Confirmation of enabling Belt Minder is currently disabled. 7. Buckle then unbuckle the safety belt three times, ending with the safety belt warning light off, then followed by flashing the safety belt warning light four times per second for three seconds, .../headlamps. 5. Inspect the safety belts to make sure there are not damaged. Buckle then unbuckle the safety belt three times, ending with the safety belt unbuckled. Safety belt maintenance Inspect the safety belt systems periodically to make sure they work properly and are no...
...assemblies, including retractors, buckles, 74 Confirmation of enabling Belt Minder is currently disabled. 7. Buckle then unbuckle the safety belt three times, ending with the safety belt warning light off, then followed by flashing the safety belt warning light four times per second for three seconds, .../headlamps. 5. Inspect the safety belts to make sure there are not damaged. Buckle then unbuckle the safety belt three times, ending with the safety belt unbuckled. Safety belt maintenance Inspect the safety belt systems periodically to make sure they work properly and are no...

Owner Guide 1st Printing
Page 77
... the rear seating positions than in this guide. See your face and torso causing serious injury. Failure to the front end of injury in a collision. 77 Do not modify the front end of injury. Do not put anything on or over the air bag module. Children must always be propelled by the... air bag into your Ford or Lincoln-Mercury dealer. Seating and safety restraints • Recline the seat slightly (one or two degrees...
... the rear seating positions than in this guide. See your face and torso causing serious injury. Failure to the front end of injury in a collision. 77 Do not modify the front end of injury. Do not put anything on or over the air bag module. Children must always be propelled by the... air bag into your Ford or Lincoln-Mercury dealer. Seating and safety restraints • Recline the seat slightly (one or two degrees...
Owner Guide 1st Printing
Page 98
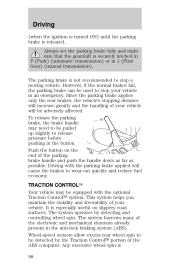
... equipped with the optional Traction Control system. Always set the parking brake fully and make sure that the gearshift is especially useful on the end of the ABS computer. However, if the normal brakes fail, the parking brake can be detected by detecting and controlling wheel spin. To release the...
... equipped with the optional Traction Control system. Always set the parking brake fully and make sure that the gearshift is especially useful on the end of the ABS computer. However, if the normal brakes fail, the parking brake can be detected by detecting and controlling wheel spin. To release the...

Owner Guide 1st Printing
Page 104
... towing a trailer, refer to Driving while you tow in gears one through four. (Overdrive) can be deactivated by pressing the transmission control switch on the end of the gearshift lever with a heavy load. • towing a trailer up or down steep hills. • additional engine braking is useful when: • driving with...
... towing a trailer, refer to Driving while you tow in gears one through four. (Overdrive) can be deactivated by pressing the transmission control switch on the end of the gearshift lever with a heavy load. • towing a trailer up or down steep hills. • additional engine braking is useful when: • driving with...
Owner Guide 1st Printing
Page 125
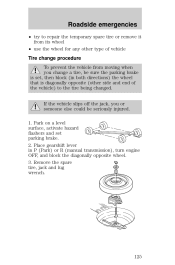
Roadside emergencies • try to repair the temporary spare tire or remove it from its wheel • use the wheel for any other side and end of the vehicle) to the tire being changed. Place gearshift lever in both directions) the wheel that is diagonally opposite (other type of vehicle Tire ...
Roadside emergencies • try to repair the temporary spare tire or remove it from its wheel • use the wheel for any other side and end of the vehicle) to the tire being changed. Place gearshift lever in both directions) the wheel that is diagonally opposite (other type of vehicle Tire ...

Owner Guide 1st Printing
Page 129
Connect the other end of the positive (+) cable to the negative (-) terminal of the assisting battery. - - - - - - + + + + + + 129 Roadside emergencies Connecting the jumper cables 1. Connect the negative (-) cable to the positive (+) terminal of the discharged battery. Note: In the illustrations, lightning bolts are used to the positive (+) terminal of the assisting battery. 3. Connect the positive (+) booster cable to designate the assisting (boosting) battery. 2.
Connect the other end of the positive (+) cable to the negative (-) terminal of the assisting battery. - - - - - - + + + + + + 129 Roadside emergencies Connecting the jumper cables 1. Connect the negative (-) cable to the positive (+) terminal of the discharged battery. Note: In the illustrations, lightning bolts are used to the positive (+) terminal of the assisting battery. 3. Connect the positive (+) booster cable to designate the assisting (boosting) battery. 2.

Owner Guide 1st Printing
Page 130
Start the engine of the gases that surround the battery. 5. Do not connect the end of the second cable to the negative (-) terminal of the battery to an exposed metal part of the booster vehicle and run both engines, or ...
Start the engine of the gases that surround the battery. 5. Do not connect the end of the second cable to the negative (-) terminal of the battery to an exposed metal part of the booster vehicle and run both engines, or ...

Owner Guide 1st Printing
Page 158
... reach of acid contact with skin or eyes, flush immediately with water for optimum driveability and performance. Shield your eyes. Because your hands on the end walls could cause acid to flow through the vent caps, resulting in P (Park) (automatic transmission) or the neutral position (manual transmission), turn off all accessories...
... reach of acid contact with skin or eyes, flush immediately with water for optimum driveability and performance. Shield your eyes. Because your hands on the end walls could cause acid to flow through the vent caps, resulting in P (Park) (automatic transmission) or the neutral position (manual transmission), turn off all accessories...

Owner Guide 1st Printing
Page 179
... and secure with the tabs in the OFF position. 179 With the flat side of the new bulb's plastic base facing upward, insert the glass end of the lamp assembly. Maintenance and care 6. Install the headlamp on and make sure they work properly. Turn the headlamps on vehicle by its plastic...
... and secure with the tabs in the OFF position. 179 With the flat side of the new bulb's plastic base facing upward, insert the glass end of the lamp assembly. Maintenance and care 6. Install the headlamp on and make sure they work properly. Turn the headlamps on vehicle by its plastic...
