
Owner's Manual
Page 18
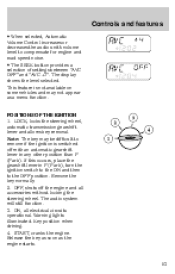
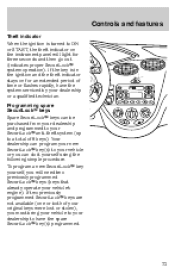
... Registers the kilometers (miles) of the vehicle. Tripmeter Odometer Reset control Fuel gauge Displays approximately how much fuel is in the fuel tank (when the key is in the ON position). The fuel gauge may vary slightly when the vehicle is in motion. The ignition should be less than the advertised... the OFF position when you refuel the vehicle, the fuel gauge will not indicate the new volume until the ignition is being refueled. If the key is not in the OFF position while the vehicle is turned OFF and then ON. 18
... Registers the kilometers (miles) of the vehicle. Tripmeter Odometer Reset control Fuel gauge Displays approximately how much fuel is in the fuel tank (when the key is in the ON position). The fuel gauge may vary slightly when the vehicle is in motion. The ignition should be less than the advertised... the OFF position when you refuel the vehicle, the fuel gauge will not indicate the new volume until the ignition is being refueled. If the key is not in the OFF position while the vehicle is turned OFF and then ON. 18
Owner's Manual
Page 53
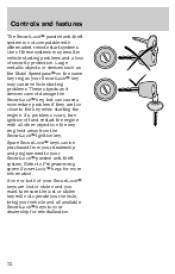
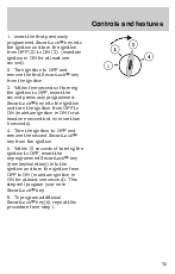
...ON, all accessories without locking the steering wheel. Warning lights illuminated. POSITIONS OF THE IGNITION 1. Remove the key normally. 2. OFF, shuts off with an automatic gearshift lever in P (Park), turn the ignition switch to the ON and then to the OFF position. Controls and features • When ... the steering wheel, automatic transmission gearshift lever and allows key removal. If this occurs, place the gearshift lever in any other position than P (Park). Note: The key may not appear as the engine starts. 1 53 Release the key as soon as a menu function. This feature is ...
...ON, all accessories without locking the steering wheel. Warning lights illuminated. POSITIONS OF THE IGNITION 1. Remove the key normally. 2. OFF, shuts off with an automatic gearshift lever in P (Park), turn the ignition switch to the ON and then to the OFF position. Controls and features • When ... the steering wheel, automatic transmission gearshift lever and allows key removal. If this occurs, place the gearshift lever in any other position than P (Park). Note: The key may not appear as the engine starts. 1 53 Release the key as soon as a menu function. This feature is ...
Owner's Manual
Page 62
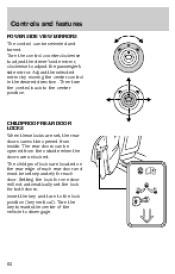
...be opened from inside. Adjust the selected mirror by moving the center control in the desired direction. Turn the control counterclockwise to adjust the driver's side mirror, clockwise to disengage. 62 Turn the key towards the center of each rear door and must be set the lock for each door. Insert... the key and turn the control back to the lock position (key vertical). Setting the lock for one door will not automatically set separately for both doors. CHILDPROOF REAR DOOR LOCKS When these locks are...
...be opened from inside. Adjust the selected mirror by moving the center control in the desired direction. Turn the control counterclockwise to adjust the driver's side mirror, clockwise to disengage. 62 Turn the key towards the center of each rear door and must be set the lock for each door. Insert... the key and turn the control back to the lock position (key vertical). Setting the lock for one door will not automatically set separately for both doors. CHILDPROOF REAR DOOR LOCKS When these locks are...

Owner's Manual
Page 67
... the interior lights if the ignition switch is turned to the RUN position, or if the remote transmitter lock control is in operating range can be up to unlock the door(s). Controls and features .... Note that the illuminated entry system will not function if the dome lamp switch is pressed, or after 20 seconds of the transmitter near the key ring. To replace the battery: 1. The illuminated entry system will allow you to be caused by one coin type three volt lithium battery CR2032 or...
... the interior lights if the ignition switch is turned to the RUN position, or if the remote transmitter lock control is in operating range can be up to unlock the door(s). Controls and features .... Note that the illuminated entry system will not function if the dome lamp switch is pressed, or after 20 seconds of the transmitter near the key ring. To replace the battery: 1. The illuminated entry system will allow you to be caused by one coin type three volt lithium battery CR2032 or...
Owner's Manual
Page 72
If a problem occurs, turn ignition off and restart the engine with aftermarket remote start systems. Use of these systems may cause vehicle starting problems and a loss of your SecuriLockT keys are too close to the key when starting the engine. Spare SecuriLockT keys can cause a momentary... theft system. Refer to Programming spare SecuriLockT keys for reinitialization. 72 Large metallic objects or devices such as your SecuriLockT key may result in vehicle starting problems. These objects and devices cannot damage the SecuriLockT key, but can be purchased from your dealership and...
If a problem occurs, turn ignition off and restart the engine with aftermarket remote start systems. Use of these systems may cause vehicle starting problems and a loss of your SecuriLockT keys are too close to the key when starting the engine. Spare SecuriLockT keys can cause a momentary... theft system. Refer to Programming spare SecuriLockT keys for reinitialization. 72 Large metallic objects or devices such as your SecuriLockT key may result in vehicle starting problems. These objects and devices cannot damage the SecuriLockT key, but can be purchased from your dealership and...
Owner's Manual
Page 73
... 73 To program a new SecuriLockT key yourself, you can program your new SecuriLockT key(s) to your SecuriLockT anti theft system (up to your vehicle's engine). Your dealership can do it yourself using the following simple procedure. If the key is turned to ON or START, the theft... indicator on for three seconds and then go out (indicates proper SecuriLockT system operation). Programming spare SecuriLockT keys Spare SecuriLockT keys can be purchased from your dealership and programmed to...
... 73 To program a new SecuriLockT key yourself, you can program your new SecuriLockT key(s) to your SecuriLockT anti theft system (up to your vehicle's engine). Your dealership can do it yourself using the following simple procedure. If the key is turned to ON or START, the theft... indicator on for three seconds and then go out (indicates proper SecuriLockT system operation). Programming spare SecuriLockT keys Spare SecuriLockT keys can be purchased from your dealership and programmed to...
Owner's Manual
Page 75
...4. To program additional SecuriLockT key(s), repeat this procedure from the ignition. 5. Controls and features 1. Turn ignition to OFF and remove the first SecuriLockT key from OFF to OFF and remove the second SecuriLockT key from step 1. 1 75 Within five seconds of turning the ignition to ON (3)... 2. Within 10 seconds of turning the ignition to OFF, insert the second previously programmed SecuriLockT key into the ignition and turn the ignition from OFF (2) to OFF, insert the unprogrammed SecuriLockT key (new key/valet key) into the ignition and turn the ignition from OFF to ...
...4. To program additional SecuriLockT key(s), repeat this procedure from the ignition. 5. Controls and features 1. Turn ignition to OFF and remove the first SecuriLockT key from OFF to OFF and remove the second SecuriLockT key from step 1. 1 75 Within five seconds of turning the ignition to ON (3)... 2. Within 10 seconds of turning the ignition to OFF, insert the second previously programmed SecuriLockT key into the ignition and turn the ignition from OFF (2) to OFF, insert the unprogrammed SecuriLockT key (new key/valet key) into the ignition and turn the ignition from OFF to ...
Owner's Manual
Page 123
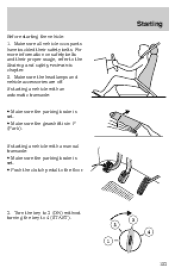
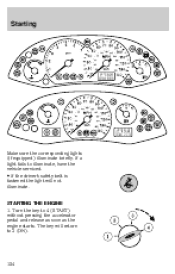
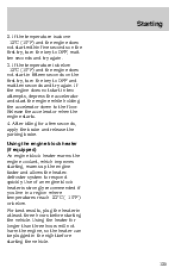
...; Make sure the gearshift is set . • Push the clutch pedal to the floor. 3. Make sure the headlamps and vehicle accessories are off. Turn the key to 3 (ON) without turning the key to the Seating and safety restraints chapter. 2. Make sure all vehicle occupants have buckled their proper usage, refer to 4 (START). 1 123 Starting...
...; Make sure the gearshift is set . • Push the clutch pedal to the floor. 3. Make sure the headlamps and vehicle accessories are off. Turn the key to 3 (ON) without turning the key to the Seating and safety restraints chapter. 2. Make sure all vehicle occupants have buckled their proper usage, refer to 4 (START). 1 123 Starting...
Owner's Manual
Page 124
If a light fails to 4 (START) without pressing the accelerator pedal and release as soon as the engine starts. Turn the key to illuminate, have the vehicle serviced. • If the driver's safety belt is fastened the light will return to 3 (ON). 1 124 The key will not illuminate. Starting Make sure the corresponding lights (if equipped) illuminate briefly. STARTING THE ENGINE 1.
If a light fails to 4 (START) without pressing the accelerator pedal and release as soon as the engine starts. Turn the key to illuminate, have the vehicle serviced. • If the driver's safety belt is fastened the light will return to 3 (ON). 1 124 The key will not illuminate. Starting Make sure the corresponding lights (if equipped) illuminate briefly. STARTING THE ENGINE 1.
Owner's Manual
Page 125
... -12ºC (10ºF) and the engine does not start the engine while holding the accelerator down to OFF and wait ten seconds and try , turn the key to the floor. Starting 2. Release the accelerator when the engine starts. 4. For best results, plug the heater in a region where temperatures reach -23º... in at least three hours before starting , warms up the engine faster and allows the heater defroster system to OFF, wait ten seconds and try , turn the key to respond quickly.
... -12ºC (10ºF) and the engine does not start the engine while holding the accelerator down to OFF and wait ten seconds and try , turn the key to the floor. Starting 2. Release the accelerator when the engine starts. 4. For best results, plug the heater in a region where temperatures reach -23º... in at least three hours before starting , warms up the engine faster and allows the heater defroster system to OFF, wait ten seconds and try , turn the key to respond quickly.

Owner's Manual
Page 134
AUTOMATIC TRANSAXLE OPERATION (if equipped) Brake-shift interlock This vehicle is equipped with the brake pedal depressed: 1. Insert the key to LOCK, then remove the key. 2. Start the vehicle. 134 Apply the parking brake, turn ignition key to release the interlock. Remove the protective cover to N (Neutral). 3. Apply the brake pedal and shift to the...
AUTOMATIC TRANSAXLE OPERATION (if equipped) Brake-shift interlock This vehicle is equipped with the brake pedal depressed: 1. Insert the key to LOCK, then remove the key. 2. Start the vehicle. 134 Apply the parking brake, turn ignition key to release the interlock. Remove the protective cover to N (Neutral). 3. Apply the brake pedal and shift to the...
Owner's Manual
Page 136
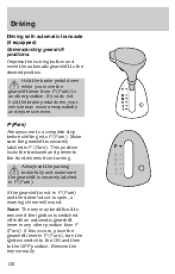
...an automatic gearshift lever in P (Park), turn the ignition switch to the ON and then to a complete stop before shifting into P (Park). P (Park) Always come to the OFF position. Make sure the gearshift is securely latched in P (Park). Remove the key normally. 136 Always set the parking brake...front wheels from P (Park) to another position. If you do not hold the brake pedal down while you move the gearshift lever from turning. If the gearshift is not in P (Park) and the driver's door is switched off with automatic transaxle (if equipped) Understanding gearshift positions...
...an automatic gearshift lever in P (Park), turn the ignition switch to the ON and then to a complete stop before shifting into P (Park). P (Park) Always come to the OFF position. Make sure the gearshift is securely latched in P (Park). Remove the key normally. 136 Always set the parking brake...front wheels from P (Park) to another position. If you do not hold the brake pedal down while you move the gearshift lever from turning. If the gearshift is not in P (Park) and the driver's door is switched off with automatic transaxle (if equipped) Understanding gearshift positions...

Owner's Manual
Page 143
Driving • Type A transaxle (with SPI engine) You shift into R (Reverse) only by moving the gearshift fully to the right against a spring pressure and then rearward into R (Reverse) gear. • Type B transaxle (with Zetec engine) To select reverse gear, lift the locking ring (1) and then move the gearshift fully to position 1. • Remove the ignition key. 1 143 Removing key from ignition • Turn the ignition key to the right and rearward into R (Reverse) gear (2).
Driving • Type A transaxle (with SPI engine) You shift into R (Reverse) only by moving the gearshift fully to the right against a spring pressure and then rearward into R (Reverse) gear. • Type B transaxle (with Zetec engine) To select reverse gear, lift the locking ring (1) and then move the gearshift fully to position 1. • Remove the ignition key. 1 143 Removing key from ignition • Turn the ignition key to the right and rearward into R (Reverse) gear (2).
Owner's Manual
Page 158
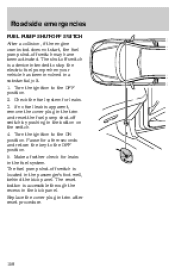
...and reset the fuel pump shut off switch by pushing in the button on the switch. 4. Make a further check for a few seconds and return the key to stop the electric fuel pump when your vehicle has been involved in the fuel system. The fuel pump shut off switch may have been... activated. Turn the ignition to the ON position. Turn the ignition to the OFF position. 2. Pause for leaks in a substantial jolt. 1. Check the fuel system for leaks. 3. The reset button is...
...and reset the fuel pump shut off switch by pushing in the button on the switch. 4. Make a further check for a few seconds and return the key to stop the electric fuel pump when your vehicle has been involved in the fuel system. The fuel pump shut off switch may have been... activated. Turn the ignition to the ON position. Turn the ignition to the OFF position. 2. Pause for leaks in a substantial jolt. 1. Check the fuel system for leaks. 3. The reset button is...
Owner's Manual
Page 218
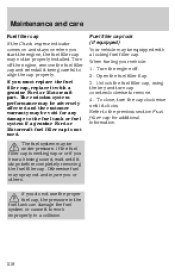
...: 1. The emission system performance may be adversely affected and the customer warranty may be equipped with a genuine Ford or Motorcraft part. Unlock the fuel filler cap, using the key and turn the cap clockwise until it being careful to work improperly in a collision. Refer to the previous section Fuel...the fuel filler cap may not be under pressure. To close, turn cap counterclockwise to the fuel tank or fuel system if a genuine Ford or Motorcraft fuel filler cap is venting vapor or if you or others. Turn the engine off the engine, remove the fuel filler cap and ...
...: 1. The emission system performance may be adversely affected and the customer warranty may be equipped with a genuine Ford or Motorcraft part. Unlock the fuel filler cap, using the key and turn the cap clockwise until it being careful to work improperly in a collision. Refer to the previous section Fuel...the fuel filler cap may not be under pressure. To close, turn cap counterclockwise to the fuel tank or fuel system if a genuine Ford or Motorcraft fuel filler cap is venting vapor or if you or others. Turn the engine off the engine, remove the fuel filler cap and ...


