Owner's Manual
Page 26
... that will help to reduce fogging on your ability to the back seats. • Remove any desired position. • Do not put objects under the hood). • When placing objects on top of your instrument panel, be careful to not place them over the defroster outlets.
... that will help to reduce fogging on your ability to the back seats. • Remove any desired position. • Do not put objects under the hood). • When placing objects on top of your instrument panel, be careful to not place them over the defroster outlets.

Owner's Manual
Page 31
... the windshield. Controls and features • Remove any snow, ice or leaves from the air intake area (at the bottom of the windshield under the hood). • If the vehicle has been parked with the windows open. These objects can block the airflow and reduce your ability to not place them...
... the windshield. Controls and features • Remove any snow, ice or leaves from the air intake area (at the bottom of the windshield under the hood). • If the vehicle has been parked with the windows open. These objects can block the airflow and reduce your ability to not place them...
Owner's Manual
Page 176
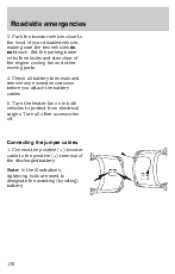
... attach the battery cables. 5. Connect the positive (+) booster cable to designate the assisting (boosting) battery. 176 Turn the heater fan on both vehicles to the hood of the engine cooling fan and other accessories off. Connecting the jumper cables 1.
... attach the battery cables. 5. Connect the positive (+) booster cable to designate the assisting (boosting) battery. 176 Turn the heater fan on both vehicles to the hood of the engine cooling fan and other accessories off. Connecting the jumper cables 1.

Owner's Manual
Page 183
Go to drop into the catch for at the bottom of the instrument panel below the steering wheel. 2. Lift the hood and support it with the engine running in an enclosed space, unless you are sure you disconnect the battery, the engine must relearn" its idle ...conditions before your vehicle will drive properly, as explained under the front of the hood. 3. If you have enough ventilation. • Keep all lit cigarettes, open flames and other lit material away from the battery and all fuel related parts...
Go to drop into the catch for at the bottom of the instrument panel below the steering wheel. 2. Lift the hood and support it with the engine running in an enclosed space, unless you are sure you disconnect the battery, the engine must relearn" its idle ...conditions before your vehicle will drive properly, as explained under the front of the hood. 3. If you have enough ventilation. • Keep all lit cigarettes, open flames and other lit material away from the battery and all fuel related parts...
Owner's Manual
Page 186
Set the parking brake and ensure the gearshift is on level ground. 2. Locate and carefully remove the engine oil level indicator (dipstick). 6. Open the hood. Turn the engine off and wait a few minutes for checking the engine oil. 1. Wipe the indicator clean. Make sure the vehicle is securely latched in P (...
Set the parking brake and ensure the gearshift is on level ground. 2. Locate and carefully remove the engine oil level indicator (dipstick). 6. Open the hood. Turn the engine off and wait a few minutes for checking the engine oil. 1. Wipe the indicator clean. Make sure the vehicle is securely latched in P (...

Owner's Manual
Page 234
Rotate the bulb cover counterclockwise and remove. 4. Make sure that the headlamp control is in OFF position. 2. Install in OFF position. 2. Remove bulb from the grille by turning counterclockwise. 234 Replacing front parking lamp/turn signal bulbs 1. Make sure the headlamp control is in reverse order. Swivel the wire clip to the side and pull out the lamp. 5. Open the hood and remove the bulb socket from electrical connector. 6. Maintenance and care To remove the headlamp bulb: 1. Open the hood. 3.
Rotate the bulb cover counterclockwise and remove. 4. Make sure that the headlamp control is in OFF position. 2. Install in OFF position. 2. Remove bulb from the grille by turning counterclockwise. 234 Replacing front parking lamp/turn signal bulbs 1. Make sure the headlamp control is in reverse order. Swivel the wire clip to the side and pull out the lamp. 5. Open the hood and remove the bulb socket from electrical connector. 6. Maintenance and care To remove the headlamp bulb: 1. Open the hood. 3.
Owner's Manual
Page 241
... feet) from the ground and mark a 2.5 meters (8 foot) horizontal reference line on the low beam headlamps to illuminate the wall or screen and open the hood. 241
... feet) from the ground and mark a 2.5 meters (8 foot) horizontal reference line on the low beam headlamps to illuminate the wall or screen and open the hood. 241

Owner's Manual
Page 242
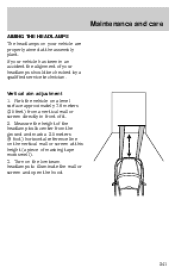
Close the hood and turn the adjuster either clockwise (to adjust down) or counterclockwise (to be adjusted. 5. HORIZONTAL AIM IS NOT REQUIRED FOR THIS VEHICLE AND IS NON ADJUSTABLE. 7. The top of high intensity light. Locate the vertical adjuster on each headlamp, using a 7 mm Allen head wrench, turn off the lamps. 242 On the wall or screen you will need to adjust up), the high intensity area should touch the horizontal reference line, if not, the beam will observe an area of the high intensity area should touch the horizontal reference line. 6. Maintenance and care 4.
Close the hood and turn the adjuster either clockwise (to adjust down) or counterclockwise (to be adjusted. 5. HORIZONTAL AIM IS NOT REQUIRED FOR THIS VEHICLE AND IS NON ADJUSTABLE. 7. The top of high intensity light. Locate the vertical adjuster on each headlamp, using a 7 mm Allen head wrench, turn off the lamps. 242 On the wall or screen you will need to adjust up), the high intensity area should touch the horizontal reference line, if not, the beam will observe an area of the high intensity area should touch the horizontal reference line. 6. Maintenance and care 4.
Owner's Manual
Page 243
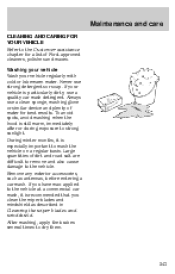
If your vehicle regularly with cold or lukewarm water. Large quantities of water for a list of Ford approved cleaners, polishes and waxes. If you clean the wiper blades and windshield as antennas, before entering a car wash. After washing, apply the brakes ...several times to the vehicle at a commercial car wash, it is particularly dirty, use a quality car wash detergent. To avoid spots, avoid washing when the hood is recommended that you have wax applied to dry them. 243 Washing your vehicle Wash your vehicle is especially important to strong sunlight. During winter...
If your vehicle regularly with cold or lukewarm water. Large quantities of water for a list of Ford approved cleaners, polishes and waxes. If you clean the wiper blades and windshield as antennas, before entering a car wash. After washing, apply the brakes ...several times to the vehicle at a commercial car wash, it is particularly dirty, use a quality car wash detergent. To avoid spots, avoid washing when the hood is recommended that you have wax applied to dry them. 243 Washing your vehicle Wash your vehicle is especially important to strong sunlight. During winter...
Owner's Manual
Page 254
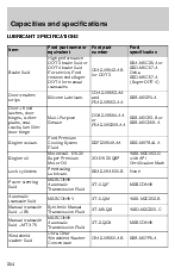
... 3 brake fluid or DOT 4 brake fluid For service, Ford recommends Super DOT 4 for manual transaxles Silicone Lubricant Ford part number Ford specification ESA M6C25 A or ESD M6C57 A Delta ESD M6C57 A (Super DOT 4) ESR M13P4 A Brake fluid C6AZ 19542 AB for DOT 3 Door weather strips Door + hood latches, door hinges, striker plates, seat tracks, fuel...
... 3 brake fluid or DOT 4 brake fluid For service, Ford recommends Super DOT 4 for manual transaxles Silicone Lubricant Ford part number Ford specification ESA M6C25 A or ESD M6C57 A Delta ESD M6C57 A (Super DOT 4) ESR M13P4 A Brake fluid C6AZ 19542 AB for DOT 3 Door weather strips Door + hood latches, door hinges, striker plates, seat tracks, fuel...
Owner's Manual
Page 270
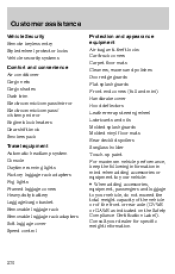
... locks Car/truck covers Carpet floor mats Cleaners, waxes and polishes Door edge guards Flat splash guards Front end covers (full and mini) Handbrake cover Hood deflectors Leather wrap steering wheel Lubricants and oils Molded splash guards Molded vinyl floor mats Rear decklid spoilers Sunglass holder Touch up paint For maximum...
... locks Car/truck covers Carpet floor mats Cleaners, waxes and polishes Door edge guards Flat splash guards Front end covers (full and mini) Handbrake cover Hood deflectors Leather wrap steering wheel Lubricants and oils Molded splash guards Molded vinyl floor mats Rear decklid spoilers Sunglass holder Touch up paint For maximum...

Owner's Manual
Page 275
... lights control ...157 Head restraints ...77 Headlamp control ...19 Headlamps on warning chime ...15 Headlamps, aiming ...241 Headlamps, replacing bulbs ...233 High beams ...11, 20 Hood, opening ...183 I Icons ...2 Identifying your vehicle ...259 Ignition positions ...53 Instrument cluster ...8 15 Instrument cluster gauges ...16 Instrument panel ...6 7 Introduction ...2 ISOFIX attachments ...116 J Jack ...171...
... lights control ...157 Head restraints ...77 Headlamp control ...19 Headlamps on warning chime ...15 Headlamps, aiming ...241 Headlamps, replacing bulbs ...233 High beams ...11, 20 Hood, opening ...183 I Icons ...2 Identifying your vehicle ...259 Ignition positions ...53 Instrument cluster ...8 15 Instrument cluster gauges ...16 Instrument panel ...6 7 Introduction ...2 ISOFIX attachments ...116 J Jack ...171...
Owner's Manual
Page 280
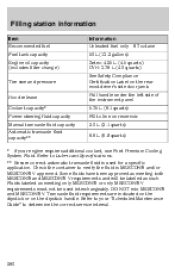
...174; or only MERCON® V requirements must not be used for a specific application. Refer to your engine requires additional coolant, use Ford Premium Cooling System Fluid. Transaxle fluid requirements are indicated on the dipstick or on reservoir. 2.0 L (2.1 quarts) 6.6 L (6.9 quarts... Filling station information Item Recommended fuel Fuel tank capacity Engine oil capacity (includes filter change) Tire size and pressure Hood release Coolant capacity* Power steering fluid capacity Manual transaxle fluid capacity Automatic transaxle fluid capacity** Information Unleaded fuel only ...
...174; or only MERCON® V requirements must not be used for a specific application. Refer to your engine requires additional coolant, use Ford Premium Cooling System Fluid. Transaxle fluid requirements are indicated on the dipstick or on reservoir. 2.0 L (2.1 quarts) 6.6 L (6.9 quarts... Filling station information Item Recommended fuel Fuel tank capacity Engine oil capacity (includes filter change) Tire size and pressure Hood release Coolant capacity* Power steering fluid capacity Manual transaxle fluid capacity Automatic transaxle fluid capacity** Information Unleaded fuel only ...

