
Owner's Manual
Page 172
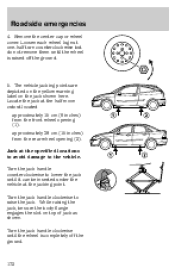
...wheel lug nut one half turn counterclockwise but do not remove them until the wheel is completely off the ground. 5. Remove the center cap or wheel cover. The vehicle jacking points are depicted on the yellow warning label on top of jack as shown. Turn the jack handle clockwise until... (1). - Turn the jack handle clockwise to the vehicle. Turn the jack handle counterclockwise to lower the jack until the wheel is raised off the ground. 172 Locate the jack at the half moon cutout located - approximately 38 cm (15 inches) from the front wheel opening (2). While raising the ...
...wheel lug nut one half turn counterclockwise but do not remove them until the wheel is completely off the ground. 5. Remove the center cap or wheel cover. The vehicle jacking points are depicted on the yellow warning label on top of jack as shown. Turn the jack handle clockwise until... (1). - Turn the jack handle clockwise to the vehicle. Turn the jack handle counterclockwise to lower the jack until the wheel is raised off the ground. 172 Locate the jack at the half moon cutout located - approximately 38 cm (15 inches) from the front wheel opening (2). While raising the ...
Owner's Manual
Page 173
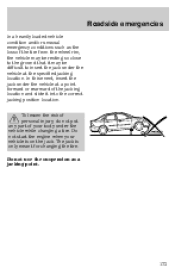
... insert the jack under the vehicle while changing a tire. Roadside emergencies In a heavily loaded vehicle condition and/or unusual emergency conditions such as a jacking point. 173 The jack is on the jack. To lessen the risk of personal injury, do not put any part of the jacking location and slide... it may be difficult to the ground that it into the correct jacking position location. In this event, insert the jack under the vehicle at a point forward or rearward of your vehicle is only meant for changing the tire. Do not ...
... insert the jack under the vehicle while changing a tire. Roadside emergencies In a heavily loaded vehicle condition and/or unusual emergency conditions such as a jacking point. 173 The jack is on the jack. To lessen the risk of personal injury, do not put any part of the jacking location and slide... it may be difficult to the ground that it into the correct jacking position location. In this event, insert the jack under the vehicle at a point forward or rearward of your vehicle is only meant for changing the tire. Do not ...

Owner's Manual
Page 177
Roadside emergencies 2. Connect the other end of the positive (+) cable to the positive (+) terminal of the assisting battery. 4. Connect the negative (-) cable to an exposed metal part of the stalled vehicle's engine, away from the battery. Do not use fuel lines, engine rocker covers, or the intake manifold as grounding points. 177 Make the final connection of the negative (-) cable to the negative (-) terminal of the assisting battery. 3.
Roadside emergencies 2. Connect the other end of the positive (+) cable to the positive (+) terminal of the assisting battery. 4. Connect the negative (-) cable to an exposed metal part of the stalled vehicle's engine, away from the battery. Do not use fuel lines, engine rocker covers, or the intake manifold as grounding points. 177 Make the final connection of the negative (-) cable to the negative (-) terminal of the assisting battery. 3.
