

Owner Guide 1st Printing
Page 40
... four seconds duration between programs. Rewind The rewind control works in tape mode. • In the tape mode, tape direction will automatically reverse when the end of Dolby Laboratories Licensing Corporation. 40 control to play mode when the AMS circuit senses a blank section on the tape. In order to stop and...
... four seconds duration between programs. Rewind The rewind control works in tape mode. • In the tape mode, tape direction will automatically reverse when the end of Dolby Laboratories Licensing Corporation. 40 control to play mode when the AMS circuit senses a blank section on the tape. In order to stop and...
Owner Guide 1st Printing
Page 45
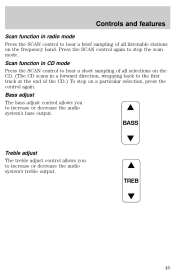
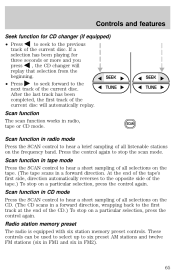
... SCAN control again to increase or decrease the audio system's bass output. Scan function in a forward direction, wrapping back to the first track at the end of all listenable stations on a particular selection, press the control again. Controls and features Scan function in radio mode Press the SCAN control to hear...
... SCAN control again to increase or decrease the audio system's bass output. Scan function in a forward direction, wrapping back to the first track at the end of all listenable stations on a particular selection, press the control again. Controls and features Scan function in radio mode Press the SCAN control to hear...
Owner Guide 1st Printing
Page 52
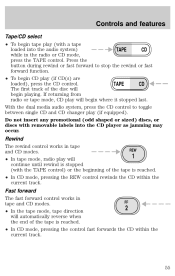
.... 52 Refer to Tune adjust or Seek function for more information on a particular selection, press the control again. REW FF SIDE 1-2 COMP SHUFFLE 1 2 3 4 5 6 3. At the end of the tape's first side, direction automatically reverses to the opposite side of the tape.) To stop on the control you selected. Select a station. Press... control to hear a short sampling of all selections on the CD. (The CD scans in a forward direction, wrapping back to the first track at the end of the CD.) To stop on selecting a station.
.... 52 Refer to Tune adjust or Seek function for more information on a particular selection, press the control again. REW FF SIDE 1-2 COMP SHUFFLE 1 2 3 4 5 6 3. At the end of the tape's first side, direction automatically reverses to the opposite side of the tape.) To stop on the control you selected. Select a station. Press... control to hear a short sampling of all selections on the CD. (The CD scans in a forward direction, wrapping back to the first track at the end of the CD.) To stop on selecting a station.
Owner Guide 1st Printing
Page 55
... into the audio system) TAPE CD while in FF tape and CD modes. 2 • In the tape mode, tape direction will automatically reverse when the end of the tape is reached. • In CD mode, pressing the REW control rewinds the CD within the current track. 55 Press the button during...
... into the audio system) TAPE CD while in FF tape and CD modes. 2 • In the tape mode, tape direction will automatically reverse when the end of the tape is reached. • In CD mode, pressing the REW control rewinds the CD within the current track. 55 Press the button during...
Owner Guide 1st Printing
Page 65
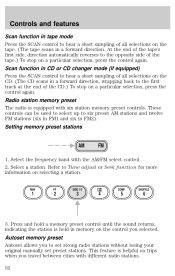
... radio is equipped with six station memory preset controls. Scan function The scan function works in FM2). 65 Scan function in a forward direction. At the end of the tape's first side, direction automatically reverses to the opposite side of the tape.) To stop on the tape. (The tape scans in tape... TUNE next track of the CD.) To stop the scan mode. These controls can be used to select up to the first track at the end of the current disc. Controls and features Seek function for three seconds or more and you press , the CD changer will automatically replay. SEEK TUNE...
... radio is equipped with six station memory preset controls. Scan function The scan function works in FM2). 65 Scan function in a forward direction. At the end of the tape's first side, direction automatically reverses to the opposite side of the tape.) To stop on the tape. (The tape scans in tape... TUNE next track of the CD.) To stop the scan mode. These controls can be used to select up to the first track at the end of the current disc. Controls and features Seek function for three seconds or more and you press , the CD changer will automatically replay. SEEK TUNE...
Owner Guide 1st Printing
Page 69
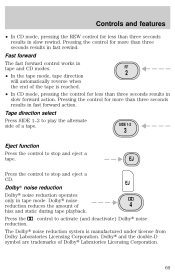
... control for more than three seconds results in FF tape and CD modes. 2 • In the tape mode, tape direction will automatically reverse when the end of hiss and static during tape playback. Press the control to stop and eject a tape. SIDE 1-2 3 Eject function Press the control to play the alternate...
... control for more than three seconds results in FF tape and CD modes. 2 • In the tape mode, tape direction will automatically reverse when the end of hiss and static during tape playback. Press the control to stop and eject a tape. SIDE 1-2 3 Eject function Press the control to play the alternate...
Owner Guide 1st Printing
Page 88
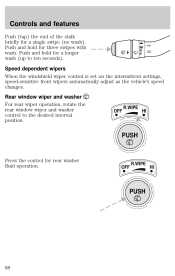
... wiper and washer control to ten seconds). OFF R.WIPE HI PUSH Press the control for three swipes with wash. Controls and features Push (tap) the end of the stalk briefly for a longer wash (up to the desired interval position.
... wiper and washer control to ten seconds). OFF R.WIPE HI PUSH Press the control for three swipes with wash. Controls and features Push (tap) the end of the stalk briefly for a longer wash (up to the desired interval position.
Owner Guide 1st Printing
Page 95
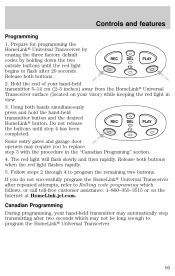
... until step 4 has been completed. Using both buttons when the red light flashes rapidly. 5. The red light will flash slowly and then rapidly. Hold the end of your hand-held transmitter may not be long enough to program the HomeLink Universal Transceiver. 95 Do not release the buttons until the...
... until step 4 has been completed. Using both buttons when the red light flashes rapidly. 5. The red light will flash slowly and then rapidly. Hold the end of your hand-held transmitter may not be long enough to program the HomeLink Universal Transceiver. 95 Do not release the buttons until the...
Owner Guide 1st Printing
Page 98
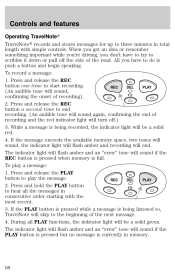
... light will flash amber and recording will be a solid red. 4. Press and hold the PLAY button to hear all PLAY functions, the indicator light will end. The indicator light will flash amber and an "error" tone will turn off the side of the road. To record a message: 1. Press and release ...the REC button a second time to end recording. (An audible tone will sound again, confirming the end of recording and the red indicator light will sound if the PLAY button is pressed but no message is being listened...
... light will flash amber and recording will be a solid red. 4. Press and hold the PLAY button to hear all PLAY functions, the indicator light will end. The indicator light will flash amber and an "error" tone will turn off the side of the road. To record a message: 1. Press and release ...the REC button a second time to end recording. (An audible tone will sound again, confirming the end of recording and the red indicator light will sound if the PLAY button is pressed but no message is being listened...
Owner Guide 1st Printing
Page 105
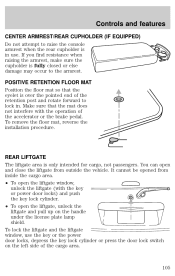
... liftgate, unlock the liftgate and pull up on the left side of the cargo area. 105 REAR LIFTGATE The liftgate area is over the pointed end of the accelerator or the brake pedal. If you find resistance when raising the armrest, make sure the cupholder is in . Controls and features CENTER...
... liftgate, unlock the liftgate and pull up on the left side of the cargo area. 105 REAR LIFTGATE The liftgate area is over the pointed end of the accelerator or the brake pedal. If you find resistance when raising the armrest, make sure the cupholder is in . Controls and features CENTER...
Owner Guide 1st Printing
Page 106
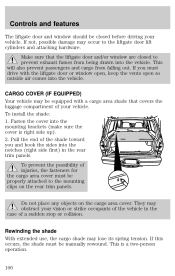
... the cargo area cover must be properly attached to prevent exhaust fumes from falling out. If not, possible damage may obstruct your vehicle. Pull the end of the vehicle in the rear trim panels. Do not place any objects on the rear trim panels. If this occurs, the shade must drive...
... the cargo area cover must be properly attached to prevent exhaust fumes from falling out. If not, possible damage may obstruct your vehicle. Pull the end of the vehicle in the rear trim panels. Do not place any objects on the rear trim panels. If this occurs, the shade must drive...
Owner Guide 1st Printing
Page 107
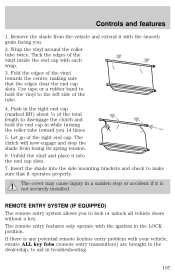
.... Let go of the tube. 4. Tuck the edges of the total length to disengage the clutch and hold the vinyl to hold the end cap in while turning the roller tube toward you 14 times. 5. The clutch will now engage and stop or accident if it operates properly. The ... a sudden stop the shade from the vehicle and extend it into the side mounting brackets and check to make sure that the edges clear the end cap slots. REMOTE ENTRY SYSTEM (IF EQUIPPED) The remote entry system allows you . 2. Unfold the vinyl and place it with your vehicle, ensure ALL key...
.... Let go of the tube. 4. Tuck the edges of the total length to disengage the clutch and hold the vinyl to hold the end cap in while turning the roller tube toward you 14 times. 5. The clutch will now engage and stop or accident if it operates properly. The ... a sudden stop the shade from the vehicle and extend it into the side mounting brackets and check to make sure that the edges clear the end cap slots. REMOTE ENTRY SYSTEM (IF EQUIPPED) The remote entry system allows you . 2. Unfold the vinyl and place it with your vehicle, ensure ALL key...
Owner Guide 1st Printing
Page 111
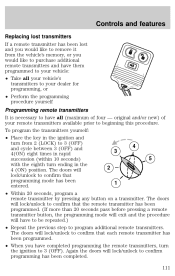
... remote transmitters, turn the ignition to 3 (OFF) 4 and cycle between 3 (OFF) and 3 4(ON) eight times in rapid 5 succession (within 10 seconds) with the eighth turn ending in the ignition and turn from the vehicle's memory, or you would like to remove it from 2 (LOCK) to 3 (OFF). The doors will lock/unlock...
... remote transmitters, turn the ignition to 3 (OFF) 4 and cycle between 3 (OFF) and 3 4(ON) eight times in rapid 5 succession (within 10 seconds) with the eighth turn ending in the ignition and turn from the vehicle's memory, or you would like to remove it from 2 (LOCK) to 3 (OFF). The doors will lock/unlock...
Owner Guide 1st Printing
Page 130
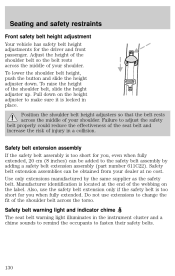
Position the shoulder belt height adjusters so that the belt rests across the middle of your dealer at the end of the webbing on the height adjuster to the safety belt assembly by the same supplier as the safety belt. Manufacturer identification is located at ...
Position the shoulder belt height adjusters so that the belt rests across the middle of your dealer at the end of the webbing on the height adjuster to the safety belt assembly by the same supplier as the safety belt. Manufacturer identification is located at ...
Owner Guide 1st Printing
Page 134
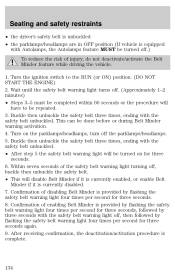
... to the RUN (or ON) position. (DO NOT START THE ENGINE) 2. Turn on for three seconds again. 9. Buckle then unbuckle the safety belt three times, ending with Autolamps, the Autolamps feature MUST be repeated. 3. Confirmation of the safety belt warning light turning off , then followed by flashing the safety belt warning...
... to the RUN (or ON) position. (DO NOT START THE ENGINE) 2. Turn on for three seconds again. 9. Buckle then unbuckle the safety belt three times, ending with Autolamps, the Autolamps feature MUST be repeated. 3. Confirmation of the safety belt warning light turning off , then followed by flashing the safety belt warning...

Owner Guide 1st Printing
Page 162
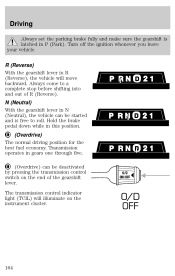
...) provides more engine braking than (Overdrive) and is desired. Transmission operates in position. The O/D OFF indicator will illuminate on steep downgrades. Not shown on the end of the gearshift lever with a heavy load. • towing a trailer up on slippery roads or to switch.
...) provides more engine braking than (Overdrive) and is desired. Transmission operates in position. The O/D OFF indicator will illuminate on steep downgrades. Not shown on the end of the gearshift lever with a heavy load. • towing a trailer up on slippery roads or to switch.
Owner Guide 1st Printing
Page 164
... position. (Overdrive) The normal driving position for the best fuel economy. Hold the brake pedal down while in R (Reverse), the vehicle will illuminate on the end of R (Reverse).
... position. (Overdrive) The normal driving position for the best fuel economy. Hold the brake pedal down while in R (Reverse), the vehicle will illuminate on the end of R (Reverse).
Owner Guide 1st Printing
Page 165
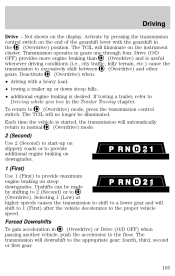
..., refer to Driving while you tow in (Overdrive) or Drive (O/D OFF) when passing another vehicle, push the accelerator to provide maximum engine braking on the end of the gearshift lever with a heavy load. • towing a trailer up on slippery roads or to provide additional engine braking on downgrades. 1 (First) Use 1 (First...
..., refer to Driving while you tow in (Overdrive) or Drive (O/D OFF) when passing another vehicle, push the accelerator to provide maximum engine braking on the end of the gearshift lever with a heavy load. • towing a trailer up on slippery roads or to provide additional engine braking on downgrades. 1 (First) Use 1 (First...
Owner Guide 1st Printing
Page 188
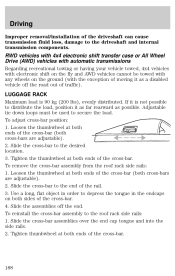
... is 90 kg (200 lbs), evenly distributed. Loosen the thumbwheel at both cross-bars are adjustable). 2. Tighten the thumbwheel at both ends of the cross-bar (both ends of the cross-bar. Loosen the thumbwheel at both cross-bars are adjustable). 2. Slide the assemblies off the road out of moving ...on the ground (with the exception of traffic). Slide the cross-bar to the roof rack side rails: 1. Slide the cross-bar to the end of the driveshaft can cause transmission fluid loss, damage to secure the load. To reinstall the cross-bar assembly to the desired location. 3. Tighten...
... is 90 kg (200 lbs), evenly distributed. Loosen the thumbwheel at both cross-bars are adjustable). 2. Tighten the thumbwheel at both ends of the cross-bar (both ends of the cross-bar. Loosen the thumbwheel at both cross-bars are adjustable). 2. Slide the assemblies off the road out of moving ...on the ground (with the exception of traffic). Slide the cross-bar to the roof rack side rails: 1. Slide the cross-bar to the end of the driveshaft can cause transmission fluid loss, damage to secure the load. To reinstall the cross-bar assembly to the desired location. 3. Tighten...
Owner Guide 1st Printing
Page 200
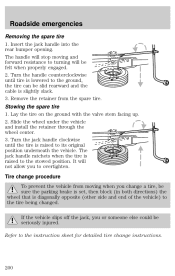
... wheel that is raised to the tire being changed. Refer to overtighten. The jack handle ratchets when the tire is diagonally opposite (other side and end of the vehicle) to the stowed position. Remove the retainer from moving and forward resistance to its original position underneath the vehicle. Tire change a tire...
... wheel that is raised to the tire being changed. Refer to overtighten. The jack handle ratchets when the tire is diagonally opposite (other side and end of the vehicle) to the stowed position. Remove the retainer from moving and forward resistance to its original position underneath the vehicle. Tire change a tire...