
Owner's Manual
Page 2
... risk of personal injury and prevent possible damage to others, your vehicle and its constituents, and certain vehicle components contain or emit chemicals known to locate the appropriate section which may be required by California law: CALIFORNIA Proposition 65 Warning Engine exhaust, some if its equipment. 2 ICONS Indicates a safety alert. Please...
... risk of personal injury and prevent possible damage to others, your vehicle and its constituents, and certain vehicle components contain or emit chemicals known to locate the appropriate section which may be required by California law: CALIFORNIA Proposition 65 Warning Engine exhaust, some if its equipment. 2 ICONS Indicates a safety alert. Please...

Owner's Manual
Page 21
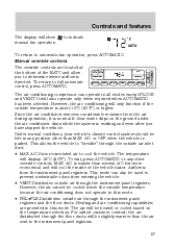
... OFF. • Foglamps are not controlled by the autolamps. Never adjust the accelerator and brake pedal with feet on pedals or while the vehicle is located on the foglamps, you must be in the ON position to the OFF position. Controls and features • To turn autolamps off, rotate the control...
... OFF. • Foglamps are not controlled by the autolamps. Never adjust the accelerator and brake pedal with feet on pedals or while the vehicle is located on the foglamps, you must be in the ON position to the OFF position. Controls and features • To turn autolamps off, rotate the control...
Owner's Manual
Page 23
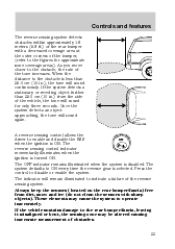
... only three seconds. As you move closer to indicate a failure of the reverse sensing system. The system defaults to operate inaccurately. Always keep the sensors (located on the rear bumper/fascia) free from the side of the vehicle, the tone will sound again. Press the control to enable and disable the...
... only three seconds. As you move closer to indicate a failure of the reverse sensing system. The system defaults to operate inaccurately. Always keep the sensors (located on the rear bumper/fascia) free from the side of the vehicle, the tone will sound again. Press the control to enable and disable the...

Owner's Manual
Page 24
Do not plug optional electrical accessories into the cigarette lighter. A second auxiliary power point is accessible from the rear seats. 24 The power point is located on the instrument panel. Controls and features AUXILIARY POWER POINT The auxiliary power point is located on the left rear side of the console (behind the driver seat). Use the power point.
Do not plug optional electrical accessories into the cigarette lighter. A second auxiliary power point is accessible from the rear seats. 24 The power point is located on the instrument panel. Controls and features AUXILIARY POWER POINT The auxiliary power point is located on the left rear side of the console (behind the driver seat). Use the power point.
Owner's Manual
Page 27
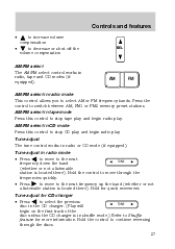
... to continue reversing through the frequencies quickly. Press the control to the next frequency up the band (whether or not • Press a listenable station is located there). Tune adjust in radio, tape and CD modes (if equipped). to move to switch between AM, FM1 or FM2 memory preset stations. Controls and.../FM select control works in radio mode • Press to move to the next TUNE frequency down the band (whether or not a listenable station is located there). AM/FM select in tape mode Press this control to stop tape play and begin on the first track of the disc unless the...
... to continue reversing through the frequencies quickly. Press the control to the next frequency up the band (whether or not • Press a listenable station is located there). Tune adjust in radio, tape and CD modes (if equipped). to move to switch between AM, FM1 or FM2 memory preset stations. Controls and.../FM select control works in radio mode • Press to move to the next TUNE frequency down the band (whether or not a listenable station is located there). AM/FM select in tape mode Press this control to stop tape play and begin on the first track of the disc unless the...

Owner's Manual
Page 37
... adjust The tune control works in radio mode • Press to move to the next frequency up the band (whether or not a listenable station is located there). Hold for quick movement. 37 Controls and features The recommended level for speed sensitive volume is from level 1 through the frequencies quickly. • Press... to move to the next TUNE frequency down the band (whether or not a listenable station is located there). Tune adjust in radio or CD changer mode (if equipped).
... adjust The tune control works in radio mode • Press to move to the next frequency up the band (whether or not a listenable station is located there). Hold for quick movement. 37 Controls and features The recommended level for speed sensitive volume is from level 1 through the frequencies quickly. • Press... to move to the next TUNE frequency down the band (whether or not a listenable station is located there). Tune adjust in radio or CD changer mode (if equipped).

Owner's Manual
Page 47
Controls and features CD changer (if equipped) Your CD changer is located in the center console. Pull the lever to access the CD changer magazine. Slide the door to remove a CD tray from the magazine. 47 Press to eject the magazine. 1.
Controls and features CD changer (if equipped) Your CD changer is located in the center console. Pull the lever to access the CD changer magazine. Slide the door to remove a CD tray from the magazine. 47 Press to eject the magazine. 1.
Owner's Manual
Page 55
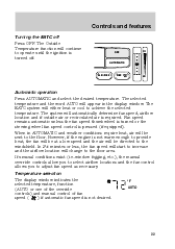
...speed control is not desired. When in the display window. The selected temperature and the word AUTO will automatically determine fan speed, airflow location and if outside air or recirculated air is turned off Press OFF. In 31⁄2 minutes or less, the fan speed will ...be directed to achieve the selected temperature. If unusual conditions exist (i.e.-window fogging, etc.), the manual override controls allow you to select airflow locations and the fan control allows you to operate until the ignition is required. The Outside Temperature function will be at a low speed and...
...speed control is not desired. When in the display window. The selected temperature and the word AUTO will automatically determine fan speed, airflow location and if outside air or recirculated air is turned off Press OFF. In 31⁄2 minutes or less, the fan speed will ...be directed to achieve the selected temperature. If unusual conditions exist (i.e.-window fogging, etc.), the manual override controls allow you to select airflow locations and the fan control allows you to operate until the ignition is required. The Outside Temperature function will be at a low speed and...
Owner's Manual
Page 57
... the air conditioner drain while the system is working and even after you to the instrument panel registers. 57 Heating and air conditioning capabilities are located at the bottom of the vehicle faster. The air will be slightly warmer than MAX A/C or OFF when the vehicle is directed. to indicate ˚...
... the air conditioner drain while the system is working and even after you to the instrument panel registers. 57 Heating and air conditioning capabilities are located at the bottom of the vehicle faster. The air will be slightly warmer than MAX A/C or OFF when the vehicle is directed. to indicate ˚...

Owner's Manual
Page 59
... before driving. Do not place objects on top of the vehicle. The readings that will interfere with the airflow to differences in vehicle and station locations. Higher readings may not agree with the windows closed during hot weather, the air conditioner will reduce fogging on top of the instrument panel, as...
... before driving. Do not place objects on top of the vehicle. The readings that will interfere with the airflow to differences in vehicle and station locations. Higher readings may not agree with the windows closed during hot weather, the air conditioner will reduce fogging on top of the instrument panel, as...

Owner's Manual
Page 60
Besides the driver's control panel for the front seat occupants, the second row auxiliary A/C-heater controls allow the rear passengers to quickly heat or cool the vehicle. Your auxiliary A/C controls may be located in the floor console. Controls and features Auxiliary A/C-heater controls (if equipped) The auxiliary A/C-heater feature provides increased capacity to control the temperature in the rear of the vehicle through a second control panel above the second row, or in the floor console, R OO FL L NE PA F OF AR RE HI RM WA OL CO 60
Besides the driver's control panel for the front seat occupants, the second row auxiliary A/C-heater controls allow the rear passengers to quickly heat or cool the vehicle. Your auxiliary A/C controls may be located in the floor console. Controls and features Auxiliary A/C-heater controls (if equipped) The auxiliary A/C-heater feature provides increased capacity to control the temperature in the rear of the vehicle through a second control panel above the second row, or in the floor console, R OO FL L NE PA F OF AR RE HI RM WA OL CO 60

Owner's Manual
Page 61
... the fan speed control knob to operate. When the auxiliary A/C-heater control is set to PANEL, airflow occurs from the third row seat floor vent located in the overhead console. In order for the auxiliary A/C-heater to the desired speed. Controls and features or...
... the fan speed control knob to operate. When the auxiliary A/C-heater control is set to PANEL, airflow occurs from the third row seat floor vent located in the overhead console. In order for the auxiliary A/C-heater to the desired speed. Controls and features or...

Owner's Manual
Page 69
Controls and features Deactivating overdrive Press the Transmission Control Switch (TCS) located on the end of your vehicle's overhead console will vary according to your vehicle, the transmission will (Overdrive) mode. When you shut off and re-...
Controls and features Deactivating overdrive Press the Transmission Control Switch (TCS) located on the end of your vehicle's overhead console will vary according to your vehicle, the transmission will (Overdrive) mode. When you shut off and re-...
Owner's Manual
Page 72
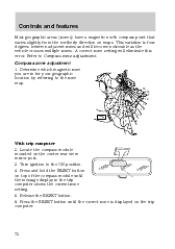
... zone adjustment. Press and hold the RESET button on the trip computer. 72 Press the RESET button until the message display in for your geographic location by referring to the zone map. 1 2 3 13 4 12 5 6 7 8 9 10 11 15 14 With trip computer 2. Determine which magnetic zone you are in the trip computer... rear view mirror post. 3. Release the RESET button. 6. A correct zone setting will become noticeable as the vehicle crosses multiple zones. Refer to the ON position. 4. Locate the compass module mounted on maps.
... zone adjustment. Press and hold the RESET button on the trip computer. 72 Press the RESET button until the message display in for your geographic location by referring to the zone map. 1 2 3 13 4 12 5 6 7 8 9 10 11 15 14 With trip computer 2. Determine which magnetic zone you are in the trip computer... rear view mirror post. 3. Release the RESET button. 6. A correct zone setting will become noticeable as the vehicle crosses multiple zones. Refer to the ON position. 4. Locate the compass module mounted on maps.

Owner's Manual
Page 78
... for up to engage the childproof lock. Setting the lock for one door will not automatically set separately for both doors. The childproof locks are located on rear edge of the control. U L CHILDPROOF DOOR LOCKS When these locks are set, the rear doors cannot be set the lock for each rear...
... for up to engage the childproof lock. Setting the lock for one door will not automatically set separately for both doors. The childproof locks are located on rear edge of the control. U L CHILDPROOF DOOR LOCKS When these locks are set, the rear doors cannot be set the lock for each rear...
Owner's Manual
Page 84
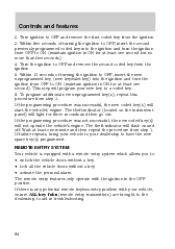
... key into the ignition and turn the ignition from the ignition. 3. This step will light for three seconds and then go out. The theft indicator (located on and off. If the programming procedure was successful, the new coded key(s) will flash on the instrument panel) will program your new key to...
... key into the ignition and turn the ignition from the ignition. 3. This step will light for three seconds and then go out. The theft indicator (located on and off. If the programming procedure was successful, the new coded key(s) will flash on the instrument panel) will program your new key to...
Owner's Manual
Page 90
... . Enter each digit within five seconds of the new code. You can easily figure out these types of the controls to confirm the procedure is located: • on the keyless entry keypad, press the middle of codes. If a second personal code is entered, the module will chirp once to ensure a good...
... . Enter each digit within five seconds of the new code. You can easily figure out these types of the controls to confirm the procedure is located: • on the keyless entry keypad, press the middle of codes. If a second personal code is entered, the module will chirp once to ensure a good...

Owner's Manual
Page 92
... of vehicle to help limit head motion in a collision or sudden stop. 92 Do not pile cargo higher than the seatbacks to that it is located directly behind your head restraints, lift the head restraint so that position as close to reduce the risk of vehicle to raise and lower the...
... of vehicle to help limit head motion in a collision or sudden stop. 92 Do not pile cargo higher than the seatbacks to that it is located directly behind your head restraints, lift the head restraint so that position as close to reduce the risk of vehicle to raise and lower the...
Owner's Manual
Page 95
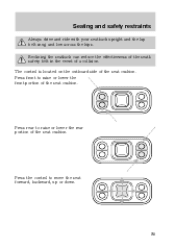
Press rear to raise or lower the rear portion of the seat cushion. Seating and safety restraints Always drive and ride with your seatback upright and the lap belt snug and low across the hips. Press front to move the seat forward, backward, up or down. 95 The control is located on the outboard side of a collision. Reclining the seatback can reduce the effectiveness of the seat's safety belt in the event of the seat cushion. Press the control to raise or lower the front portion of the seat cushion.
Press rear to raise or lower the rear portion of the seat cushion. Seating and safety restraints Always drive and ride with your seatback upright and the lap belt snug and low across the hips. Press front to move the seat forward, backward, up or down. 95 The control is located on the outboard side of a collision. Reclining the seatback can reduce the effectiveness of the seat's safety belt in the event of the seat cushion. Press the control to raise or lower the front portion of the seat cushion.
Owner's Manual
Page 96
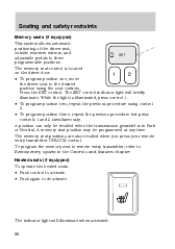
...: • Push control to activate. • Push again to three programmable positions. A position can only be programmed at any time. The memory seat control is located on the driver door. 1 2 • To program position one, move the driver seat to Remote entry system in Park or Neutral. The SET control indicator...
...: • Push control to activate. • Push again to three programmable positions. A position can only be programmed at any time. The memory seat control is located on the driver door. 1 2 • To program position one, move the driver seat to Remote entry system in Park or Neutral. The SET control indicator...


