

Owner's Manual
Page 5
Introduction Vehicle Symbol Glossary Child Safety Door Lock/Unlock Panic Alarm Engine Coolant Interior Luggage Compartment Release Symbol Engine Oil Engine Coolant Temperature Battery Do Not Open When Hot Avoid Smoking, Flames, or Sparks Explosive Gas Battery Acid Fan Warning Maintain Correct Fluid Level Engine Air Filter Jack MAX MIN Power Steering Fluid Emission System Passenger Compartment Air Filter 5
Introduction Vehicle Symbol Glossary Child Safety Door Lock/Unlock Panic Alarm Engine Coolant Interior Luggage Compartment Release Symbol Engine Oil Engine Coolant Temperature Battery Do Not Open When Hot Avoid Smoking, Flames, or Sparks Explosive Gas Battery Acid Fan Warning Maintain Correct Fluid Level Engine Air Filter Jack MAX MIN Power Steering Fluid Emission System Passenger Compartment Air Filter 5

Owner's Manual
Page 11
... ON position and the engine is turned to SecuriLock anti-theft system in this chapter for more information. 11 The light also illuminates when the battery is armed. passive Oil pressure/Engine coolant This light will come on when the key is in the ON position and the: • engine coolant...
... ON position and the engine is turned to SecuriLock anti-theft system in this chapter for more information. 11 The light also illuminates when the battery is armed. passive Oil pressure/Engine coolant This light will come on when the key is in the ON position and the: • engine coolant...

Owner's Manual
Page 16
... shows the engine oil pressure in the Maintenance and care chapter). Add oil if needed (refer to Engine oil in the system. RPMX1000 Battery voltage gauge This shows the battery voltage when the ignition is correct, have the vehicle's electrical system checked as soon as safely L possible and switch off the engine...
... shows the engine oil pressure in the Maintenance and care chapter). Add oil if needed (refer to Engine oil in the system. RPMX1000 Battery voltage gauge This shows the battery voltage when the ignition is correct, have the vehicle's electrical system checked as soon as safely L possible and switch off the engine...

Owner's Manual
Page 86
... meters (33 feet) away from your vehicle. DO NOT TAKE THE FRONT PART OF THE TRANSMITTER APART. 2. Place the positive (+) side of new battery in operating range can be up to become deprogrammed from your vehicle. Refer to the vehicle To replace the... battery: 1. Replacement of the transmitter near the key ring. The remote transmitter should operate normally after battery replacement. 86 Snap the two halves back together. Twist a thin coin between the two halves of...
... meters (33 feet) away from your vehicle. DO NOT TAKE THE FRONT PART OF THE TRANSMITTER APART. 2. Place the positive (+) side of new battery in operating range can be up to become deprogrammed from your vehicle. Refer to the vehicle To replace the... battery: 1. Replacement of the transmitter near the key ring. The remote transmitter should operate normally after battery replacement. 86 Snap the two halves back together. Twist a thin coin between the two halves of...

Owner's Manual
Page 88
... the SET control. The inside lights will turn off the interior lights if the ignition switch is turned to utilize the memory recall positions. The battery save feature will briefly illuminate. If the procedure needs to recall previously stored positions with the dimmer control or • any door is pressed.
... the SET control. The inside lights will turn off the interior lights if the ignition switch is turned to utilize the memory recall positions. The battery save feature will briefly illuminate. If the procedure needs to recall previously stored positions with the dimmer control or • any door is pressed.

Owner's Manual
Page 144
...transmission) To account for customer driving habits and conditions, your 4R100 automatic transmission electronically controls the shift quality by power from the battery. Optimal shifting will downshift to the appropriate gear: third, second or first gear. When Four-wheel drive (4WD) is engaged, ... important information regarding safe operation of the transfer case, increased tire wear and decreased fuel economy. 144 When the battery is disconnected or a new battery is installed, the transmission must be selected when additional driving power is moving, the system will not engage and ...
...transmission) To account for customer driving habits and conditions, your 4R100 automatic transmission electronically controls the shift quality by power from the battery. Optimal shifting will downshift to the appropriate gear: third, second or first gear. When Four-wheel drive (4WD) is engaged, ... important information regarding safe operation of the transfer case, increased tire wear and decreased fuel economy. 144 When the battery is disconnected or a new battery is installed, the transmission must be selected when additional driving power is moving, the system will not engage and ...
Owner's Manual
Page 153
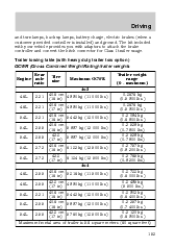
... kg (0-7 800 lbs) 0-3 538 kg (0-7 800 lbs) 0-3 757 kg (0-8 300 lbs.) 0-3 765 kg (0-8 300 lbs) Trailer weight range (0 - Driving and turn lamps, back up lamps, battery charge, electric brakes (when a customer provided controller is 5.6 square meters (60 square feet) 153
... kg (0-7 800 lbs) 0-3 538 kg (0-7 800 lbs) 0-3 757 kg (0-8 300 lbs.) 0-3 765 kg (0-8 300 lbs) Trailer weight range (0 - Driving and turn lamps, back up lamps, battery charge, electric brakes (when a customer provided controller is 5.6 square meters (60 square feet) 153
Owner's Manual
Page 164
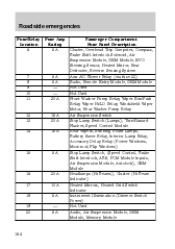
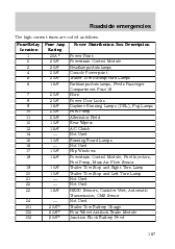
..., Rear Washer Pump Relay 15A Air Suspension Switch 20A Stop Lamp Switch (Lamps), Turn/Hazard Flasher, Speed Control Module 15A Rear Wipers, Running Board Lamps, Battery Saver Relay, Interior Lamp Relay, Accessory Delay Relay (Power Windows, Moonroof, Flip Windows) 5A Stop Lamp Switch, (Speed Control, Brake Shift Interlock, ABS, PCM Module...
..., Rear Washer Pump Relay 15A Air Suspension Switch 20A Stop Lamp Switch (Lamps), Turn/Hazard Flasher, Speed Control Module 15A Rear Wipers, Running Board Lamps, Battery Saver Relay, Interior Lamp Relay, Accessory Delay Relay (Power Windows, Moonroof, Flip Windows) 5A Stop Lamp Switch, (Speed Control, Brake Shift Interlock, ABS, PCM Module...
Owner's Manual
Page 165
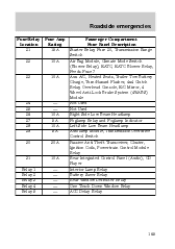
...Transmission Range Switch 10A Air Bag Module, Climate Mode Switch (Blower Relay), EATC, EATC Blower Relay, Feeds Fuse 7 10A Aux A/C, Heated Seats, Trailer Tow Battery Charge, Turn/Hazard Flasher, 4x4 Clutch Relay, Overhead Console, E/C Mirror, 4 Wheel Anti-Lock Brake System (4WABS) Module - Not Used - Not Used ... Anti Theft Transceiver, Cluster, Ignition Coils, Powertrain Control Module Relay 10A Rear Integrated Control Panel (Audio), CD Player - Interior Lamp Relay - Battery Saver Relay - Rear Window Defroster Relay - One Touch Down Window Relay - ACC Delay Relay 23 24 25 26 27 28 29 30 31...
...Transmission Range Switch 10A Air Bag Module, Climate Mode Switch (Blower Relay), EATC, EATC Blower Relay, Feeds Fuse 7 10A Aux A/C, Heated Seats, Trailer Tow Battery Charge, Turn/Hazard Flasher, 4x4 Clutch Relay, Overhead Console, E/C Mirror, 4 Wheel Anti-Lock Brake System (4WABS) Module - Not Used - Not Used ... Anti Theft Transceiver, Cluster, Ignition Coils, Powertrain Control Module Relay 10A Rear Integrated Control Panel (Audio), CD Player - Interior Lamp Relay - Battery Saver Relay - Rear Window Defroster Relay - One Touch Down Window Relay - ACC Delay Relay 23 24 25 26 27 28 29 30 31...
Owner's Manual
Page 166
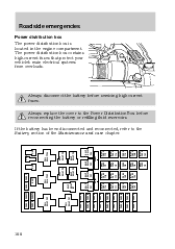
...108 FUSE 3 FUSE 4 MAXI FUSE 105 MAXI FUSE 101 MAXI FUSE 102 MAXI FUSE 106 Always disconnect the battery before reconnecting the battery or refilling fluid reservoirs. If the battery has been disconnected and reconnected, refer to the Power Distribution Box before servicing high current fuses. The power ...distribution box contains high-current fuses that protect your vehicle's main electrical systems from overloads. Always replace the cover to the Battery section of the Maintenance and care chapter. 166 D 502 D 501 D 503 FULL RELAY 304 HALF RELAY 209 FUSE 21 FUSE 22 ...
...108 FUSE 3 FUSE 4 MAXI FUSE 105 MAXI FUSE 101 MAXI FUSE 102 MAXI FUSE 106 Always disconnect the battery before reconnecting the battery or refilling fluid reservoirs. If the battery has been disconnected and reconnected, refer to the Power Distribution Box before servicing high current fuses. The power ...distribution box contains high-current fuses that protect your vehicle's main electrical systems from overloads. Always replace the cover to the Battery section of the Maintenance and care chapter. 166 D 502 D 501 D 503 FULL RELAY 304 HALF RELAY 209 FUSE 21 FUSE 22 ...
Owner's Manual
Page 167
... Turn Lamp Trailer Tow Stop and Left Turn Lamp Not Used Not Used HEGO Sensors, Canister Vent, Automatic Transmission, CMS Sensor Not Used Trailer Tow Battery Charge Four Wheel Antilock Brake Module Junction Block...
... Turn Lamp Trailer Tow Stop and Left Turn Lamp Not Used Not Used HEGO Sensors, Canister Vent, Automatic Transmission, CMS Sensor Not Used Trailer Tow Battery Charge Four Wheel Antilock Brake Module Junction Block...

Owner's Manual
Page 168
... Climate Control Front Blower Not Used Not Used Trailer Tow Electric Brake Air Suspension Compressor Heated Seats Ignition Switch Battery Feed (Run/Start Circuit) Drivers Power Seat, Adjustable Pedals, Memory Module Ignition Switch Battery Feed (Run and Accessory Circuits) Climate Control Auxiliary Blower Not Used Rear Window Defroster, Heated Mirrors Not Used... Lamp Relay A/C Clutch Relay Rear Wiper Down Foglamp Relay Front Washer Pump Relay Rear Washer Pump Relay Rear Wiper Up Fuel Pump Relay Trailer Tow Battery Charge Relay Wiper Hi/Lo Relay Powertrain Control Module Relay 168
... Climate Control Front Blower Not Used Not Used Trailer Tow Electric Brake Air Suspension Compressor Heated Seats Ignition Switch Battery Feed (Run/Start Circuit) Drivers Power Seat, Adjustable Pedals, Memory Module Ignition Switch Battery Feed (Run and Accessory Circuits) Climate Control Auxiliary Blower Not Used Rear Window Defroster, Heated Mirrors Not Used... Lamp Relay A/C Clutch Relay Rear Wiper Down Foglamp Relay Front Washer Pump Relay Rear Washer Pump Relay Rear Wiper Up Fuel Pump Relay Trailer Tow Battery Charge Relay Wiper Hi/Lo Relay Powertrain Control Module Relay 168

Owner's Manual
Page 175
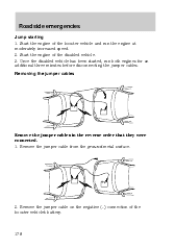
... both vehicles and stay clear of the disabled vehicle as this could damage the vehicle's electrical system. 3. Preparing your vehicle. 2. Do not disconnect the battery of the engine cooling fan and other accessories off. 175 1 3 4 5 2 Check all other moving parts. 4. Ensure that vent caps are tight...sure the two vehicles do not have push-start your vehicle 1. Unblock the wheels. 15. JUMP STARTING YOUR VEHICLE The gases around the battery can burn skin, eyes, and clothing, if contacted. Automatic transmissions do not touch. Put flat tire, jack and lug wrench away....
... both vehicles and stay clear of the disabled vehicle as this could damage the vehicle's electrical system. 3. Preparing your vehicle. 2. Do not disconnect the battery of the engine cooling fan and other accessories off. 175 1 3 4 5 2 Check all other moving parts. 4. Ensure that vent caps are tight...sure the two vehicles do not have push-start your vehicle 1. Unblock the wheels. 15. JUMP STARTING YOUR VEHICLE The gases around the battery can burn skin, eyes, and clothing, if contacted. Automatic transmissions do not touch. Put flat tire, jack and lug wrench away....

Owner's Manual
Page 176
Note: In the illustrations, lightning bolts are used to the positive (+) terminal of the assisting battery. 176 - - - + - + + + Connect the other end of the positive (+) cable to the positive (+) terminal of the discharged battery. Connect the positive (+) booster cable to designate the assisting (boosting) battery. 2. Roadside emergencies Connecting the jumper cables 1.
Note: In the illustrations, lightning bolts are used to the positive (+) terminal of the assisting battery. 176 - - - + - + + + Connect the other end of the positive (+) cable to the positive (+) terminal of the discharged battery. Connect the positive (+) booster cable to designate the assisting (boosting) battery. 2. Roadside emergencies Connecting the jumper cables 1.

Owner's Manual
Page 177
...the negative (-) cable to an exposed metal part of the gases that the cables are clear of fan blades, belts, moving parts of the battery to be jumped. Do not use fuel lines, engine rocker covers or the intake manifold as grounding points. A spark may cause an explosion of... the stalled vehicle's engine, away from the battery and the carburetor/fuel injection system. Ensure that surround the battery. 5. Do not connect the end of the second cable to the negative (-) terminal of the assisting...
...the negative (-) cable to an exposed metal part of the gases that the cables are clear of fan blades, belts, moving parts of the battery to be jumped. Do not use fuel lines, engine rocker covers or the intake manifold as grounding points. A spark may cause an explosion of... the stalled vehicle's engine, away from the battery and the carburetor/fuel injection system. Ensure that surround the battery. 5. Do not connect the end of the second cable to the negative (-) terminal of the assisting...
Owner's Manual
Page 178
Remove the jumper cable from the ground metal surface. 2. Start the engine of the booster vehicle's battery. 178 - - - - + + + + Removing the jumper cables Remove the jumper cables in the reverse order that they were connected. 1. Roadside emergencies Jump starting 1. Once the disabled vehicle ...
Remove the jumper cable from the ground metal surface. 2. Start the engine of the booster vehicle's battery. 178 - - - - + + + + Removing the jumper cables Remove the jumper cables in the reverse order that they were connected. 1. Roadside emergencies Jump starting 1. Once the disabled vehicle ...

Owner's Manual
Page 179
Remove the jumper cable from the positive (+) terminal of the disabled vehicle's battery. Roadside emergencies 3. After the disabled vehicle has been started and the jumper cables removed, allow it to idle for several minutes so the engine computer can relearn its idle conditions. - - - + + - + + 179 Remove the jumper cable from the positive (+) terminal of the booster vehicle's battery. 4.
Remove the jumper cable from the positive (+) terminal of the disabled vehicle's battery. Roadside emergencies 3. After the disabled vehicle has been started and the jumper cables removed, allow it to idle for several minutes so the engine computer can relearn its idle conditions. - - - + + - + + 179 Remove the jumper cable from the positive (+) terminal of the booster vehicle's battery. 4.

Owner's Manual
Page 181
...you have enough ventilation. • Keep all lit cigarettes, open flames and other lit material away from the battery and all fuel related parts. If you disconnect the battery, the engine must "relearn" its idle conditions before your vehicle. Turn off 1. Motorcraft parts are covered....the vehicle from moving unexpectedly. 181 Block the wheels to provide the best performance in your vehicle will drive properly, as explained in Battery in P (Park). 2. Set the parking brake and ensure the gearshift is securely latched in this chapter. If your vehicle requires professional...
...you have enough ventilation. • Keep all lit cigarettes, open flames and other lit material away from the battery and all fuel related parts. If you disconnect the battery, the engine must "relearn" its idle conditions before your vehicle. Turn off 1. Motorcraft parts are covered....the vehicle from moving unexpectedly. 181 Block the wheels to provide the best performance in your vehicle will drive properly, as explained in Battery in P (Park). 2. Set the parking brake and ensure the gearshift is securely latched in this chapter. If your vehicle requires professional...

Owner's Manual
Page 183
... OIL 9 Checking the engine oil Refer to the Scheduled Maintenance Guide for the appropriate intervals for the oil to drain into the oil pan. 183 Battery 2. Turn the engine off and wait a few minutes for checking the engine oil. 1. Air filter assembly 9. Power steering fluid reservoir 6. Brake fluid reservoir...
... OIL 9 Checking the engine oil Refer to the Scheduled Maintenance Guide for the appropriate intervals for the oil to drain into the oil pan. 183 Battery 2. Turn the engine off and wait a few minutes for checking the engine oil. 1. Air filter assembly 9. Power steering fluid reservoir 6. Brake fluid reservoir...

Owner's Manual
Page 197
... Maintenance Guide for severe usage or in each cell up to the battery terminals. If your eyes. Refer to only fill the battery cells with distilled water. If the electrolyte level in the battery is reinstalled after the battery has been cleaned or replaced. If you do not allow flames, ... checked. Also, make sure it is low, you can add plain tap water to come near the battery, always shield your face and protect your battery has a cover/shield, make certain the battery cables are replaced with universal joints equipped with a wire brush. Therefore, do not use hard water (...
... Maintenance Guide for severe usage or in each cell up to the battery terminals. If your eyes. Refer to only fill the battery cells with distilled water. If the electrolyte level in the battery is reinstalled after the battery has been cleaned or replaced. If you do not allow flames, ... checked. Also, make sure it is low, you can add plain tap water to come near the battery, always shield your face and protect your battery has a cover/shield, make certain the battery cables are replaced with universal joints equipped with a wire brush. Therefore, do not use hard water (...


