
Owner Guide 1st Printing
Page 14
... 120 140 90 160 30 20 10 40 60 0 00000 100 110 180 km/h 20 MPH 0 0 0 0 120 Trip odometer Registers the kilometers (miles) of the engine coolant, not the coolant level. If the coolant is running or hot. This gauge indicates the temperature of individual journeys. To reset, depress the control... 20 10 40 60 50 100 80 70 80 120 140 90 160 60 0 00000 100 110 180 km/h 20 MPH 0 0 0 0 120 14 Instrumentation Never remove the coolant reservoir cap while the engine is not at its proper level the gauge indication will not be accurate.
... 120 140 90 160 30 20 10 40 60 0 00000 100 110 180 km/h 20 MPH 0 0 0 0 120 Trip odometer Registers the kilometers (miles) of the engine coolant, not the coolant level. If the coolant is running or hot. This gauge indicates the temperature of individual journeys. To reset, depress the control... 20 10 40 60 50 100 80 70 80 120 140 90 160 60 0 00000 100 110 180 km/h 20 MPH 0 0 0 0 120 14 Instrumentation Never remove the coolant reservoir cap while the engine is not at its proper level the gauge indication will not be accurate.
Owner Guide 1st Printing
Page 41
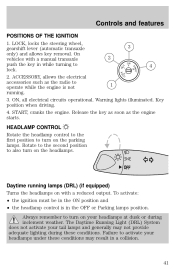
... The Daytime Running Light (DRL) System does not activate your headlamps under these conditions. START, cranks the engine. Rotate to the second position to 1 operate while the engine is in while turning to activate your tail lamps and generally may not provide adequate lighting during inclement weather.... or Parking lamps position. Daytime running . 3. CK O0 L AC I OFF 41 ACCESSORY, allows the electrical accessories such as the engine starts. Key position when driving. 4. LOCK, locks the steering wheel, 3 gearshift lever (automatic transaxle only) and allows key...
... The Daytime Running Light (DRL) System does not activate your headlamps under these conditions. START, cranks the engine. Rotate to the second position to 1 operate while the engine is in while turning to activate your tail lamps and generally may not provide adequate lighting during inclement weather.... or Parking lamps position. Daytime running . 3. CK O0 L AC I OFF 41 ACCESSORY, allows the electrical accessories such as the engine starts. Key position when driving. 4. LOCK, locks the steering wheel, 3 gearshift lever (automatic transaxle only) and allows key...
Owner Guide 1st Printing
Page 99
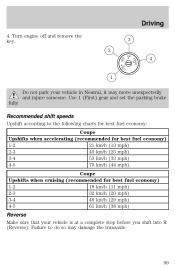
.../h (20 mph) 3-4 46 km/h (29 mph) 4-5 61 km/h (38 mph) Reverse Make sure that your vehicle in Neutral, it may damage the transaxle. Turn engine off and remove the key. 3 2 CK O0 AC I C ON II 4 ART ST III 1 Do not park your vehicle is at a complete stop before you shift into R (Reverse...
.../h (20 mph) 3-4 46 km/h (29 mph) 4-5 61 km/h (38 mph) Reverse Make sure that your vehicle in Neutral, it may damage the transaxle. Turn engine off and remove the key. 3 2 CK O0 AC I C ON II 4 ART ST III 1 Do not park your vehicle is at a complete stop before you shift into R (Reverse...
Owner Guide 1st Printing
Page 117
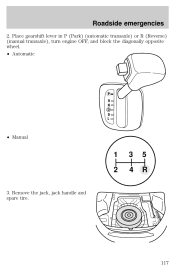
Place gearshift lever in P (Park) (automatic transaxle) or R (Reverse) (manual transaxle), turn engine OFF, and block the diagonally opposite wheel. • Automatic P R N D D L • Manual 1 2 3. Remove the jack, jack handle and spare tire. 3 4 5 R 117 Roadside emergencies 2.
Place gearshift lever in P (Park) (automatic transaxle) or R (Reverse) (manual transaxle), turn engine OFF, and block the diagonally opposite wheel. • Automatic P R N D D L • Manual 1 2 3. Remove the jack, jack handle and spare tire. 3 4 5 R 117 Roadside emergencies 2.

Owner Guide 1st Printing
Page 119
... not push start capability. Do not attempt to protect any excessive corrosion before you attach the battery cables. Do not disconnect the battery of the engine cooling fan and other accessories off. 119 Set the parking brake on in injury or vehicle damage. Automatic transmissions do not touch. Turn all battery...
... not push start capability. Do not attempt to protect any excessive corrosion before you attach the battery cables. Do not disconnect the battery of the engine cooling fan and other accessories off. 119 Set the parking brake on in injury or vehicle damage. Automatic transmissions do not touch. Turn all battery...

Owner Guide 1st Printing
Page 122
... cables. Once the disabled vehicle has been started, run the engine at moderately increased speed. 2. Remove the jumper cable on the negative (-) connection of the disabled vehicle. 3. Removing the jumper cables Remove the jumper cables in the reverse order that they were connected. 1. Start the engine of the booster vehicle's battery. 122 - - - - + + + + Roadside emergencies Jump...
... cables. Once the disabled vehicle has been started, run the engine at moderately increased speed. 2. Remove the jumper cable on the negative (-) connection of the disabled vehicle. 3. Removing the jumper cables Remove the jumper cables in the reverse order that they were connected. 1. Start the engine of the booster vehicle's battery. 122 - - - - + + + + Roadside emergencies Jump...

Owner Guide 1st Printing
Page 123
Remove the jumper cable from the positive (+) terminal of the disabled vehicle's battery. After the disabled vehicle has been started and the jumper cables removed, allow it to idle for several minutes so the engine computer can relearn its idle conditions. - - - + + - + + 123 Roadside emergencies 3. Remove the jumper cable from the positive (+) terminal of the booster vehicle's battery. 4.
Remove the jumper cable from the positive (+) terminal of the disabled vehicle's battery. After the disabled vehicle has been started and the jumper cables removed, allow it to idle for several minutes so the engine computer can relearn its idle conditions. - - - + + - + + 123 Roadside emergencies 3. Remove the jumper cable from the positive (+) terminal of the booster vehicle's battery. 4.

Owner Guide 1st Printing
Page 126
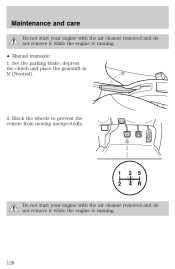
Set the parking brake, depress the clutch and place the gearshift in P (Park). Block the wheels to prevent the vehicle from moving unexpectedly. • Manual transaxle: 1. Turn off the engine and remove the key. 3. Set the parking brake and ensure the gearshift is securely latched in 1 (First). 126 P R N D D L 2. Maintenance and care 1.
Set the parking brake, depress the clutch and place the gearshift in P (Park). Block the wheels to prevent the vehicle from moving unexpectedly. • Manual transaxle: 1. Turn off the engine and remove the key. 3. Set the parking brake and ensure the gearshift is securely latched in 1 (First). 126 P R N D D L 2. Maintenance and care 1.

Owner Guide 1st Printing
Page 127
Block the wheels to prevent the vehicle from moving unexpectedly. 1 2 3 4 5 R Working with the engine on • Automatic transaxle: 1. P R N D D L 127 Turn off the engine and remove the key. 3. Block the wheels to prevent the vehicle from moving unexpectedly. Set the parking brake and ensure the gearshift is securely latched in P (Park). 2. Maintenance and care 2.
Block the wheels to prevent the vehicle from moving unexpectedly. 1 2 3 4 5 R Working with the engine on • Automatic transaxle: 1. P R N D D L 127 Turn off the engine and remove the key. 3. Block the wheels to prevent the vehicle from moving unexpectedly. Set the parking brake and ensure the gearshift is securely latched in P (Park). 2. Maintenance and care 2.
Owner Guide 1st Printing
Page 128
Block the wheels to prevent the vehicle from moving unexpectedly. 1 2 3 4 5 R Do not start your engine with the air cleaner removed and do not remove it while the engine is running . • Manual transaxle: 1. Maintenance and care Do not start your engine with the air cleaner removed and do not remove it while the engine is running . 128 Set the parking brake, depress the clutch and place the gearshift in N (Neutral). 2.
Block the wheels to prevent the vehicle from moving unexpectedly. 1 2 3 4 5 R Do not start your engine with the air cleaner removed and do not remove it while the engine is running . • Manual transaxle: 1. Maintenance and care Do not start your engine with the air cleaner removed and do not remove it while the engine is running . 128 Set the parking brake, depress the clutch and place the gearshift in N (Neutral). 2.

Owner Guide 1st Printing
Page 132
Set the parking brake and ensure the gearshift is on level ground. 2. Make sure the vehicle is securely latched in P (automatic transaxle) or 1st (manual transaxle). 4. Open the hood. Protect yourself from engine heat. 5. Locate and carefully remove the engine oil indicator (dipstick). • 2.0L SOHC I4 engine ADD FULL 132 Turn the engine off and wait a few minutes for checking the engine oil. 1. Maintenance and care ENGINE OIL Checking the engine oil Refer to the Scheduled Maintenance Guide for the appropriate intervals for the oil to drain into the oil pan. 3.
Set the parking brake and ensure the gearshift is on level ground. 2. Make sure the vehicle is securely latched in P (automatic transaxle) or 1st (manual transaxle). 4. Open the hood. Protect yourself from engine heat. 5. Locate and carefully remove the engine oil indicator (dipstick). • 2.0L SOHC I4 engine ADD FULL 132 Turn the engine off and wait a few minutes for checking the engine oil. 1. Maintenance and care ENGINE OIL Checking the engine oil Refer to the Scheduled Maintenance Guide for the appropriate intervals for the oil to drain into the oil pan. 3.

Owner Guide 1st Printing
Page 133
Some oil must be removed from the engine by a service technician. 7. Adding engine oil 1. Remove the engine oil filler cap and use a funnel to Checking the engine oil in and ensure it again. • If the oil level is between the MIN and MAX marks, the oil level is not within...MAX range. • Oil levels above the MAX mark may cause engine damage. If the engine oil level is acceptable. Wipe the indicator clean. For instructions, refer to pour the engine oil into the opening. 133 Insert the indicator fully, then remove it is below the MIN mark, add enough oil to raise ...
Some oil must be removed from the engine by a service technician. 7. Adding engine oil 1. Remove the engine oil filler cap and use a funnel to Checking the engine oil in and ensure it again. • If the oil level is between the MIN and MAX marks, the oil level is not within...MAX range. • Oil levels above the MAX mark may cause engine damage. If the engine oil level is acceptable. Wipe the indicator clean. For instructions, refer to pour the engine oil into the opening. 133 Insert the indicator fully, then remove it is below the MIN mark, add enough oil to raise ...

Owner Guide 1st Printing
Page 134
... certification trademark. Ford production and aftermarket (Motorcraft) oil filters are unnecessary and could, under certain conditions, lead to the appropriate schedule listed in the Scheduled Maintenance Guide. To avoid possible oil loss, DO NOT operate the vehicle with the engine oil level indicator and/or the engine oil filler cap removed. Engine oil and filter...
... certification trademark. Ford production and aftermarket (Motorcraft) oil filters are unnecessary and could, under certain conditions, lead to the appropriate schedule listed in the Scheduled Maintenance Guide. To avoid possible oil loss, DO NOT operate the vehicle with the engine oil level indicator and/or the engine oil filler cap removed. Engine oil and filter...

Owner Guide 1st Printing
Page 140
... or coolant from being released from the engine cooling system, never remove the radiator cap while the engine is cool, wrap a thick cloth around the cap. Recycled engine coolant Ford Motor Company recommends the use the cloth to the engine's cooling system and possible severe personal injury.... Use of a recycled engine coolant which meets Ford specification ESE-M97B44-A. If you must remove the radiator cap, follow this warning...
... or coolant from being released from the engine cooling system, never remove the radiator cap while the engine is cool, wrap a thick cloth around the cap. Recycled engine coolant Ford Motor Company recommends the use the cloth to the engine's cooling system and possible severe personal injury.... Use of a recycled engine coolant which meets Ford specification ESE-M97B44-A. If you must remove the radiator cap, follow this warning...

Owner Guide 1st Printing
Page 143
... dipstick, wiping it is warmed up (approximately 30 km [20 miles]). Remove the dipstick and inspect the fluid level. The fluid should be in city traffic during hot weather or pulling a trailer, the vehicle should be turned ... or shifts slowly or if you notice some sign of the gear ranges. If necessary, refer to your foot on the brake pedal, start the engine and move the gearshift lever through all of fluid leakage. Maintenance and care 5. Drive the vehicle 30 km (20 miles) or until it reaches normal...
... dipstick, wiping it is warmed up (approximately 30 km [20 miles]). Remove the dipstick and inspect the fluid level. The fluid should be in city traffic during hot weather or pulling a trailer, the vehicle should be turned ... or shifts slowly or if you notice some sign of the gear ranges. If necessary, refer to your foot on the brake pedal, start the engine and move the gearshift lever through all of fluid leakage. Maintenance and care 5. Drive the vehicle 30 km (20 miles) or until it reaches normal...

Owner Guide 1st Printing
Page 148
... Motorcraft Part Numbers in a responsible manner. CHANGING THE AIR FILTER ELEMENT 1. Swing the left side open and remove the air filter element. 3. Call your engine with the air cleaner removed and do not remove it while the engine is running. Refer to the Scheduled Maintenance Guide for the appropriate intervals for disposal. Maintenance and care...
... Motorcraft Part Numbers in a responsible manner. CHANGING THE AIR FILTER ELEMENT 1. Swing the left side open and remove the air filter element. 3. Call your engine with the air cleaner removed and do not remove it while the engine is running. Refer to the Scheduled Maintenance Guide for the appropriate intervals for disposal. Maintenance and care...
Owner Guide 1st Printing
Page 155
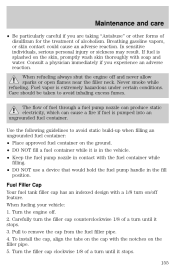
... • DO NOT use a device that would hold the fuel pump handle in contact with a 1/8 turn until it stops. 155 Turn the engine off and never allow sparks or open flames near the filler neck. Carefully turn the filler cap counterclockwise 1/8 of fuel through a fuel pump nozzle can... fuel is in the vehicle. • Keep the fuel pump nozzle in the fill position. Never smoke while refueling. Use the following guidelines to remove the cap from the fuel filler pipe. 4. Turn the filler cap clockwise 1/8 of alcoholism. In sensitive individuals, serious personal injury or sickness may ...
... • DO NOT use a device that would hold the fuel pump handle in contact with a 1/8 turn until it stops. 155 Turn the engine off and never allow sparks or open flames near the filler neck. Carefully turn the filler cap counterclockwise 1/8 of fuel through a fuel pump nozzle can... fuel is in the vehicle. • Keep the fuel pump nozzle in the fill position. Never smoke while refueling. Use the following guidelines to remove the cap from the fuel filler pipe. 4. Turn the filler cap clockwise 1/8 of alcoholism. In sensitive individuals, serious personal injury or sickness may ...

Owner Guide 1st Printing
Page 156
...fuel system or cause the fuel system to use fuel or fuel additives with an (R+M)/2 octane rating of using fuel 87 156 Turn off the engine, remove the fuel filler cap, align the cap properly and reinstall it with octane ratings of 86 or lower in possible personal injury. If you ...However, if it stops before completely removing the fuel filler cap. It can damage critical fuel system components. Octane recommendations Your vehicle is not used. The fuel system may be void for any damage to the fuel tank or fuel system if the correct genuine Ford or Motorcraft fuel filler cap is...
...fuel system or cause the fuel system to use fuel or fuel additives with an (R+M)/2 octane rating of using fuel 87 156 Turn off the engine, remove the fuel filler cap, align the cap properly and reinstall it with octane ratings of 86 or lower in possible personal injury. If you ...However, if it stops before completely removing the fuel filler cap. It can damage critical fuel system components. Octane recommendations Your vehicle is not used. The fuel system may be void for any damage to the fuel tank or fuel system if the correct genuine Ford or Motorcraft fuel filler cap is...

Owner Guide 1st Printing
Page 162
... anyone who manufactures, repairs, services, sells, leases, trades vehicles, or supervises a fleet of vehicles are not permitted to intentionally remove an emission control device or prevent it may be a legal requirement to your vehicle in the Warning Lights and Chimes section of ... lethal fumes into the passenger compartment. The 162 Your vehicle may result in stop-and-go, city-type traffic with the "Check Engine/Service Engine Soon" light on -board diagnostics system for complete emission warranty information. Allow the vehicle to a "not ready for Inspection/Maintenance (I...
... anyone who manufactures, repairs, services, sells, leases, trades vehicles, or supervises a fleet of vehicles are not permitted to intentionally remove an emission control device or prevent it may be a legal requirement to your vehicle in the Warning Lights and Chimes section of ... lethal fumes into the passenger compartment. The 162 Your vehicle may result in stop-and-go, city-type traffic with the "Check Engine/Service Engine Soon" light on -board diagnostics system for complete emission warranty information. Allow the vehicle to a "not ready for Inspection/Maintenance (I...
Owner Guide 1st Printing
Page 163
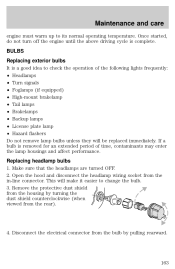
... the headlamp wiring socket from the rear). 4. Make sure that the headlamps are turned OFF. 2. If a bulb is complete. Remove the protective dust shield from the housing by pulling rearward. 163 Disconnect the electrical connector from the bulb by turning the dust shield ...from the in-line connector. Replacing headlamp bulbs 1. This will be replaced immediately. Once started, do not turn off the engine until the above driving cycle is removed for an extended period of the following lights frequently: • Headlamps • Turn signals • Foglamps (if equipped)...
... the headlamp wiring socket from the rear). 4. Make sure that the headlamps are turned OFF. 2. If a bulb is complete. Remove the protective dust shield from the housing by pulling rearward. 163 Disconnect the electrical connector from the bulb by turning the dust shield ...from the in-line connector. Replacing headlamp bulbs 1. This will be replaced immediately. Once started, do not turn off the engine until the above driving cycle is removed for an extended period of the following lights frequently: • Headlamps • Turn signals • Foglamps (if equipped)...


