
Scheduled Maintenance Guide 3rd Printing
Page 9
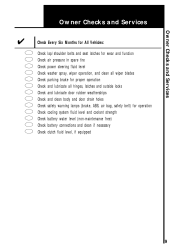
... and clean body and door drain holes safety warning lamps (brake, ABS, air bag, safety belt) for operation cooling system fluid level and coolant strength battery water level (non-maintenance free) battery connections and clean if necessary clutch fluid level, if equipped 9
... and clean body and door drain holes safety warning lamps (brake, ABS, air bag, safety belt) for operation cooling system fluid level and coolant strength battery water level (non-maintenance free) battery connections and clean if necessary clutch fluid level, if equipped 9
Owner Guide 1st Printing
Page 7
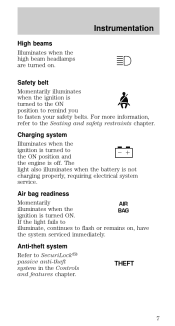
... the ON position to remind you to SecuriLock passive anti-theft system in the Controls and features chapter. The light also illuminates when the battery is turned ON. Anti-theft system Refer to fasten your safety belts. Instrumentation High beams Illuminates when the high beam headlamps are turned on , have...
... the ON position to remind you to SecuriLock passive anti-theft system in the Controls and features chapter. The light also illuminates when the battery is turned ON. Anti-theft system Refer to fasten your safety belts. Instrumentation High beams Illuminates when the high beam headlamps are turned on , have...
Owner Guide 1st Printing
Page 15
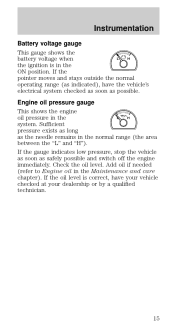
... or by a qualified technician. 15 Check the oil level. Add oil if needed (refer to Engine oil in the ON position. Instrumentation Battery voltage gauge This gauge shows the L H battery voltage when the ignition is correct, have the vehicle's electrical system checked as soon as possible. If the gauge indicates low pressure...
... or by a qualified technician. 15 Check the oil level. Add oil if needed (refer to Engine oil in the ON position. Instrumentation Battery voltage gauge This gauge shows the L H battery voltage when the ignition is correct, have the vehicle's electrical system checked as soon as possible. If the gauge indicates low pressure...
Owner Guide 1st Printing
Page 24
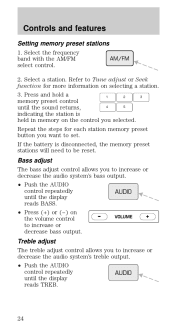
If the battery is held in memory on the control you to increase or decrease bass output. Treble adjust The treble adjust control allows you want to set. ...
If the battery is held in memory on the control you to increase or decrease bass output. Treble adjust The treble adjust control allows you want to set. ...
Owner Guide 1st Printing
Page 30
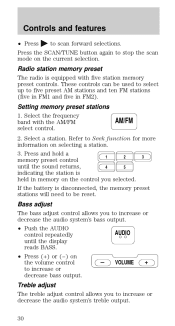
... current selection. Setting memory preset stations 1. These controls can be reset. Select the frequency AM/FM band with five station memory preset controls. If the battery is equipped with the AM/FM select control. 2. Treble adjust The treble adjust control allows you to five preset AM stations and ten FM stations...
... current selection. Setting memory preset stations 1. These controls can be reset. Select the frequency AM/FM band with five station memory preset controls. If the battery is equipped with the AM/FM select control. 2. Treble adjust The treble adjust control allows you to five preset AM stations and ten FM stations...
Owner Guide 1st Printing
Page 36
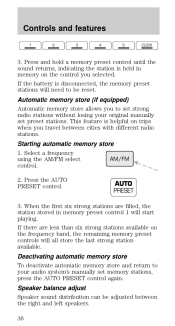
... set preset stations. Press the AUTO PRESET control. AUTO PRESET 3. Speaker balance adjust Speaker sound distribution can be reset. Controls and features 1 2 3 4 5 CLOCK 3. If the battery is held in memory preset control 1 will start playing. Automatic memory store (if equipped) Automatic memory store allows you travel between the right and left...
... set preset stations. Press the AUTO PRESET control. AUTO PRESET 3. Speaker balance adjust Speaker sound distribution can be reset. Controls and features 1 2 3 4 5 CLOCK 3. If the battery is held in memory preset control 1 will start playing. Automatic memory store (if equipped) Automatic memory store allows you travel between the right and left...

Owner Guide 1st Printing
Page 59
... transmitter is powered by : 59 The battery saver will shut off if: • they have been turned on with the dimmer control or • any control on all your vehicle's transmitters to .... A decrease in the ignition and turn from your dealer if service is required. All transmitters must be caused by two coin type three-volt lithium batteries. Replacing lost transmitters Take all transmitters (up to OFF. If you to be up to four may be programmed), perform the following procedure: To reprogram...
... transmitter is powered by : 59 The battery saver will shut off if: • they have been turned on with the dimmer control or • any control on all your vehicle's transmitters to .... A decrease in the ignition and turn from your dealer if service is required. All transmitters must be caused by two coin type three-volt lithium batteries. Replacing lost transmitters Take all transmitters (up to OFF. If you to be up to four may be programmed), perform the following procedure: To reprogram...

Owner Guide 1st Printing
Page 60
.... If there is read by the SecuriLock passive anti-theft system. Twist a thin coin between the two halves of new batteries down. Refer to the vehicle To replace the batteries: 1. Your vehicle's engine can only be started with the two special SecuriLock electronically coded keys provided with your vehicle, the...
.... If there is read by the SecuriLock passive anti-theft system. Twist a thin coin between the two halves of new batteries down. Refer to the vehicle To replace the batteries: 1. Your vehicle's engine can only be started with the two special SecuriLock electronically coded keys provided with your vehicle, the...
Owner Guide 1st Printing
Page 117
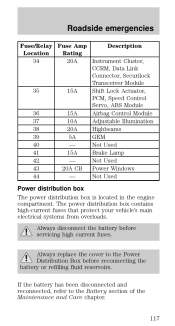
...is located in the engine compartment. Always disconnect the battery before reconnecting the battery or refilling fluid reservoirs. The power distribution box contains high-current fuses that protect your vehicle's main electrical systems from overloads. If the battery has been disconnected and reconnected, refer to the ...Power Distribution Box before servicing high current fuses. Always replace the cover to the Battery section of the Maintenance and Care chapter. 117 Not Used 43 20A CB Power Windows 44 - Roadside emergencies Fuse/Relay...
...is located in the engine compartment. Always disconnect the battery before reconnecting the battery or refilling fluid reservoirs. The power distribution box contains high-current fuses that protect your vehicle's main electrical systems from overloads. If the battery has been disconnected and reconnected, refer to the ...Power Distribution Box before servicing high current fuses. Always replace the cover to the Battery section of the Maintenance and Care chapter. 117 Not Used 43 20A CB Power Windows 44 - Roadside emergencies Fuse/Relay...

Owner Guide 1st Printing
Page 123
... key at an angle, you hold the key square to remove the lug nut. Roadside emergencies Anti-theft lug nuts (if equipped) If your nearest Ford or Lincoln/Mercury dealer who has access to the master set of the lug nuts on each wheel must be removed and replaced with a special... 1. Insert the key over the locking lug nut. Turn the wrench in injury or vehicle damage. 123 JUMP STARTING YOUR VEHICLE The gases around the battery can explode if exposed to flames, sparks, or lit cigarettes.
... key at an angle, you hold the key square to remove the lug nut. Roadside emergencies Anti-theft lug nuts (if equipped) If your nearest Ford or Lincoln/Mercury dealer who has access to the master set of the lug nuts on each wheel must be removed and replaced with a special... 1. Insert the key over the locking lug nut. Turn the wrench in injury or vehicle damage. 123 JUMP STARTING YOUR VEHICLE The gases around the battery can explode if exposed to flames, sparks, or lit cigarettes.
Owner Guide 1st Printing
Page 124
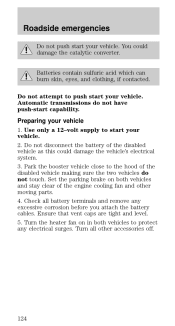
...electrical system. 3. Preparing your vehicle 1. Check all other moving parts. 4. Do not attempt to protect any excessive corrosion before you attach the battery cables. Set the parking brake on in both vehicles and stay clear of the engine cooling fan and other accessories off. 124 Ensure that vent... caps are tight and level. 5. Park the booster vehicle close to start your vehicle. Turn all battery terminals and remove any electrical surges. Use only a 12-volt supply to the hood of the disabled vehicle as this could damage the ...
...electrical system. 3. Preparing your vehicle 1. Check all other moving parts. 4. Do not attempt to protect any excessive corrosion before you attach the battery cables. Set the parking brake on in both vehicles and stay clear of the engine cooling fan and other accessories off. 124 Ensure that vent... caps are tight and level. 5. Park the booster vehicle close to start your vehicle. Turn all battery terminals and remove any electrical surges. Use only a 12-volt supply to the hood of the disabled vehicle as this could damage the ...
Owner Guide 1st Printing
Page 125
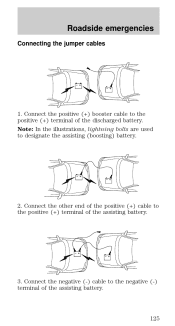
Connect the positive (+) booster cable to the positive (+) terminal of the discharged battery. Connect the other end of the positive (+) cable to the positive (+) terminal of the assisting battery. 3. Connect the negative (-) cable to designate the assisting (boosting) battery. 2. Roadside emergencies Connecting the jumper cables 1. Note: In the illustrations, lightning bolts are used to the negative (-) terminal of the assisting battery. - - - - - - + + + + + + 125
Connect the positive (+) booster cable to the positive (+) terminal of the discharged battery. Connect the other end of the positive (+) cable to the positive (+) terminal of the assisting battery. 3. Connect the negative (-) cable to designate the assisting (boosting) battery. 2. Roadside emergencies Connecting the jumper cables 1. Note: In the illustrations, lightning bolts are used to the negative (-) terminal of the assisting battery. - - - - - - + + + + + + 125
Owner Guide 1st Printing
Page 126
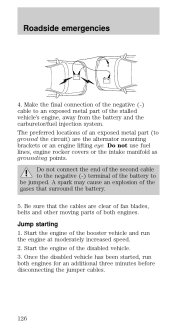
... the carburetor/fuel injection system. Do not connect the end of the second cable to the negative (-) terminal of the battery to an exposed metal part of the negative (-) cable to be jumped. A spark may cause an explosion of the gases that the cables are the ... brackets or an engine lifting eye. Once the disabled vehicle has been started, run the engine at moderately increased speed. 2. Be sure that surround the battery. 5. Start the engine of an exposed metal part (to ground the circuit) are clear of fan blades, belts and other moving parts of the booster...
... the carburetor/fuel injection system. Do not connect the end of the second cable to the negative (-) terminal of the battery to an exposed metal part of the negative (-) cable to be jumped. A spark may cause an explosion of the gases that the cables are the ... brackets or an engine lifting eye. Once the disabled vehicle has been started, run the engine at moderately increased speed. 2. Be sure that surround the battery. 5. Start the engine of an exposed metal part (to ground the circuit) are clear of fan blades, belts and other moving parts of the booster...

Owner Guide 1st Printing
Page 127
Remove the jumper cable on the negative (-) connection of the booster vehicle's battery. - - - - - - + + + + + + 127 Roadside emergencies Removing the jumper cables Remove the jumper cables in the reverse order that they were connected. 1. Remove the jumper cable from the positive (+) terminal of the booster vehicle's battery. 3. Remove the jumper cable from the ground metal surface. 2.
Remove the jumper cable on the negative (-) connection of the booster vehicle's battery. - - - - - - + + + + + + 127 Roadside emergencies Removing the jumper cables Remove the jumper cables in the reverse order that they were connected. 1. Remove the jumper cable from the positive (+) terminal of the booster vehicle's battery. 3. Remove the jumper cable from the ground metal surface. 2.
Owner Guide 1st Printing
Page 128
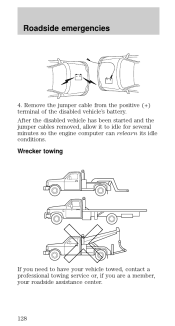
Roadside emergencies 4. Wrecker towing If you are a member, your roadside assistance center. 128 - - + + Remove the jumper cable from the positive (+) terminal of the disabled vehicle's battery. After the disabled vehicle has been started and the jumper cables removed, allow it to have your vehicle towed, contact a professional towing service or, if you need to idle for several minutes so the engine computer can relearn its idle conditions.
Roadside emergencies 4. Wrecker towing If you are a member, your roadside assistance center. 128 - - + + Remove the jumper cable from the positive (+) terminal of the disabled vehicle's battery. After the disabled vehicle has been started and the jumper cables removed, allow it to have your vehicle towed, contact a professional towing service or, if you need to idle for several minutes so the engine computer can relearn its idle conditions.

Owner Guide 1st Printing
Page 130
Check your "Warranty Guide" to find out which makes tracking routine service easy. If you disconnect the battery, the engine must "relearn" its idle conditions before your vehicle. PRECAUTIONS WHEN SERVICING YOUR VEHICLE Be especially careful when inspecting or servicing your vehicle. ... and built to specifications. Set the parking brake and ensure the gearshift is running, keep loose clothing, jewelry or long hair away from the battery and all fuel related parts. Maintenance and care SERVICE RECOMMENDATIONS To help you service your vehicle: • We highlight do-it-yourself items in...
Check your "Warranty Guide" to find out which makes tracking routine service easy. If you disconnect the battery, the engine must "relearn" its idle conditions before your vehicle. PRECAUTIONS WHEN SERVICING YOUR VEHICLE Be especially careful when inspecting or servicing your vehicle. ... and built to specifications. Set the parking brake and ensure the gearshift is running, keep loose clothing, jewelry or long hair away from the battery and all fuel related parts. Maintenance and care SERVICE RECOMMENDATIONS To help you service your vehicle: • We highlight do-it-yourself items in...
Owner Guide 1st Printing
Page 134
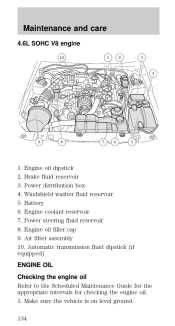
Windshield washer fluid reservoir 5. Power steering fluid reservoir 8. Engine coolant reservoir 7. Air filter assembly 10. Power distribution box 4. Brake fluid reservoir 3. Battery 6. Engine oil filler cap 9. Automatic transmission fluid dipstick (if equipped) ENGINE OIL Checking the engine oil Refer to the Scheduled Maintenance Guide for the appropriate intervals for checking the engine oil. 1. Make sure the vehicle is on level ground. 134 Maintenance and care 4.6L SOHC V8 engine 10 1 2 3 4 9 8 7 6 5 1. Engine oil dipstick 2.
Windshield washer fluid reservoir 5. Power steering fluid reservoir 8. Engine coolant reservoir 7. Air filter assembly 10. Power distribution box 4. Brake fluid reservoir 3. Battery 6. Engine oil filler cap 9. Automatic transmission fluid dipstick (if equipped) ENGINE OIL Checking the engine oil Refer to the Scheduled Maintenance Guide for the appropriate intervals for checking the engine oil. 1. Make sure the vehicle is on level ground. 134 Maintenance and care 4.6L SOHC V8 engine 10 1 2 3 4 9 8 7 6 5 1. Engine oil dipstick 2.

Owner Guide 1st Printing
Page 150
...trouble-free operation, keep the top of service. Keep the electrolyte level in high temperature climates, check the battery electrolyte level. If your battery has a cover/shield, make certain the battery cables are always tightly fastened to the Scheduled Maintenance Guide for severe usage or in each cell up to ...the battery, as long as you see any corrosion on the battery or terminals, remove the cables from the terminals and clean with distilled water. If you do not use hard...
...trouble-free operation, keep the top of service. Keep the electrolyte level in high temperature climates, check the battery electrolyte level. If your battery has a cover/shield, make certain the battery cables are always tightly fastened to the Scheduled Maintenance Guide for severe usage or in each cell up to ...the battery, as long as you see any corrosion on the battery or terminals, remove the cables from the terminals and clean with distilled water. If you do not use hard...
Owner Guide 1st Printing
Page 151
... resulting in P (Park) (automatic transmission) or the neutral position (manual transmission), turn off all accessories and start the engine. 3. Keep batteries out of reach of acid solution. To begin this process: 1. Always provide proper ventilation. In case of 15 minutes and get prompt medical ...attention. Because your eyes. Lift the battery with a battery carrier or with water for a minimum of acid contact with skin or eyes, flush immediately with your hands on the end walls...
... resulting in P (Park) (automatic transmission) or the neutral position (manual transmission), turn off all accessories and start the engine. 3. Keep batteries out of reach of acid solution. To begin this process: 1. Always provide proper ventilation. In case of 15 minutes and get prompt medical ...attention. Because your eyes. Lift the battery with a battery carrier or with water for a minimum of acid contact with skin or eyes, flush immediately with your hands on the end walls...
Owner Guide 1st Printing
Page 152
... the engine to be driven 16 km (10 miles) or more about recycling automotive batteries. Rinse thoroughly with clean water. Maintenance and care 4. If the battery has been disconnected or a new battery has been installed, the clock and the preset radio stations must be adversely affected until.... The relearning process will automatically complete as tree sap and some hot wax treatments used by commercial car washes reduce the effectiveness of automotive batteries in a responsible manner. RE D TU LE A WINDSHIELD WIPER BLADES Check the wiper blades at least twice a year or when they ...
... the engine to be driven 16 km (10 miles) or more about recycling automotive batteries. Rinse thoroughly with clean water. Maintenance and care 4. If the battery has been disconnected or a new battery has been installed, the clock and the preset radio stations must be adversely affected until.... The relearning process will automatically complete as tree sap and some hot wax treatments used by commercial car washes reduce the effectiveness of automotive batteries in a responsible manner. RE D TU LE A WINDSHIELD WIPER BLADES Check the wiper blades at least twice a year or when they ...
