Scheduled Maintenance Guide 3rd Printing
Page 19
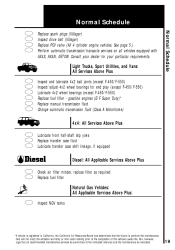
... item will not nulify the emission warranty or limit recall liability prior to the completion of the vehicle's useful life. gasoline engines (E/F Super Duty)* Replace manual transmission fluid Change automatic transmission fluid (Class A Motorhome) 4x4: All Services Above Plus Lubricate front half-shaft slip yoke Replace transfer case fluid Lubricate transfer...
... item will not nulify the emission warranty or limit recall liability prior to the completion of the vehicle's useful life. gasoline engines (E/F Super Duty)* Replace manual transmission fluid Change automatic transmission fluid (Class A Motorhome) 4x4: All Services Above Plus Lubricate front half-shaft slip yoke Replace transfer case fluid Lubricate transfer...
Scheduled Maintenance Guide 3rd Printing
Page 28
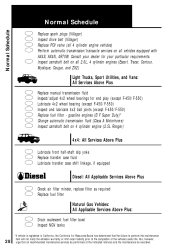
... bowl Inspect NGV tanks *If vehicle is registered in California, the California Air Resources Board has determined that all 2.0L, 4 cylinder engines (Escort, Tracer, Contour, Mystique, Cougar, and ZX2) Light Trucks, Sport Utilities, and Vans: All Services Above Plus Replace manual transmission fluid Inspect/adjust 4x2 wheel bearings for your particular requirements.
... bowl Inspect NGV tanks *If vehicle is registered in California, the California Air Resources Board has determined that all 2.0L, 4 cylinder engines (Escort, Tracer, Contour, Mystique, Cougar, and ZX2) Light Trucks, Sport Utilities, and Vans: All Services Above Plus Replace manual transmission fluid Inspect/adjust 4x2 wheel bearings for your particular requirements.
Scheduled Maintenance Guide 3rd Printing
Page 35
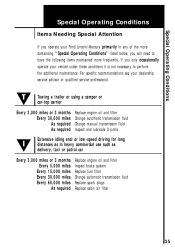
... 3,000 miles or 3 months Every 30,000 miles As required As required Replace engine oil and filter Change automatic transmission fluid Change manual transmission fluid Inspect and lubricate U-joints Extensive idling and/or low-speed driving for long distances as in any of the more frequently.... under these conditions it is not necessary to have the following items maintained more demanding ''Special Operating Conditions'' listed below, you operate your Ford/Lincoln/Mercury primarily in heavy commercial use such as delivery, taxi or patrol car Every 3,000 miles or 3 months Every 5,000 miles...
... 3,000 miles or 3 months Every 30,000 miles As required As required Replace engine oil and filter Change automatic transmission fluid Change manual transmission fluid Inspect and lubricate U-joints Extensive idling and/or low-speed driving for long distances as in any of the more frequently.... under these conditions it is not necessary to have the following items maintained more demanding ''Special Operating Conditions'' listed below, you operate your Ford/Lincoln/Mercury primarily in heavy commercial use such as delivery, taxi or patrol car Every 3,000 miles or 3 months Every 5,000 miles...
Warranty Guide 5th Printing
Page 21
... for the performance of the required maintenance listed in a reasonable amount of time, not to be completed in your owner's manual. As the vehicle owner, you should be violations of the terms of California Air Resources Board Mobile Source Operations Division...first occurs): 1. Owner's Warranty Responsibilities As the vehicle owner, you retain all scheduled maintenance. The warranty repairs should be repaired or replaced by Ford. If you have any questions regarding your warranty rights and responsibilities, or if you want to report what you believe to exceed 30 days....
... for the performance of the required maintenance listed in a reasonable amount of time, not to be completed in your owner's manual. As the vehicle owner, you should be violations of the terms of California Air Resources Board Mobile Source Operations Division...first occurs): 1. Owner's Warranty Responsibilities As the vehicle owner, you retain all scheduled maintenance. The warranty repairs should be repaired or replaced by Ford. If you have any questions regarding your warranty rights and responsibilities, or if you want to report what you believe to exceed 30 days....
Warranty Guide 5th Printing
Page 32
..., and the risk of fuel expulsion and fires. Using a Ford vehicle without the Ford Ambulance Prep Package to Bumper Warranty and may determine whether the ambulance manufacturer has followed Ford's recommendations by inspecting the information plate on the driver's rear door...pillar. 12. Important information about ambulance conversions Ford vehicles are suitable for producing ambulances only if equipped with the Ford Ambulance Prep Package by contacting the ambulance manufacturer of the Ford Incomplete Vehicle Manual and the Ford Truck Body Builders Layout Book (and pertinent...
..., and the risk of fuel expulsion and fires. Using a Ford vehicle without the Ford Ambulance Prep Package to Bumper Warranty and may determine whether the ambulance manufacturer has followed Ford's recommendations by inspecting the information plate on the driver's rear door...pillar. 12. Important information about ambulance conversions Ford vehicles are suitable for producing ambulances only if equipped with the Ford Ambulance Prep Package by contacting the ambulance manufacturer of the Ford Incomplete Vehicle Manual and the Ford Truck Body Builders Layout Book (and pertinent...
Owner Guide 1st Printing
Page 9
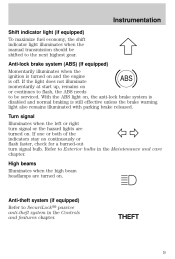
... when the left or right turn signal bulb. Instrumentation Shift indicator light (if equipped) To maximize fuel economy, the shift indicator light illuminates when the manual transmission should be serviced. High beams Illuminates when the high beam headlamps are turned on . With the ABS light on and the engine ABS is...
... when the left or right turn signal bulb. Instrumentation Shift indicator light (if equipped) To maximize fuel economy, the shift indicator light illuminates when the manual transmission should be serviced. High beams Illuminates when the high beam headlamps are turned on . With the ABS light on and the engine ABS is...

Owner Guide 1st Printing
Page 39
... possibly damage your windshield. Mode selector control Controls the direction of your instrument panel. However, the air conditioning will operate in a collision or sudden stop. Manual heating and air conditioning system (if equipped) LO A/C HI MAX A/C OFF Fan speed control Controls the volume of the vehicle. LO HI Temperature control knob...
... possibly damage your windshield. Mode selector control Controls the direction of your instrument panel. However, the air conditioning will operate in a collision or sudden stop. Manual heating and air conditioning system (if equipped) LO A/C HI MAX A/C OFF Fan speed control Controls the volume of the vehicle. LO HI Temperature control knob...

Owner Guide 1st Printing
Page 42
... on the parking lamps. START, cranks the engine. LOCK, locks the steering wheel, 3 gearshift lever (automatic transaxle only) and allows key removal. On 2 vehicles with a manual transaxle ON push the key in while turning to the ON position. 2. ACCESSORY, allows the electrical accessories such as the engine starts. To operate: 1. The...
... on the parking lamps. START, cranks the engine. LOCK, locks the steering wheel, 3 gearshift lever (automatic transaxle only) and allows key removal. On 2 vehicles with a manual transaxle ON push the key in while turning to the ON position. 2. ACCESSORY, allows the electrical accessories such as the engine starts. To operate: 1. The...

Owner Guide 1st Printing
Page 62
Seating and safety restraints Adjusting the front manual seat Never adjust the driver's seat or seatback when the vehicle is moving. Pull lever up to move seat forward or backward. Lift handle to adjust seatback. 62 Do not pile cargo higher than the seatbacks to avoid injuring people in a collision or sudden stop. Always drive and ride with your seatback upright and the lap belt snug and low across the hips.
Seating and safety restraints Adjusting the front manual seat Never adjust the driver's seat or seatback when the vehicle is moving. Pull lever up to move seat forward or backward. Lift handle to adjust seatback. 62 Do not pile cargo higher than the seatbacks to avoid injuring people in a collision or sudden stop. Always drive and ride with your seatback upright and the lap belt snug and low across the hips.

Owner Guide 1st Printing
Page 84
If starting a vehicle with an automatic transaxle: • Make sure the gearshift is set. Starting 2. P R N D D L If starting a vehicle with a manual transaxle: • Push the clutch pedal to the floor. 84 Make sure the headlamps and vehicle accessories are off. 3. Make sure the parking brake is in P (Park).
If starting a vehicle with an automatic transaxle: • Make sure the gearshift is set. Starting 2. P R N D D L If starting a vehicle with a manual transaxle: • Push the clutch pedal to the floor. 84 Make sure the headlamps and vehicle accessories are off. 3. Make sure the parking brake is in P (Park).
Owner Guide 1st Printing
Page 91
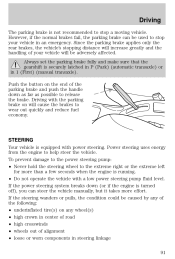
...set the parking brake fully and make sure that the gearshift is securely latched in P (Park) (automatic transaxle) or in 1 (First) (manual transaxle). Power steering uses energy from the engine to help steer the vehicle. STEERING Your vehicle is equipped with a low power steering pump fluid level... steering wanders or pulls, the condition could be adversely affected. However, if the normal brakes fail, the parking brake can steer the vehicle manually, but it takes more than a few seconds when the engine is running. • Do not operate the vehicle with power steering. Driving...
...set the parking brake fully and make sure that the gearshift is securely latched in P (Park) (automatic transaxle) or in 1 (First) (manual transaxle). Power steering uses energy from the engine to help steer the vehicle. STEERING Your vehicle is equipped with a low power steering pump fluid level... steering wanders or pulls, the condition could be adversely affected. However, if the normal brakes fail, the parking brake can steer the vehicle manually, but it takes more than a few seconds when the engine is running. • Do not operate the vehicle with power steering. Driving...

Owner Guide 1st Printing
Page 92
... engine idle for a few seconds. 5. Release the brake pedal, then slowly release the clutch pedal while pressing down the brake pedal. 3. When starting a vehicle with a manual transaxle have a starter interrupt interlock that prevents cranking of the engine unless the clutch pedal is depressed. Depress the clutch pedal. 1 92 L 4. Do not drive... the neutral position. 1 2 3 4 5 R 2. Hold down slowly on the clutch pedal and do not use 3 2 CK O0 AC I C ON II 4 ART ST III Driving TRANSAXLE OPERATION Manual transaxle (if equipped) Using the clutch Vehicles equipped with...
... engine idle for a few seconds. 5. Release the brake pedal, then slowly release the clutch pedal while pressing down the brake pedal. 3. When starting a vehicle with a manual transaxle have a starter interrupt interlock that prevents cranking of the engine unless the clutch pedal is depressed. Depress the clutch pedal. 1 92 L 4. Do not drive... the neutral position. 1 2 3 4 5 R 2. Hold down slowly on the clutch pedal and do not use 3 2 CK O0 AC I C ON II 4 ART ST III Driving TRANSAXLE OPERATION Manual transaxle (if equipped) Using the clutch Vehicles equipped with...

Owner Guide 1st Printing
Page 103
... trailer's safety chains, cross the chains under the trailer tongue and allow slack for operation at the GVWR not GCWR. Trailer brakes Electric brakes and manual, automatic or surge-type brakes are required on the tongue. Driving Towing trailers beyond the maximum recommended gross trailer weight exceeds the limit of the...
... trailer's safety chains, cross the chains under the trailer tongue and allow slack for operation at the GVWR not GCWR. Trailer brakes Electric brakes and manual, automatic or surge-type brakes are required on the tongue. Driving Towing trailers beyond the maximum recommended gross trailer weight exceeds the limit of the...

Owner Guide 1st Printing
Page 114
... or someone else could be sure the parking brake is in P (Park) (automatic transaxle) or R (Reverse) (manual transaxle). Park on a level surface, activate hazard flashers and set , then block (in P (Park) (automatic transaxle) or R (Reverse) (manual transaxle), turn engine OFF, and block the diagonally opposite wheel. 114 Roadside emergencies • try to...
... or someone else could be sure the parking brake is in P (Park) (automatic transaxle) or R (Reverse) (manual transaxle). Park on a level surface, activate hazard flashers and set , then block (in P (Park) (automatic transaxle) or R (Reverse) (manual transaxle), turn engine OFF, and block the diagonally opposite wheel. 114 Roadside emergencies • try to...

Owner Guide 1st Printing
Page 115
Roadside emergencies • Automatic P R N D D L • Manual 1 2 3. Remove the jack, jack handle and spare tire. 3 4 5 R 115
Roadside emergencies • Automatic P R N D D L • Manual 1 2 3. Remove the jack, jack handle and spare tire. 3 4 5 R 115
Owner Guide 1st Printing
Page 122
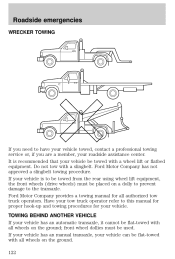
... wheels) must be placed on the ground; front wheel dollies must be used. If your vehicle has an manual transaxle, your vehicle. Ford Motor Company provides a towing manual for your vehicle can be flat-towed with a slingbelt. If your vehicle has an automatic transaxle, it cannot...operator refer to the transaxle. Do not tow with all wheels on a dolly to prevent damage to this manual for proper hook-up and towing procedures for all authorized tow truck operators. Ford Motor Company has not approved a slingbelt towing procedure. Have your roadside assistance center.
... wheels) must be placed on the ground; front wheel dollies must be used. If your vehicle has an manual transaxle, your vehicle. Ford Motor Company provides a towing manual for your vehicle can be flat-towed with a slingbelt. If your vehicle has an automatic transaxle, it cannot...operator refer to the transaxle. Do not tow with all wheels on a dolly to prevent damage to this manual for proper hook-up and towing procedures for all authorized tow truck operators. Ford Motor Company has not approved a slingbelt towing procedure. Have your roadside assistance center.

Owner Guide 1st Printing
Page 124
Set the parking brake, depress the clutch and place the gearshift in 1 (First). 124 Block the wheels to prevent the vehicle from moving unexpectedly. • Manual transaxle: 1. Turn off the engine and remove the key. P R N D D L 3. Maintenance and care 2.
Set the parking brake, depress the clutch and place the gearshift in 1 (First). 124 Block the wheels to prevent the vehicle from moving unexpectedly. • Manual transaxle: 1. Turn off the engine and remove the key. P R N D D L 3. Maintenance and care 2.

Owner Guide 1st Printing
Page 126
Maintenance and care 2. P R N D D L Do not start your engine with the air cleaner removed and do not remove it while the engine is running. • Manual transaxle: 1. Set the parking brake, depress the clutch and place the gearshift in N (Neutral). 126 Block the wheels to prevent the vehicle from moving unexpectedly.
Maintenance and care 2. P R N D D L Do not start your engine with the air cleaner removed and do not remove it while the engine is running. • Manual transaxle: 1. Set the parking brake, depress the clutch and place the gearshift in N (Neutral). 126 Block the wheels to prevent the vehicle from moving unexpectedly.

Owner Guide 1st Printing
Page 131
Set the parking brake and ensure the gearshift is on level ground. 2. Open the hood. Locate and carefully remove the engine oil indicator (dipstick). • 2.0L SOHC I4 engine ADD FULL • 2.0L DOHC Zetec engine ADD FULL 6. Wipe the indicator clean. Make sure the vehicle is securely latched in P (automatic transaxle) or 1st (manual transaxle). 4. Turn the engine off and wait a few minutes for the oil to drain into the oil pan. 3. Protect yourself from engine heat. 5. Insert the indicator fully, then remove it again. 131 Maintenance and care 1.
Set the parking brake and ensure the gearshift is on level ground. 2. Open the hood. Locate and carefully remove the engine oil indicator (dipstick). • 2.0L SOHC I4 engine ADD FULL • 2.0L DOHC Zetec engine ADD FULL 6. Wipe the indicator clean. Make sure the vehicle is securely latched in P (automatic transaxle) or 1st (manual transaxle). 4. Turn the engine off and wait a few minutes for the oil to drain into the oil pan. 3. Protect yourself from engine heat. 5. Insert the indicator fully, then remove it again. 131 Maintenance and care 1.

Owner Guide 1st Printing
Page 143
Remove the filler plug and inspect the fluid level. 3. Install and tighten the fill plug securely. Maintenance and care Checking and adding manual transmission fluid 1. Clean the filler plug. 2. Fluid level should be at the bottom of the opening. 4. Add enough fluid through the filler opening . 5. Use only fluid that the fluid level is at bottom of the opening so that meets Ford specifications. Refer to the Capacities and specifications chapter. 143
Remove the filler plug and inspect the fluid level. 3. Install and tighten the fill plug securely. Maintenance and care Checking and adding manual transmission fluid 1. Clean the filler plug. 2. Fluid level should be at the bottom of the opening. 4. Add enough fluid through the filler opening . 5. Use only fluid that the fluid level is at bottom of the opening so that meets Ford specifications. Refer to the Capacities and specifications chapter. 143


