
Owner Guide 1st Printing
Page 12
.... The fuel gauge may vary slightly when the 1 vehicle is in the ON position). If it enters the red section, the engine is running or hot. Instrumentation Fuel gauge Displays approximately how much fuel is in the fuel tank (when the key is in motion...remains within the normal area (the area between the "H" and "C"). C H Never remove the coolant reservoir cap while the engine is overheating. If the coolant is being refueled. The ignition / 2 should be in the tank. Engine coolant temperature gauge Indicates the temperature of reserve fuel in the OFF position while E...
.... The fuel gauge may vary slightly when the 1 vehicle is in the ON position). If it enters the red section, the engine is running or hot. Instrumentation Fuel gauge Displays approximately how much fuel is in the fuel tank (when the key is in motion...remains within the normal area (the area between the "H" and "C"). C H Never remove the coolant reservoir cap while the engine is overheating. If the coolant is being refueled. The ignition / 2 should be in the tank. Engine coolant temperature gauge Indicates the temperature of reserve fuel in the OFF position while E...

Owner Guide 1st Printing
Page 42
... second position to turn on . 3. LOCK, locks the steering wheel, 3 gearshift lever (automatic transaxle only) and allows key removal. START, cranks the engine. The defroster will be lit while the rear window defroster is not running. 3. ART ST III HEADLAMP CONTROL Rotate the headlamp ... the parking lamps. To operate: 1. Turn the ignition to C II 4 lock. 2. ACCESSORY, allows the electrical accessories such as the engine starts. Press and release the control once to turn off . Warning lights illuminated. POSITIONS OF THE IGNITION 1. Controls and features REAR WINDOW ...
... second position to turn on . 3. LOCK, locks the steering wheel, 3 gearshift lever (automatic transaxle only) and allows key removal. START, cranks the engine. The defroster will be lit while the rear window defroster is not running. 3. ART ST III HEADLAMP CONTROL Rotate the headlamp ... the parking lamps. To operate: 1. Turn the ignition to C II 4 lock. 2. ACCESSORY, allows the electrical accessories such as the engine starts. Press and release the control once to turn off . Warning lights illuminated. POSITIONS OF THE IGNITION 1. Controls and features REAR WINDOW ...

Owner Guide 1st Printing
Page 94
... (recommended for best fuel economy) 1-2 22 km/h (14 mph) 2-3 40 km/h (25 mph) 3-4 55 km/h (34 mph) 4-5 70 km/h (44 mph) 94 L Driving 4. Turn engine off and remove the key. 3 2 CK O0 AC I C ON II 4 ART ST III 1 Do not park your vehicle in Neutral, it may move unexpectedly and injure someone...
... (recommended for best fuel economy) 1-2 22 km/h (14 mph) 2-3 40 km/h (25 mph) 3-4 55 km/h (34 mph) 4-5 70 km/h (44 mph) 94 L Driving 4. Turn engine off and remove the key. 3 2 CK O0 AC I C ON II 4 ART ST III 1 Do not park your vehicle in Neutral, it may move unexpectedly and injure someone...

Owner Guide 1st Printing
Page 96
... emergencies chapter. If your vehicle until you verify that a fuse has blown and the vehicle's brakelamps may overheat. 96 Continue depressing the brake pedal, and remove the shift-lock override cap with a 2.5 cm (1 inch) or longer screwdriver. 2. Do not rock the vehicle for more than a few minutes. Refer to move the...
... emergencies chapter. If your vehicle until you verify that a fuse has blown and the vehicle's brakelamps may overheat. 96 Continue depressing the brake pedal, and remove the shift-lock override cap with a 2.5 cm (1 inch) or longer screwdriver. 2. Do not rock the vehicle for more than a few minutes. Refer to move the...

Owner Guide 1st Printing
Page 114
... the vehicle from its wheel • use the wheel for any other side and end of the vehicle) to repair the temporary spare tire or remove it from moving or slipping off the jack, you change procedure 1. Park on a level surface, activate hazard flashers and set , then block (in ... from moving when you or someone else could be sure the parking brake is in P (Park) (automatic transaxle) or R (Reverse) (manual transaxle), turn engine OFF, and block the diagonally opposite wheel. 114 When one of vehicle Tire change a tire, be seriously injured. 2. If the vehicle slips off the jack...
... the vehicle from its wheel • use the wheel for any other side and end of the vehicle) to repair the temporary spare tire or remove it from moving or slipping off the jack, you change procedure 1. Park on a level surface, activate hazard flashers and set , then block (in ... from moving when you or someone else could be sure the parking brake is in P (Park) (automatic transaxle) or R (Reverse) (manual transaxle), turn engine OFF, and block the diagonally opposite wheel. 114 When one of vehicle Tire change a tire, be seriously injured. 2. If the vehicle slips off the jack...
Owner Guide 1st Printing
Page 117
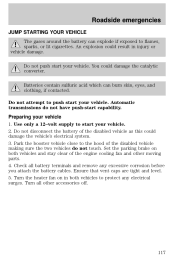
... to start your vehicle. 2. Park the booster vehicle close to push start capability. An explosion could result in both vehicles and stay clear of the engine cooling fan and other accessories off. 117 Do not attempt to the hood of the disabled vehicle as this could damage the catalytic converter. Automatic... battery can burn skin, eyes, and clothing, if contacted. Preparing your vehicle. Ensure that vent caps are tight and level. 5. Turn all battery terminals and remove any electrical surges. Turn the heater fan on both vehicles to flames, sparks, or lit cigarettes.
... to start your vehicle. 2. Park the booster vehicle close to push start capability. An explosion could result in both vehicles and stay clear of the engine cooling fan and other accessories off. 117 Do not attempt to the hood of the disabled vehicle as this could damage the catalytic converter. Automatic... battery can burn skin, eyes, and clothing, if contacted. Preparing your vehicle. Ensure that vent caps are tight and level. 5. Turn all battery terminals and remove any electrical surges. Turn the heater fan on both vehicles to flames, sparks, or lit cigarettes.

Owner Guide 1st Printing
Page 120
... - - - - + + + + Once the disabled vehicle has been started, run the engine at moderately increased speed. 2. Remove the jumper cable on the negative (-) connection of the disabled vehicle. 3. Remove the jumper cable from the ground metal surface. 2. Start the engine of the booster vehicle and run both engines for an additional three minutes before disconnecting the jumper...
... - - - - + + + + Once the disabled vehicle has been started, run the engine at moderately increased speed. 2. Remove the jumper cable on the negative (-) connection of the disabled vehicle. 3. Remove the jumper cable from the ground metal surface. 2. Start the engine of the booster vehicle and run both engines for an additional three minutes before disconnecting the jumper...

Owner Guide 1st Printing
Page 121
Remove the jumper cable from the positive (+) terminal of the booster vehicle's battery. 4. After the disabled vehicle has been started and the jumper cables removed, allow it to idle for several minutes so the engine computer can relearn its idle conditions. - - - + + - + + 121 Remove the jumper cable from the positive (+) terminal of the disabled vehicle's battery. Roadside emergencies 3.
Remove the jumper cable from the positive (+) terminal of the booster vehicle's battery. 4. After the disabled vehicle has been started and the jumper cables removed, allow it to idle for several minutes so the engine computer can relearn its idle conditions. - - - + + - + + 121 Remove the jumper cable from the positive (+) terminal of the disabled vehicle's battery. Roadside emergencies 3.

Owner Guide 1st Printing
Page 124
Block the wheels to prevent the vehicle from moving unexpectedly. • Manual transaxle: 1. Turn off the engine and remove the key. Set the parking brake, depress the clutch and place the gearshift in 1 (First). 124 P R N D D L 3. Maintenance and care 2.
Block the wheels to prevent the vehicle from moving unexpectedly. • Manual transaxle: 1. Turn off the engine and remove the key. Set the parking brake, depress the clutch and place the gearshift in 1 (First). 124 P R N D D L 3. Maintenance and care 2.
Owner Guide 1st Printing
Page 125
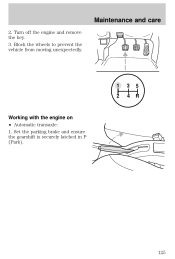
Set the parking brake and ensure the gearshift is securely latched in P (Park). 125 Turn off the engine and remove the key. 3. Block the wheels to prevent the vehicle from moving unexpectedly. 1 2 3 4 5 R Working with the engine on • Automatic transaxle: 1. Maintenance and care 2.
Set the parking brake and ensure the gearshift is securely latched in P (Park). 125 Turn off the engine and remove the key. 3. Block the wheels to prevent the vehicle from moving unexpectedly. 1 2 3 4 5 R Working with the engine on • Automatic transaxle: 1. Maintenance and care 2.

Owner Guide 1st Printing
Page 126
Block the wheels to prevent the vehicle from moving unexpectedly. Set the parking brake, depress the clutch and place the gearshift in N (Neutral). 126 Maintenance and care 2. P R N D D L Do not start your engine with the air cleaner removed and do not remove it while the engine is running. • Manual transaxle: 1.
Block the wheels to prevent the vehicle from moving unexpectedly. Set the parking brake, depress the clutch and place the gearshift in N (Neutral). 126 Maintenance and care 2. P R N D D L Do not start your engine with the air cleaner removed and do not remove it while the engine is running. • Manual transaxle: 1.

Owner Guide 1st Printing
Page 127
Inside the vehicle, pull the hood release handle located under the bottom left corner of the instrument panel. 127 OPENING THE HOOD 1. Maintenance and care 2. Block the wheels to prevent the vehicle from moving unexpectedly. 1 2 3 4 5 R Do not start your engine with the air cleaner removed and do not remove it while the engine is running.
Inside the vehicle, pull the hood release handle located under the bottom left corner of the instrument panel. 127 OPENING THE HOOD 1. Maintenance and care 2. Block the wheels to prevent the vehicle from moving unexpectedly. 1 2 3 4 5 R Do not start your engine with the air cleaner removed and do not remove it while the engine is running.

Owner Guide 1st Printing
Page 131
Set the parking brake and ensure the gearshift is on level ground. 2. Open the hood. Maintenance and care 1. Make sure the vehicle is securely latched in P (automatic transaxle) or 1st (manual transaxle). 4. Protect yourself from engine heat. 5. Turn the engine off and wait a few minutes for the oil to drain into the oil pan. 3. Wipe the indicator clean. Insert the indicator fully, then remove it again. 131 Locate and carefully remove the engine oil indicator (dipstick). • 2.0L SOHC I4 engine ADD FULL • 2.0L DOHC Zetec engine ADD FULL 6.
Set the parking brake and ensure the gearshift is on level ground. 2. Open the hood. Maintenance and care 1. Make sure the vehicle is securely latched in P (automatic transaxle) or 1st (manual transaxle). 4. Protect yourself from engine heat. 5. Turn the engine off and wait a few minutes for the oil to drain into the oil pan. 3. Wipe the indicator clean. Insert the indicator fully, then remove it again. 131 Locate and carefully remove the engine oil indicator (dipstick). • 2.0L SOHC I4 engine ADD FULL • 2.0L DOHC Zetec engine ADD FULL 6.

Owner Guide 1st Printing
Page 132
...possible oil loss, DO NOT operate the vehicle with the engine oil level indicator and/or the engine oil filler cap removed. 132 Some oil must be removed from the engine by turning the filler cap clockwise until three clicks can be heard. Check the engine oil. DO NOT ADD OIL. • If the oil... level is acceptable. Remove the engine oil filler cap and use a funnel to pour the engine oil into the opening. 3. Maintenance and care • If the oil level is ...
...possible oil loss, DO NOT operate the vehicle with the engine oil level indicator and/or the engine oil filler cap removed. 132 Some oil must be removed from the engine by turning the filler cap clockwise until three clicks can be heard. Check the engine oil. DO NOT ADD OIL. • If the oil... level is acceptable. Remove the engine oil filler cap and use a funnel to pour the engine oil into the opening. 3. Maintenance and care • If the oil level is ...
Owner Guide 1st Printing
Page 139
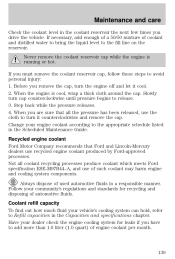
...and standards for leaks if you must remove the coolant reservoir cap, follow these steps to the fill line on the reservoir. Recycled engine coolant Ford Motor Company recommends that all coolant recycling processes produce coolant which meets Ford specification ESE-M97B44-A, and use of ...refill capacity To find out how much fluid your engine coolant according to release. 3. Not all the pressure has been released, use recycled engine coolant produced by Ford-approved processes. Never remove the coolant reservoir cap while the engine is cool, wrap a thick cloth around the cap...
...and standards for leaks if you must remove the coolant reservoir cap, follow these steps to the fill line on the reservoir. Recycled engine coolant Ford Motor Company recommends that all coolant recycling processes produce coolant which meets Ford specification ESE-M97B44-A, and use of ...refill capacity To find out how much fluid your engine coolant according to release. 3. Not all the pressure has been released, use recycled engine coolant produced by Ford-approved processes. Never remove the coolant reservoir cap while the engine is cool, wrap a thick cloth around the cap...

Owner Guide 1st Printing
Page 141
...lint free rag. 6. The fluid should be between the MIN and MAX lines. Turn the engine off for normal operating temperature. 141 Allow sufficient time for fluid checks and changes. Remove the dipstick, wiping it reaches normal operating temperature. 2. Maintenance and care 2. If your Scheduled ...Maintenance Guide for scheduled intervals for each gear to cool before checking. 1. Park the vehicle on the reservoir. Remove the dipstick and inspect the fluid level. However, the fluid level should be turned off . 4. Latch the gearshift lever in the ...
...lint free rag. 6. The fluid should be between the MIN and MAX lines. Turn the engine off for normal operating temperature. 141 Allow sufficient time for fluid checks and changes. Remove the dipstick, wiping it reaches normal operating temperature. 2. Maintenance and care 2. If your Scheduled ...Maintenance Guide for scheduled intervals for each gear to cool before checking. 1. Park the vehicle on the reservoir. Remove the dipstick and inspect the fluid level. However, the fluid level should be turned off . 4. Latch the gearshift lever in the ...

Owner Guide 1st Printing
Page 146
... authorized standards for changing the air filter element. Swing the left side open and remove the air filter element. 3. CHANGING THE AIR FILTER ELEMENT 1. Do not start your engine with the air cleaner removed and do not remove it while the engine is running. Then swing the left side of the air filter housing closed...
... authorized standards for changing the air filter element. Swing the left side open and remove the air filter element. 3. CHANGING THE AIR FILTER ELEMENT 1. Do not start your engine with the air cleaner removed and do not remove it while the engine is running. Then swing the left side of the air filter housing closed...
Owner Guide 1st Printing
Page 153
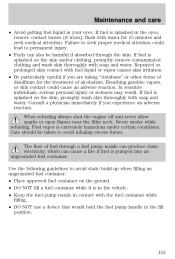
... minutes and seek medical attention. If fuel is splashed on the skin and/or clothing, promptly remove contaminated clothing and wash skin thoroughly with soap and water. When refueling always shut the engine off and never allow sparks or open flames near the filler neck. Never smoke while refueling.... in contact with the fuel container while filling. • DO NOT use a device that would hold the fuel pump handle in the eyes, remove contact lenses (if worn), flush with fuel liquid or vapor causes skin irritation. • Be particularly careful if you experience an adverse reaction. ...
... minutes and seek medical attention. If fuel is splashed on the skin and/or clothing, promptly remove contaminated clothing and wash skin thoroughly with soap and water. When refueling always shut the engine off and never allow sparks or open flames near the filler neck. Never smoke while refueling.... in contact with the fuel container while filling. • DO NOT use a device that would hold the fuel pump handle in the eyes, remove contact lenses (if worn), flush with fuel liquid or vapor causes skin irritation. • Be particularly careful if you experience an adverse reaction. ...

Owner Guide 1st Printing
Page 154
... the fuel filler cap, replace it . It can damage critical fuel system components. 154 Choosing the right fuel Use only UNLEADED FUEL. Turn the engine off the engine, remove the fuel filler cap, align the cap properly and reinstall it with a fuel filler cap that is designed for any damage to the fuel... tank or fuel system if the correct genuine Ford or Motorcraft fuel filler cap is not used. To install the cap, align the tabs on the...
... the fuel filler cap, replace it . It can damage critical fuel system components. 154 Choosing the right fuel Use only UNLEADED FUEL. Turn the engine off the engine, remove the fuel filler cap, align the cap properly and reinstall it with a fuel filler cap that is designed for any damage to the fuel... tank or fuel system if the correct genuine Ford or Motorcraft fuel filler cap is not used. To install the cap, align the tabs on the...

Owner Guide 1st Printing
Page 160
...First, at least 10 minutes of the Instrumentation chapter. Exhaust leaks may result in dry grass or other than Ford, Motorcraft or Ford-authorized parts are not permitted to intentionally remove an emission control device or prevent it may not pass the I /M test" condition. Do not make any... unauthorized changes to genuine Ford Motor Company parts in the Warning Lights and Chimes section of driving on or near the engine. Please consult your vehicle or engine. ...
...First, at least 10 minutes of the Instrumentation chapter. Exhaust leaks may result in dry grass or other than Ford, Motorcraft or Ford-authorized parts are not permitted to intentionally remove an emission control device or prevent it may not pass the I /M test" condition. Do not make any... unauthorized changes to genuine Ford Motor Company parts in the Warning Lights and Chimes section of driving on or near the engine. Please consult your vehicle or engine. ...


