
Owner's Manual
Page 43
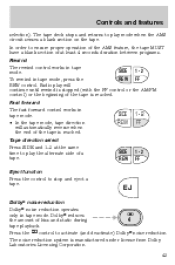
... reduction Dolby noise reduction operates only in tape mode, press the REW control. Eject function Press the control to play will automatically reverse when the end of hiss and static during tape playback. Press the The noise reduction system is manufactured under license from Dolby Laboratories Licensing Corporation. 43 Tape direction...
... reduction Dolby noise reduction operates only in tape mode, press the REW control. Eject function Press the control to play will automatically reverse when the end of hiss and static during tape playback. Press the The noise reduction system is manufactured under license from Dolby Laboratories Licensing Corporation. 43 Tape direction...
Owner's Manual
Page 47
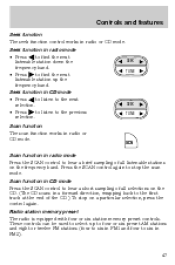
... the previous selection. Scan function The scan function works in radio or CD mode. These controls can be used to the first track at the end of all listenable stations on a particular selection, press the control again. Controls and features Seek function The seek function control works in radio or CD...
... the previous selection. Scan function The scan function works in radio or CD mode. These controls can be used to the first track at the end of all listenable stations on a particular selection, press the control again. Controls and features Seek function The seek function control works in radio or CD...

Owner's Manual
Page 54
... again. Scan function in FM1 and four to stop on a particular selection, press the control again. At the end of the tape's first side, direction automatically reverses to the first track at the end of all listenable stations on the tape. (The tape scans in radio, tape or CD mode (if equipped).
... again. Scan function in FM1 and four to stop on a particular selection, press the control again. At the end of the tape's first side, direction automatically reverses to the first track at the end of all listenable stations on the tape. (The tape scans in radio, tape or CD mode (if equipped).

Owner's Manual
Page 57
... mode, pressing the control for more than three seconds results in fast rewind. Tape direction select Press SIDE 1-2 to play will automatically reverse when the end of a tape. Pressing the control for less than three seconds results in slow rewind. Eject function Press the control to activate (and deactivate) Dolby noise...
... mode, pressing the control for more than three seconds results in fast rewind. Tape direction select Press SIDE 1-2 to play will automatically reverse when the end of a tape. Pressing the control for less than three seconds results in slow rewind. Eject function Press the control to activate (and deactivate) Dolby noise...
Owner's Manual
Page 66
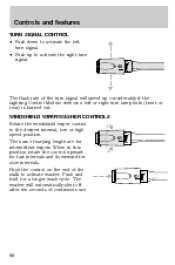
HI LO F S OFF The flash rate of continuous use. HI LO F S OFF HI LO F S OFF 66 Push the control on the end of varying length are for intermittent wipers. Push and hold for slow intervals. The washer will automatically shut off after ten seconds of the turn ...
HI LO F S OFF The flash rate of continuous use. HI LO F S OFF HI LO F S OFF 66 Push the control on the end of varying length are for intermittent wipers. Push and hold for slow intervals. The washer will automatically shut off after ten seconds of the turn ...
Owner's Manual
Page 68
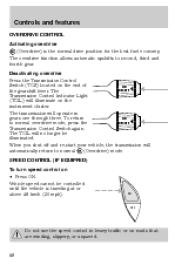
... shut off and re-start your vehicle, the transmission will illuminate on • Press ON. The TCIL will operate in heavy traffic or on the end of O/D ON/OFF the gearshift lever. Controls and features OVERDRIVE CONTROL Activating overdrive (Overdrive) is traveling at or above 48 km/h (30 mph).
... shut off and re-start your vehicle, the transmission will illuminate on • Press ON. The TCIL will operate in heavy traffic or on the end of O/D ON/OFF the gearshift lever. Controls and features OVERDRIVE CONTROL Activating overdrive (Overdrive) is traveling at or above 48 km/h (30 mph).
Owner's Manual
Page 73
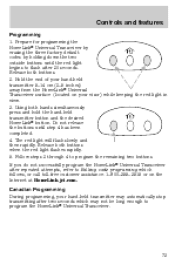
Hold the end of your hand-held transmitter 5-14 cm (2-5 inches) away from the HomeLink Universal Transceiver surface (located on your hand-held transmitter button and the desired ...
Hold the end of your hand-held transmitter 5-14 cm (2-5 inches) away from the HomeLink Universal Transceiver surface (located on your hand-held transmitter button and the desired ...
Owner's Manual
Page 81
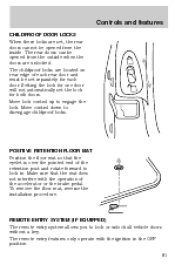
... MAT Position the floor mat so that the mat does not interfere with the ignition in . Make sure that the eyelet is over the pointed end of the retention post and rotate forward to lock or unlock all vehicle doors without a key.
... MAT Position the floor mat so that the mat does not interfere with the ignition in . Make sure that the eyelet is over the pointed end of the retention post and rotate forward to lock or unlock all vehicle doors without a key.
Owner's Manual
Page 99
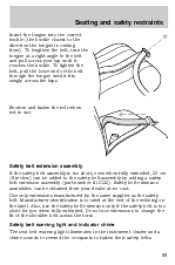
... safety belt assembly by the same supplier as the safety belt. Do not use extensions to the belt and pull across your dealer at the end of the webbing on the label. Also, use . To lengthen the belt, turn the tongue at a right angle to change the fit of the belt... through the tongue until it fits snugly across the torso. To tighten the belt, pull the loose end of the shoulder belt across the hips. Seating and safety restraints Insert the tongue into the correct buckle (the buckle closest to the direction the...
... safety belt assembly by the same supplier as the safety belt. Do not use extensions to the belt and pull across your dealer at the end of the webbing on the label. Also, use . To lengthen the belt, turn the tongue at a right angle to change the fit of the belt... through the tongue until it fits snugly across the torso. To tighten the belt, pull the loose end of the shoulder belt across the hips. Seating and safety restraints Insert the tongue into the correct buckle (the buckle closest to the direction the...
Owner's Manual
Page 111
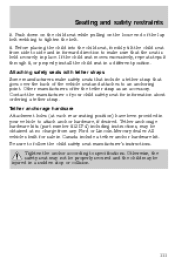
Seating and safety restraints 5. Before placing the child into the child seat, forcibly tilt the child seat from any Ford or Lincoln-Mercury dealer. All vehicles built for information about ordering a tether strap. Otherwise, the safety seat may not be properly secured and the child ... the tether strap as an accessory. Tighten the anchor according to tighten the belt. 6. Push down on the child seat while pulling on the loose end of the lap belt webbing to specifications.
Seating and safety restraints 5. Before placing the child into the child seat, forcibly tilt the child seat from any Ford or Lincoln-Mercury dealer. All vehicles built for information about ordering a tether strap. Otherwise, the safety seat may not be properly secured and the child ... the tether strap as an accessory. Tighten the anchor according to tighten the belt. 6. Push down on the child seat while pulling on the loose end of the lap belt webbing to specifications.
Owner's Manual
Page 139
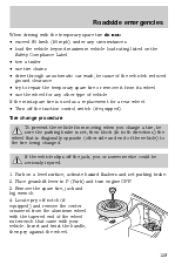
...mini-spare tire is set parking brake. 2. Locate pry off notch (if equipped) and remove the center ornament from the aluminum wheel with the tapered end of the wheel nut wrench that is diagonally opposite (other type of the vehicle's reduced ground clearance • try to the tire being changed. Roadside... emergencies When driving with the temporary spare tire do not: • exceed 80 km/h (50 mph) under any other side and end of the vehicle) to repair the temporary spare tire or remove it from moving when you or someone else could be sure the parking brake...
...mini-spare tire is set parking brake. 2. Locate pry off notch (if equipped) and remove the center ornament from the aluminum wheel with the tapered end of the wheel nut wrench that is diagonally opposite (other type of the vehicle's reduced ground clearance • try to the tire being changed. Roadside... emergencies When driving with the temporary spare tire do not: • exceed 80 km/h (50 mph) under any other side and end of the vehicle) to repair the temporary spare tire or remove it from moving when you or someone else could be sure the parking brake...
Owner's Manual
Page 143
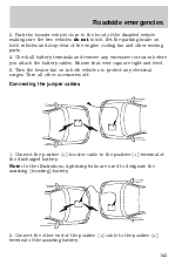
Turn all battery terminals and remove any electrical surges. Connect the positive (+) booster cable to the positive (+) terminal of the discharged battery. Connect the other end of the positive (+) cable to the positive (+) terminal of the assisting battery. 143 - - - + - + + + Turn the heater fan on both vehicles to protect any excessive corrosion ...
Turn all battery terminals and remove any electrical surges. Connect the positive (+) booster cable to the positive (+) terminal of the discharged battery. Connect the other end of the positive (+) cable to the positive (+) terminal of the assisting battery. 143 - - - + - + + + Turn the heater fan on both vehicles to protect any excessive corrosion ...

Owner's Manual
Page 144
... of the stalled vehicle's engine, away from the battery and the carburetor/fuel injection system. Be sure that surround the battery. 5. Do not connect the end of the second cable to the negative (-) terminal of an exposed metal part (to be jumped. Roadside emergencies 3. The preferred locations of the battery to...
... of the stalled vehicle's engine, away from the battery and the carburetor/fuel injection system. Be sure that surround the battery. 5. Do not connect the end of the second cable to the negative (-) terminal of an exposed metal part (to be jumped. Roadside emergencies 3. The preferred locations of the battery to...

Owner's Manual
Page 163
In case of acid contact with skin or eyes, flush immediately with your hands on the end walls could cause acid to flow through the vent caps, resulting in P (Park), turn off all accessories and start the engine. 3. To begin this process: 1. ...
In case of acid contact with skin or eyes, flush immediately with your hands on the end walls could cause acid to flow through the vent caps, resulting in P (Park), turn off all accessories and start the engine. 3. To begin this process: 1. ...
Owner's Manual
Page 179
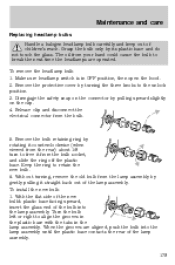
... ring to the unlock position. 3. To install the new bulb: 1. With the flat side of the new bulb's plastic base facing upward, insert the glass end of the bulb into the lamp assembly until the plastic base contacts the rear of the lamp assembly. 179 When the grooves are operated. Remove...
... ring to the unlock position. 3. To install the new bulb: 1. With the flat side of the new bulb's plastic base facing upward, insert the glass end of the bulb into the lamp assembly until the plastic base contacts the rear of the lamp assembly. 179 When the grooves are operated. Remove...

Owner's Manual
Page 202
... axle (GVWR or GAWR as indicated on the Safety compliance certification label). Customer assistance Carpet floor mats Cleaners, waxes and polishes Flat splash guards Front end covers (full and mini) Hood deflectors Locking gas cap Lubricants and oils Molded splash guards Molded vinyl floor mats Rallye bars Rear air deflectors Rear...
... axle (GVWR or GAWR as indicated on the Safety compliance certification label). Customer assistance Carpet floor mats Cleaners, waxes and polishes Flat splash guards Front end covers (full and mini) Hood deflectors Locking gas cap Lubricants and oils Molded splash guards Molded vinyl floor mats Rallye bars Rear air deflectors Rear...
Scheduled Maintenance Guide 3rd Printing
Page 14
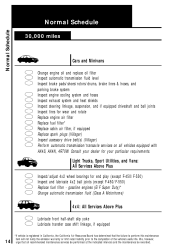
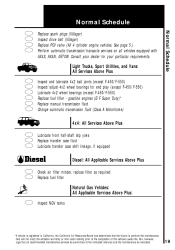
... determined that all vehicles equipped with AX4S, AX4N, 4R70W. Light Trucks, Sport Utilities, and Vans: All Services Above Plus Inspect/adjust 4x2 wheel bearings for end play (except F-450/F-550) Inspect and lubricate 4x2 ball joints (except F-450/F-550) Replace fuel filter -
... determined that all vehicles equipped with AX4S, AX4N, 4R70W. Light Trucks, Sport Utilities, and Vans: All Services Above Plus Inspect/adjust 4x2 wheel bearings for end play (except F-450/F-550) Inspect and lubricate 4x2 ball joints (except F-450/F-550) Replace fuel filter -
Scheduled Maintenance Guide 3rd Printing
Page 19
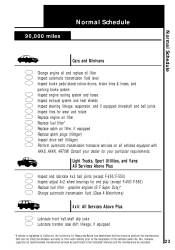
... Services Above Plus Inspect and lubricate 4x2 ball joints (except F-450/F-550) Inspect/adjust 4x2 wheel bearings for your particular requirements. Consult your dealer for end play (except F-450/F-550) Lubricate 4x2 wheel bearings (except F-450/F-550) Replace fuel filter - We, however, urge that the failure to perform this maintenance item...
... Services Above Plus Inspect and lubricate 4x2 ball joints (except F-450/F-550) Inspect/adjust 4x2 wheel bearings for your particular requirements. Consult your dealer for end play (except F-450/F-550) Lubricate 4x2 wheel bearings (except F-450/F-550) Replace fuel filter - We, however, urge that the failure to perform this maintenance item...
Scheduled Maintenance Guide 3rd Printing
Page 23
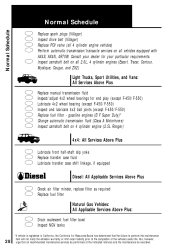
... maintenance item will not nulify the emission warranty or limit recall liability prior to the completion of the vehicle's useful life. Consult your dealer for end play (except F-450/F-550) Replace fuel filter - gasoline engines (E/F Super Duty)* Change automatic transmission fluid (Class A Motorhome) 4x4: All Services Above Plus Lubricate front half...
... maintenance item will not nulify the emission warranty or limit recall liability prior to the completion of the vehicle's useful life. Consult your dealer for end play (except F-450/F-550) Replace fuel filter - gasoline engines (E/F Super Duty)* Change automatic transmission fluid (Class A Motorhome) 4x4: All Services Above Plus Lubricate front half...
Scheduled Maintenance Guide 3rd Printing
Page 28
... automatic transmission/transaxle services on all recommended maintenance services be performed at the indicated intervals and the maintenance be recorded. 28 Consult your dealer for end play (except F-450/F-550) Lubricate 4x2 wheel bearing (except F-450/F-550) Inspect and lubricate 4x2 ball joints (except F-450/F-550) Replace fuel filter - Inspect camshaft...
... automatic transmission/transaxle services on all recommended maintenance services be performed at the indicated intervals and the maintenance be recorded. 28 Consult your dealer for end play (except F-450/F-550) Lubricate 4x2 wheel bearing (except F-450/F-550) Inspect and lubricate 4x2 ball joints (except F-450/F-550) Replace fuel filter - Inspect camshaft...


