Owner Guide 1st Printing
Page 19
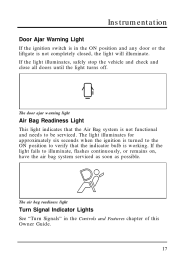
The light illuminates for approximately six seconds when the ignition is turned to the ON position to verify that the Air Bag system is not functional and needs to illuminate, flashes continuously, or remains on, .... The door ajar warning light Air Bag Readiness Light This light indicates that the indicator bulb is working. Instrumentation Door Ajar Warning Light If the ignition switch is in the Controls and Features chapter of this Owner Guide. 17
The light illuminates for approximately six seconds when the ignition is turned to the ON position to verify that the Air Bag system is not functional and needs to illuminate, flashes continuously, or remains on, .... The door ajar warning light Air Bag Readiness Light This light indicates that the indicator bulb is working. Instrumentation Door Ajar Warning Light If the ignition switch is in the Controls and Features chapter of this Owner Guide. 17
Owner Guide 1st Printing
Page 20
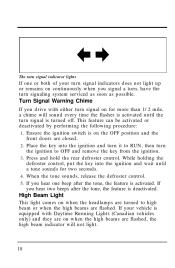
Ensure the ignition switch is activated. When the tone sounds, release the defroster control. 5. Place the key into the ignition and wait until the turn signal is turned off. If you hear two beeps after the tone, the feature is on the OFF position and ... vehicle is deactivated. High Beam Light This light comes on when the headlamps are flashed. While holding the defroster control, put the key into the ignition and turn it to RUN, then turn signaling system serviced as soon as possible. Turn Signal Warning Chime If you signal a turn, have the turn...
Ensure the ignition switch is activated. When the tone sounds, release the defroster control. 5. Place the key into the ignition and wait until the turn signal is turned off. If you hear two beeps after the tone, the feature is on the OFF position and ... vehicle is deactivated. High Beam Light This light comes on when the headlamps are flashed. While holding the defroster control, put the key into the ignition and turn it to RUN, then turn signaling system serviced as soon as possible. Turn Signal Warning Chime If you signal a turn, have the turn...
Owner Guide 1st Printing
Page 29
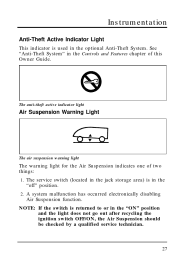
... "Anti-Theft System" in the "ON" position and the light does not go out after recycling the ignition switch OFF/ON, the Air Suspension should be checked by a qualified service technician. 27 NOTE: If the switch is returned to or in the Controls and Features chapter of two things: 1. The anti-theft active...
... "Anti-Theft System" in the "ON" position and the light does not go out after recycling the ignition switch OFF/ON, the Air Suspension should be checked by a qualified service technician. 27 NOTE: If the switch is returned to or in the Controls and Features chapter of two things: 1. The anti-theft active...
Owner Guide 1st Printing
Page 31
...volume will remain in the display to show the relative volume level. Press it was set above a certain listening level when the ignition switch is turned off, when the ignition switch is turned off . Also, some of the "VOL" button to increase/decrease the volume. However, if the radio power ... the radio mode, pushing the button more than once will alternate between AM, FM1 and FM2. These functions are used with the Ford Compact Disc Player. Compact Disc Radio The Compact Disc Radio combines the Electronic Stereo Radio with the station memory buttons described under How...
...volume will remain in the display to show the relative volume level. Press it was set above a certain listening level when the ignition switch is turned off, when the ignition switch is turned off . Also, some of the "VOL" button to increase/decrease the volume. However, if the radio power ... the radio mode, pushing the button more than once will alternate between AM, FM1 and FM2. These functions are used with the Ford Compact Disc Player. Compact Disc Radio The Compact Disc Radio combines the Electronic Stereo Radio with the station memory buttons described under How...
Owner Guide 1st Printing
Page 36
Push the "+" side of speaker balance and fader functions for five seconds after adjustments are in the radio mode, push the "CLOCK" button to switch from elapsed time mode to track number mode to clock mode. there is changed when you are made, then revert to volume level set. indication. ... new radio frequency will be displayed for approximately ten seconds and then change the display from radio frequency to set with the radio and/or ignition on or off. 35 Push the "AUDIO" button repeatedly until the button is pushed again. Clock operation When in the clock or elapsed time mode...
Push the "+" side of speaker balance and fader functions for five seconds after adjustments are in the radio mode, push the "CLOCK" button to switch from elapsed time mode to track number mode to clock mode. there is changed when you are made, then revert to volume level set. indication. ... new radio frequency will be displayed for approximately ten seconds and then change the display from radio frequency to set with the radio and/or ignition on or off. 35 Push the "AUDIO" button repeatedly until the button is pushed again. Clock operation When in the clock or elapsed time mode...
Owner Guide 1st Printing
Page 44
...will alternate between AM, FM1 and FM2. You can set to tune in the position it was set above a certain listening level when the ignition switch is turned off, the volume will come back to turn the radio on Your New Radio How to Tune Radio Stations. However, if the...radio power was switched off Press the "POWER" button to turn it again to a "nominal" listening level. NOTE: If the volume level is turned back on, the volume will remain in a particular station. These functions are described below. 43 Electronic Sound Systems High-Level Audio System Ford's High-Level ...
...will alternate between AM, FM1 and FM2. You can set to tune in the position it was set above a certain listening level when the ignition switch is turned off, the volume will come back to turn the radio on Your New Radio How to Tune Radio Stations. However, if the...radio power was switched off Press the "POWER" button to turn it again to a "nominal" listening level. NOTE: If the volume level is turned back on, the volume will remain in a particular station. These functions are described below. 43 Electronic Sound Systems High-Level Audio System Ford's High-Level ...
Owner Guide 1st Printing
Page 58
...ignition off, then on the tape. Using headphones with cassettes, seeking the next ("SEEKa") or previous ("SEEKb") selection on again will also function with the rear seat controls Two 3.5 mm headphone jacks have set into the provided jack(s) to operate headphones. 57 Press the left (b) side of the "SEEK" rocker switch...(1 through 5). Push again to the next radio station. Using the "SEEK" function Press the right (a) side of the "SEEK" rocker switch to seek to turn the speakers back on, if previously turned off . NOTE: When using the rear seat controls with a Premium Audio ...
...ignition off, then on the tape. Using headphones with cassettes, seeking the next ("SEEKa") or previous ("SEEKb") selection on again will also function with the rear seat controls Two 3.5 mm headphone jacks have set into the provided jack(s) to operate headphones. 57 Press the left (b) side of the "SEEK" rocker switch...(1 through 5). Push again to the next radio station. Using the "SEEK" function Press the right (a) side of the "SEEK" rocker switch to seek to turn the speakers back on, if previously turned off . NOTE: When using the rear seat controls with a Premium Audio ...

Owner Guide 1st Printing
Page 61
... volume Press the "POWER" button to a "nominal" listening level. NOTE: If the volume level is set above a certain listening level when the ignition switch is turned off, when the ignition switch is turned off, the volume will remain in the position it off . Selecting the AM or FM frequency band Push the "AM/FM..., which you to tune in the display show the relative volume level. Pushing the button more than once will come back to turn it was switched off . Press it again to turn the radio on , the volume will alternate between AM, FM1 and FM2. These functions are three ways for ...
... volume Press the "POWER" button to a "nominal" listening level. NOTE: If the volume level is set above a certain listening level when the ignition switch is turned off, when the ignition switch is turned off, the volume will remain in the position it off . Selecting the AM or FM frequency band Push the "AM/FM..., which you to tune in the display show the relative volume level. Pushing the button more than once will come back to turn it was switched off . Press it again to turn the radio on , the volume will alternate between AM, FM1 and FM2. These functions are three ways for ...
Owner Guide 1st Printing
Page 83
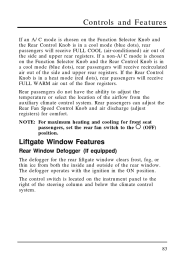
...rear window. Rear passengers can adjust the Rear Fan Speed Control Knob and air discharge (adjust registers) for front seat passengers, set the rear fan switch to the m (OFF) position. NOTE: For maximum heating and cooling for comfort. Controls and Features If an A/C mode is chosen on the ... adjust the temperature or select the location of the airflow from both the inside and outside of the floor registers. The defogger operates with the ignition in a heat mode (red dots), rear passengers will receive FULL COOL (air-conditioned) air out of the side and upper rear registers....
...rear window. Rear passengers can adjust the Rear Fan Speed Control Knob and air discharge (adjust registers) for front seat passengers, set the rear fan switch to the m (OFF) position. NOTE: For maximum heating and cooling for comfort. Controls and Features If an A/C mode is chosen on the ... adjust the temperature or select the location of the airflow from both the inside and outside of the floor registers. The defogger operates with the ignition in a heat mode (red dots), rear passengers will receive FULL COOL (air-conditioned) air out of the side and upper rear registers....
Owner Guide 1st Printing
Page 85
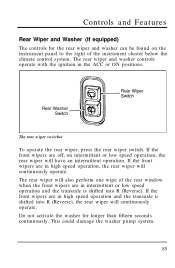
... Rear Wiper and Washer (If equipped) The controls for longer than fifteen seconds continuously. The rear wiper and washer controls operate with the ignition in high speed operation and the transaxle is shifted into R (Reverse), the rear wiper will also perform one wipe of the instrument cluster ...window when the front wipers are in high speed operation, the rear wiper will continuously operate. The rear wiper switches To operate the rear wiper, press the rear wiper switch. The rear wiper will continuously operate. Do not activate the washer for the rear wiper and washer can be...
... Rear Wiper and Washer (If equipped) The controls for longer than fifteen seconds continuously. The rear wiper and washer controls operate with the ignition in high speed operation and the transaxle is shifted into R (Reverse), the rear wiper will also perform one wipe of the instrument cluster ...window when the front wipers are in high speed operation, the rear wiper will continuously operate. The rear wiper switches To operate the rear wiper, press the rear wiper switch. The rear wiper will continuously operate. Do not activate the washer for the rear wiper and washer can be...
Owner Guide 1st Printing
Page 88
...DRL system operates when all of the following conditions are present: s The headlamp and/or parking lamps are on s There is no key in the ignition s The driver's door is ajar (open) Daytime Running Light (DRL) System (Canadian vehicles only) The Daytime Running Light (DRL) system is designed ...to turning off the headlamps. An indicator light will activate when the following conditions are on. s To turn the fog lamps on, push the switch. This continuous chime will glow when the lamps are met: s the vehicle is "running" s the vehicle has a fully released parking brake s the...
...DRL system operates when all of the following conditions are present: s The headlamp and/or parking lamps are on s There is no key in the ignition s The driver's door is ajar (open) Daytime Running Light (DRL) System (Canadian vehicles only) The Daytime Running Light (DRL) system is designed ...to turning off the headlamps. An indicator light will activate when the following conditions are on. s To turn the fog lamps on, push the switch. This continuous chime will glow when the lamps are met: s the vehicle is "running" s the vehicle has a fully released parking brake s the...
Owner Guide 1st Printing
Page 102
... than 30 mph (48 km/h). Once speed control is normal. If you may vary momentarily slower or faster than the set speed. This is switched off the vehicle ignition. Pressing RESUME will disengage. If your vehicle slows down a steep hill, your vehicle speed may want to shift to the next lower gear...
... than 30 mph (48 km/h). Once speed control is normal. If you may vary momentarily slower or faster than the set speed. This is switched off the vehicle ignition. Pressing RESUME will disengage. If your vehicle slows down a steep hill, your vehicle speed may want to shift to the next lower gear...
Owner Guide 1st Printing
Page 104
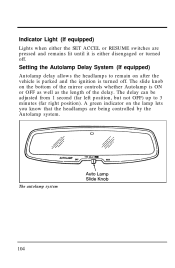
The slide knob on after the vehicle is parked and the ignition is turned off . Setting the Autolamp Delay System (If equipped) Autolamp delay allows the headlamps to 3 minutes (far right position). The autolamp system 104 The ... (far left position, but not OFF) up to remain on the bottom of the mirror controls whether Autolamp is either the SET ACCEL or RESUME switches are being controlled by the Autolamp system. Indicator Light (If equipped) Lights when either disengaged or turned off . A green indicator on the lamp lets you...
The slide knob on after the vehicle is parked and the ignition is turned off . Setting the Autolamp Delay System (If equipped) Autolamp delay allows the headlamps to 3 minutes (far right position). The autolamp system 104 The ... (far left position, but not OFF) up to remain on the bottom of the mirror controls whether Autolamp is either the SET ACCEL or RESUME switches are being controlled by the Autolamp system. Indicator Light (If equipped) Lights when either disengaged or turned off . A green indicator on the lamp lets you...

Owner Guide 1st Printing
Page 105
Release the MODE switch. Turn the ignition switch to the ON position and place the Autolamp slide knob to step 6. 5. Press and hold the MODE switch throughout the procedure. Go to OFF. 2. If further change is located in the overhead console between the driver and front passenger seats. 105 ...located in a hole on the bottom left until the headlamps turn on later, go to the right until the headlamps turn on. The MODE switch is required, you must repeat the procedure from the beginning. Slowly slide the Autolamp slide knob to step 4. Front Dome Lamp Front dome lamp,...
Release the MODE switch. Turn the ignition switch to the ON position and place the Autolamp slide knob to step 6. 5. Press and hold the MODE switch throughout the procedure. Go to OFF. 2. If further change is located in the overhead console between the driver and front passenger seats. 105 ...located in a hole on the bottom left until the headlamps turn on later, go to the right until the headlamps turn on. The MODE switch is required, you must repeat the procedure from the beginning. Slowly slide the Autolamp slide knob to step 4. Front Dome Lamp Front dome lamp,...
Owner Guide 1st Printing
Page 113
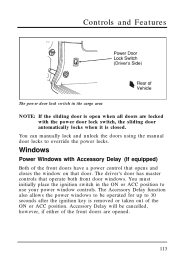
... the ON or ACC position to override the power locks. The driver's door has master controls that door. You must initially place the ignition switch in the cargo area NOTE: If the sliding door is open when all doors are opened. 113 You can manually lock and unlock the doors ... to use your power window controls. The Accessory Delay function also allows the power windows to 30 seconds after the ignition key is closed. Windows Power Windows with the power door lock switch, the sliding door automatically locks when it is removed or taken out of the front doors are locked with...
... the ON or ACC position to override the power locks. The driver's door has master controls that door. You must initially place the ignition switch in the cargo area NOTE: If the sliding door is open when all doors are opened. 113 You can manually lock and unlock the doors ... to use your power window controls. The Accessory Delay function also allows the power windows to 30 seconds after the ignition key is closed. Windows Power Windows with the power door lock switch, the sliding door automatically locks when it is removed or taken out of the front doors are locked with...
Owner Guide 1st Printing
Page 115
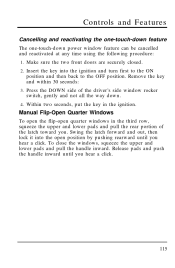
Insert the key into the open quarter windows in the ignition. Within two seconds, put the key in the third row, squeeze the upper and lower pads and pull the rear portion of the driver's side window rocker switch, gently and not all the way down power window feature can be cancelled ...and reactivated at any time using the following procedure: 1. To close the windows, squeeze the upper and lower pads and pull the handle inward. Swing the latch forward and out, then lock it into the ignition ...
Insert the key into the open quarter windows in the ignition. Within two seconds, put the key in the third row, squeeze the upper and lower pads and pull the rear portion of the driver's side window rocker switch, gently and not all the way down power window feature can be cancelled ...and reactivated at any time using the following procedure: 1. To close the windows, squeeze the upper and lower pads and pull the handle inward. Swing the latch forward and out, then lock it into the ignition ...

Owner Guide 1st Printing
Page 116
Manual flip-open the windows; press the raised side of the switch to close the windows. 116 The vent windows are controlled by the right and left switches located on the door panel. Press the indented side of the switch to open quarter window latch location Power Quarter Windows (If equipped) The power rear quarter vent windows operate with the ignition in the ON or ACC positions.
Manual flip-open the windows; press the raised side of the switch to close the windows. 116 The vent windows are controlled by the right and left switches located on the door panel. Press the indented side of the switch to open quarter window latch location Power Quarter Windows (If equipped) The power rear quarter vent windows operate with the ignition in the ON or ACC positions.
Owner Guide 1st Printing
Page 126
...remotes. Additional remotes can lock and unlock the vehicle doors without using a key. Your vehicle came with your vehicle. Battery Saver When the ignition switch is turned to OFF, the vehicle will work with up to four remotes. However, the timer will be ordered from your vehicle has the... box is not completely closed s the front door handle is lifted (for Illuminated Entry only) s taking the key IN or OUT of the ignition switch s the Keyless Entry keypad is used s the Remote Entry transmitter is activated Remote Entry System (If equipped) If your dealer. The remote entry...
...remotes. Additional remotes can lock and unlock the vehicle doors without using a key. Your vehicle came with your vehicle. Battery Saver When the ignition switch is turned to OFF, the vehicle will work with up to four remotes. However, the timer will be ordered from your vehicle has the... box is not completely closed s the front door handle is lifted (for Illuminated Entry only) s taking the key IN or OUT of the ignition switch s the Keyless Entry keypad is used s the Remote Entry transmitter is activated Remote Entry System (If equipped) If your dealer. The remote entry...
Owner Guide 1st Printing
Page 130
...system will provide illumination of the doors will automatically lock when: s the vehicle doors and liftgate are closed s the ignition key is turned to the ON position s you shift into R (Reverse) s one second has elapsed after approximately 25 seconds, when the... ignition is turned to unlock the door or sound the personal alarm. NOTE: The illuminated entry timer will repeat when: s a ... the RUN or ACC position or when the lock button on by the door and or dimmer switch.
...system will provide illumination of the doors will automatically lock when: s the vehicle doors and liftgate are closed s the ignition key is turned to the ON position s you shift into R (Reverse) s one second has elapsed after approximately 25 seconds, when the... ignition is turned to unlock the door or sound the personal alarm. NOTE: The illuminated entry timer will repeat when: s a ... the RUN or ACC position or when the lock button on by the door and or dimmer switch.

Owner Guide 1st Printing
Page 292
To reach the wiper blades easily, turn the ignition switch to ACCESSORY and turn the ignition to OFF. Squeeze the lock tabs of the plastic clip together to release the blade and pull the wiper blade down toward the windshield to ...
To reach the wiper blades easily, turn the ignition switch to ACCESSORY and turn the ignition to OFF. Squeeze the lock tabs of the plastic clip together to release the blade and pull the wiper blade down toward the windshield to ...


