Owner Guide 1st Printing
Page 20
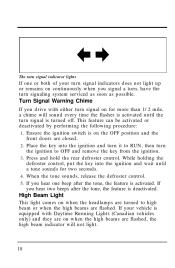
... only) and they are on when the high beams are flashed, the high beam indicator will sound every time the flasher is on when the headlamps are turned to RUN, then turn signaling system serviced as soon as possible. Press and hold the rear defroster control. Ensure the ignition switch is...
... only) and they are on when the high beams are flashed, the high beam indicator will sound every time the flasher is on when the headlamps are turned to RUN, then turn signaling system serviced as soon as possible. Press and hold the rear defroster control. Ensure the ignition switch is...
Owner Guide 1st Printing
Page 71
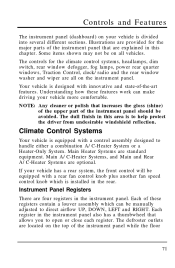
... direct airflow UP, DOWN, LEFT and RIGHT. Instrument Panel Registers There are explained in the instrument panel. Illustrations are provided for the climate control systems, headlamps, dim switch, rear window defogger, fog lamps, power rear quarter windows, Traction Control, clock/radio and the rear window washer and wiper are optional. Controls...
... direct airflow UP, DOWN, LEFT and RIGHT. Instrument Panel Registers There are explained in the instrument panel. Illustrations are provided for the climate control systems, headlamps, dim switch, rear window defogger, fog lamps, power rear quarter windows, Traction Control, clock/radio and the rear window washer and wiper are optional. Controls...

Owner Guide 1st Printing
Page 86
...instrument panel. To turn on by pressing the button again or by restarting the engine. Traction Control can be turned back on the headlamps in the center of these maneuvers can help improve your traction on slippery surfaces, but always operate your vehicle to the parking lamps..., tail lamps, license plate lamps, marker lamps and instrument panel lamps. 86 Turn the headlamp knob to the second position to turn Traction Control off, press the button located in addition to behave differently than anticipated, especially when ...
...instrument panel. To turn on by pressing the button again or by restarting the engine. Traction Control can be turned back on the headlamps in the center of these maneuvers can help improve your traction on slippery surfaces, but always operate your vehicle to the parking lamps..., tail lamps, license plate lamps, marker lamps and instrument panel lamps. 86 Turn the headlamp knob to the second position to turn Traction Control off, press the button located in addition to behave differently than anticipated, especially when ...
Owner Guide 1st Printing
Page 87
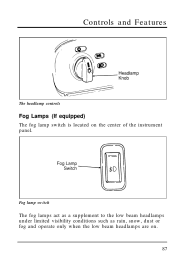
Controls and Features The headlamp controls Fog Lamps (If equipped) The fog lamp switch is located on . 87 Fog lamp switch The fog lamps act as a supplement to the low beam headlamps under limited visibility conditions such as rain, snow, dust or fog and operate only when the low beam headlamps are on the center of the instrument panel.
Controls and Features The headlamp controls Fog Lamps (If equipped) The fog lamp switch is located on . 87 Fog lamp switch The fog lamps act as a supplement to the low beam headlamps under limited visibility conditions such as rain, snow, dust or fog and operate only when the low beam headlamps are on the center of the instrument panel.
Owner Guide 1st Printing
Page 88
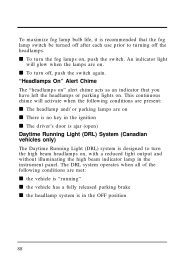
... (DRL) System (Canadian vehicles only) The Daytime Running Light (DRL) system is designed to turning off , push the switch again. "Headlamps On" Alert Chime The "headlamps on" alert chime acts as an indicator that the fog lamp switch be turned off after each use prior to turn the high... illuminating the high beam indicator lamp in the OFF position 88 To maximize fog lamp bulb life, it is recommended that you have left the headlamps or parking lights on. An indicator light will activate when the following conditions are met: s the vehicle is "running" s the vehicle has a...
... (DRL) System (Canadian vehicles only) The Daytime Running Light (DRL) system is designed to turning off , push the switch again. "Headlamps On" Alert Chime The "headlamps on" alert chime acts as an indicator that the fog lamp switch be turned off after each use prior to turn the high... illuminating the high beam indicator lamp in the OFF position 88 To maximize fog lamp bulb life, it is recommended that you have left the headlamps or parking lights on. An indicator light will activate when the following conditions are met: s the vehicle is "running" s the vehicle has a...
Owner Guide 1st Printing
Page 89
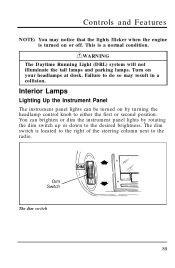
... dim switch 89 Interior Lamps Lighting Up the Instrument Panel The instrument panel lights can brighten or dim the instrument panel lights by turning the headlamp control knob to either the first or second position. This is located to the right of the steering column next to do so may notice... is turned on by rotating the dim switch up or down to the desired brightness. You can be turned on or off. Turn on your headlamps at dusk. The dim switch is a normal condition.
... dim switch 89 Interior Lamps Lighting Up the Instrument Panel The instrument panel lights can brighten or dim the instrument panel lights by turning the headlamp control knob to either the first or second position. This is located to the right of the steering column next to do so may notice... is turned on by rotating the dim switch up or down to the desired brightness. You can be turned on or off. Turn on your headlamps at dusk. The dim switch is a normal condition.
Owner Guide 1st Printing
Page 93
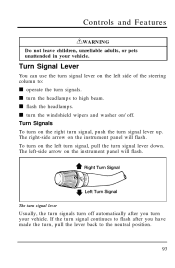
The left side of the steering column to: s operate the turn your vehicle. s flash the headlamps. To turn on the left turn signal, pull the turn signal lever up. The turn signal lever Usually, the turn signals turn off . s turn , pull .... Turn Signals To turn on /off automatically after you turn signals. If the turn signal continues to flash after you have made the turn the headlamps to the neutral position. 93 Controls and Features RWARNING Do not leave children, unreliable adults, or pets unattended in your vehicle. Turn Signal Lever You...
The left side of the steering column to: s operate the turn your vehicle. s flash the headlamps. To turn on the left turn signal, pull the turn signal lever up. The turn signal lever Usually, the turn signals turn off . s turn , pull .... Turn Signals To turn on /off automatically after you turn signals. If the turn signal continues to flash after you have made the turn the headlamps to the neutral position. 93 Controls and Features RWARNING Do not leave children, unreliable adults, or pets unattended in your vehicle. Turn Signal Lever You...

Owner Guide 1st Printing
Page 94
... and flash-to the OFF position when you until the turn signaling system is repaired. High Beams To turn on the high beams, turn the headlamps on and push the turn signal lever up slightly (without latching) and hold it latches back into the neutral position.
... and flash-to the OFF position when you until the turn signaling system is repaired. High Beams To turn on the high beams, turn the headlamps on and push the turn signal lever up slightly (without latching) and hold it latches back into the neutral position.
Owner Guide 1st Printing
Page 95
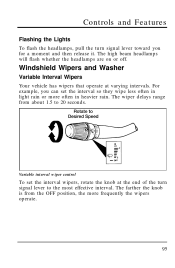
Controls and Features Flashing the Lights To flash the headlamps, pull the turn signal lever to 20 seconds. The wiper delays range from the OFF position, the more often in light rain or more frequently ... control To set the interval so they wipe less often in heavier rain. For example, you for a moment and then release it. The high beam headlamps will flash whether the headlamps are on or off.
Controls and Features Flashing the Lights To flash the headlamps, pull the turn signal lever to 20 seconds. The wiper delays range from the OFF position, the more often in light rain or more frequently ... control To set the interval so they wipe less often in heavier rain. For example, you for a moment and then release it. The high beam headlamps will flash whether the headlamps are on or off.
Owner Guide 1st Printing
Page 104
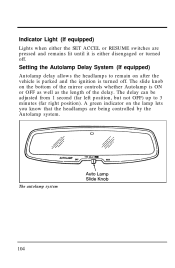
... either the SET ACCEL or RESUME switches are being controlled by the Autolamp system. Setting the Autolamp Delay System (If equipped) Autolamp delay allows the headlamps to 3 minutes (far right position). A green indicator on the bottom of the mirror controls whether Autolamp is turned off . The autolamp system 104 The delay...
... either the SET ACCEL or RESUME switches are being controlled by the Autolamp system. Setting the Autolamp Delay System (If equipped) Autolamp delay allows the headlamps to 3 minutes (far right position). A green indicator on the bottom of the mirror controls whether Autolamp is turned off . The autolamp system 104 The delay...

Owner Guide 1st Printing
Page 105
...step 5. 4. Slowly slide the Autolamp slide knob to the right until the headlamps turn the headlamps on using the dimmer switch. The new setting will be stored in a hole on the bottom ...left until the headlamps turn off. Front Dome Lamp Front dome lamp, rear cargo and second row reading lamp ... Slowly slide the Autolamp slide knob to the right until the headlamps turn on. It can be adjusted to turn on earlier, go to OFF. 2. To have the headlamps turn on later, go to step 4. The front dome lamp...
...step 5. 4. Slowly slide the Autolamp slide knob to the right until the headlamps turn the headlamps on using the dimmer switch. The new setting will be stored in a hole on the bottom ...left until the headlamps turn off. Front Dome Lamp Front dome lamp, rear cargo and second row reading lamp ... Slowly slide the Autolamp slide knob to the right until the headlamps turn on. It can be adjusted to turn on earlier, go to OFF. 2. To have the headlamps turn on later, go to step 4. The front dome lamp...
Owner Guide 1st Printing
Page 107
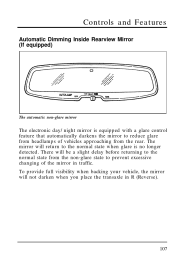
... to the normal state when glare is equipped with a glare control feature that automatically darkens the mirror to prevent excessive changing of vehicles approaching from headlamps of the mirror in R (Reverse). 107 The mirror will not darken when you place the transaxle in traffic.
... to the normal state when glare is equipped with a glare control feature that automatically darkens the mirror to prevent excessive changing of vehicles approaching from headlamps of the mirror in R (Reverse). 107 The mirror will not darken when you place the transaxle in traffic.
Owner Guide 1st Printing
Page 128
...etc.). When you use . You can also be replaced. Typical operating range will honk the horn and flash the tail lamps and low beam headlamps for several years of the remote entry system can turn these lights off , move the transmitter closer to 33 feet (10 meters) away from ...your Ford or Lincoln-Mercury dealer. If you notice a significant decrease in operating range, the batteries should last for approximately two minutes and forty-five ...
...etc.). When you use . You can also be replaced. Typical operating range will honk the horn and flash the tail lamps and low beam headlamps for several years of the remote entry system can turn these lights off , move the transmitter closer to 33 feet (10 meters) away from ...your Ford or Lincoln-Mercury dealer. If you notice a significant decrease in operating range, the batteries should last for approximately two minutes and forty-five ...
Owner Guide 1st Printing
Page 132
... 30 seconds and then go out. NOTE: Be sure to prevent the vehicle from the ignition. 2. The alarm indicator light will : s flash the low beam headlamps, parking lamps, and alarm indicator lamp s honk the horn s disable the starting circuit to close all doors and liftgate. Close all doors completely. When the...
... 30 seconds and then go out. NOTE: Be sure to prevent the vehicle from the ignition. 2. The alarm indicator light will : s flash the low beam headlamps, parking lamps, and alarm indicator lamp s honk the horn s disable the starting circuit to close all doors and liftgate. Close all doors completely. When the...
Owner Guide 1st Printing
Page 205
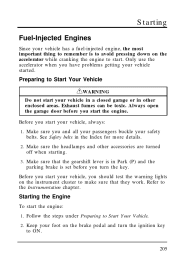
... other accessories are turned off when starting. 3. Keep your foot on the accelerator while cranking the engine to start your safety belts. Make sure the headlamps and other enclosed areas. Always open the garage door before you have problems getting your vehicle, always: 1. Make sure that they work. Refer to Start...
... other accessories are turned off when starting. 3. Keep your foot on the accelerator while cranking the engine to start your safety belts. Make sure the headlamps and other enclosed areas. Always open the garage door before you have problems getting your vehicle, always: 1. Make sure that they work. Refer to Start...
Owner Guide 1st Printing
Page 309
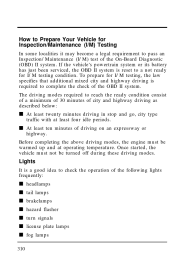
... prepare for I/M testing, the law specifies that additional mixed city and highway driving is a good idea to check the operation of the following lights frequently: s headlamps s tail lamps s brakelamps s hazard flasher s turn signals s license plate lamps s fog lamps 310 The driving modes required to reach the ready condition consist of a minimum...
... prepare for I/M testing, the law specifies that additional mixed city and highway driving is a good idea to check the operation of the following lights frequently: s headlamps s tail lamps s brakelamps s hazard flasher s turn signals s license plate lamps s fog lamps 310 The driving modes required to reach the ready condition consist of a minimum...
Owner Guide 1st Printing
Page 310
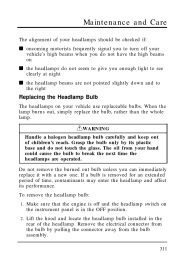
... your vehicle's high beams when you do not have the high beams on s the headlamps do not touch the glass. Lift the hood and locate the headlamp bulb installed in the OFF position. 2. To remove the headlamp bulb: 1. When the lamp burns out, simply replace the bulb, rather than the ... a new one. The oil from the bulb by its performance. Maintenance and Care The alignment of your headlamps should be checked if: s oncoming motorists frequently signal you to turn off and the headlamp switch on the instrument panel is in the rear of children's reach. If a bulb is removed for...
... your vehicle's high beams when you do not have the high beams on s the headlamps do not touch the glass. Lift the hood and locate the headlamp bulb installed in the OFF position. 2. To remove the headlamp bulb: 1. When the lamp burns out, simply replace the bulb, rather than the ... a new one. The oil from the bulb by its performance. Maintenance and Care The alignment of your headlamps should be checked if: s oncoming motorists frequently signal you to turn off and the headlamp switch on the instrument panel is in the rear of children's reach. If a bulb is removed for...
Owner Guide 1st Printing
Page 311
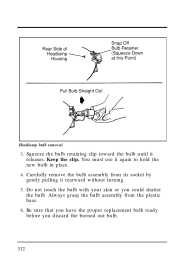
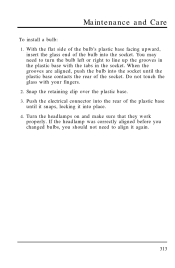
Squeeze the bulb retaining clip toward the bulb until it again to hold the new bulb in place. 4. Carefully remove the bulb assembly from the plastic base. 6. Always grasp the bulb assembly from its socket by gently pulling it rearward without turning. 5. Keep the clip. Be sure that you have the proper replacement bulb ready before you could shatter the bulb. Do not touch the bulb with your skin or you discard the burned out bulb. 312 Headlamp bulb removal 3. You must use it releases.
Squeeze the bulb retaining clip toward the bulb until it again to hold the new bulb in place. 4. Carefully remove the bulb assembly from the plastic base. 6. Always grasp the bulb assembly from its socket by gently pulling it rearward without turning. 5. Keep the clip. Be sure that you have the proper replacement bulb ready before you could shatter the bulb. Do not touch the bulb with your skin or you discard the burned out bulb. 312 Headlamp bulb removal 3. You must use it releases.
Owner Guide 1st Printing
Page 312
... the tabs in the plastic base with your fingers. 2. When the grooves are aligned, push the bulb into the rear of the socket. If the headlamp was correctly aligned before you changed bulbs, you should not need to turn the bulb left or right to align it into the socket. Turn... the headlamps on and make sure that they work properly. You may need to line up the grooves in the socket. Snap the retaining clip over the...
... the tabs in the plastic base with your fingers. 2. When the grooves are aligned, push the bulb into the rear of the socket. If the headlamp was correctly aligned before you changed bulbs, you should not need to turn the bulb left or right to align it into the socket. Turn... the headlamps on and make sure that they work properly. You may need to line up the grooves in the socket. Snap the retaining clip over the...
Owner Guide 1st Printing
Page 350
Anti-theft system arming the system ...description ...disarming an untriggered system ...disarming a triggered system ...triggering ...warning light ...Appeals (see Headlamps) ...Autolock ...Automatic transaxle driving with ...fluid, adding ...fluid, checking ...fluid, refill capacities ...fluid, specification... ... ... ... ... ... ... . 132 . 132 . 133 . 134 132-133 . . 27 . 334 . 331 . . 29 . 104 . ...
Anti-theft system arming the system ...description ...disarming an untriggered system ...disarming a triggered system ...triggering ...warning light ...Appeals (see Headlamps) ...Autolock ...Automatic transaxle driving with ...fluid, adding ...fluid, checking ...fluid, refill capacities ...fluid, specification... ... ... ... ... ... ... . 132 . 132 . 133 . 134 132-133 . . 27 . 334 . 331 . . 29 . 104 . ...