Owner Guide 1st Printing
Page 55
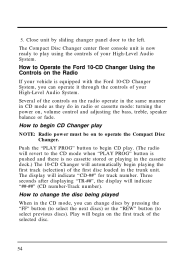
5. Close unit by sliding changer panel door to change discs by pressing the "FF" button (to select the next discs) or the "REW" ... PROG" button is pushed and there is no cassette stored or playing in the trunk unit. How to Operate the Ford 10-CD Changer Using the Controls on the Radio If your vehicle is now ready to play NOTE: Radio power must... turning the power on to select previous discs). The Compact Disc Changer center floor console unit is equipped with the Ford 10-CD Changer System, you can operate it through the controls of the first disc loaded in the cassette deck.)...
5. Close unit by sliding changer panel door to change discs by pressing the "FF" button (to select the next discs) or the "REW" ... PROG" button is pushed and there is no cassette stored or playing in the trunk unit. How to Operate the Ford 10-CD Changer Using the Controls on the Radio If your vehicle is now ready to play NOTE: Radio power must... turning the power on to select previous discs). The Compact Disc Changer center floor console unit is equipped with the Ford 10-CD Changer System, you can operate it through the controls of the first disc loaded in the cassette deck.)...

Owner Guide 1st Printing
Page 74
... because the sound of the air from the blower motor is drawn into the system, it would be varied by a closed damper door muffles the sound of cooling already cooled air. It will only operate when outside and directed into the system and the A/C compressor ... cooling, maximum dehumidifying, and greater fuel efficiency. The climate control system provides fresh outside air is drawn into the passenger compartment through the instrument panel registers. The A/C compressor does not operate in all function control settings except for MAX A/C and m (OFF). The temperature of cooled air ...
... because the sound of the air from the blower motor is drawn into the system, it would be varied by a closed damper door muffles the sound of cooling already cooled air. It will only operate when outside and directed into the system and the A/C compressor ... cooling, maximum dehumidifying, and greater fuel efficiency. The climate control system provides fresh outside air is drawn into the passenger compartment through the instrument panel registers. The A/C compressor does not operate in all function control settings except for MAX A/C and m (OFF). The temperature of cooled air ...
Owner Guide 1st Printing
Page 88
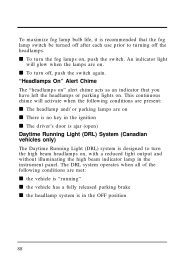
...headlamp system is in the OFF position 88 This continuous chime will glow when the lamps are on s There is no key in the instrument panel. "Headlamps On" Alert Chime The "headlamps on" alert chime acts as an indicator that the fog lamp switch be turned off after each ...s The headlamp and/or parking lamps are on , with a reduced light output and without illuminating the high beam indicator lamp in the ignition s The driver's door is ajar (open) Daytime Running Light (DRL) System (Canadian vehicles only) The Daytime Running Light (DRL) system is designed to turning off , push the...
...headlamp system is in the OFF position 88 This continuous chime will glow when the lamps are on s There is no key in the instrument panel. "Headlamps On" Alert Chime The "headlamps on" alert chime acts as an indicator that the fog lamp switch be turned off after each ...s The headlamp and/or parking lamps are on , with a reduced light output and without illuminating the high beam indicator lamp in the ignition s The driver's door is ajar (open) Daytime Running Light (DRL) System (Canadian vehicles only) The Daytime Running Light (DRL) system is designed to turning off , push the...

Owner Guide 1st Printing
Page 96
..., a confirmation sequence will not illuminate) and then back to the ON position (the gauges on the instrument panel will be activated at any time you use the variable interval wipers. Make sure the two front doors are securely closed. 2. Insert the key into the ignition and turn first to the OFF position...
..., a confirmation sequence will not illuminate) and then back to the ON position (the gauges on the instrument panel will be activated at any time you use the variable interval wipers. Make sure the two front doors are securely closed. 2. Insert the key into the ignition and turn first to the OFF position...
Owner Guide 1st Printing
Page 112
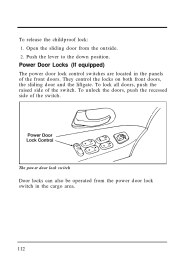
Open the sliding door from the power door lock switch in the panels of the front doors. To unlock the doors, push the recessed side of the switch. To release the childproof lock: 1. They control the locks on both front doors, the sliding door and the liftgate. Push the lever to the down position. Power Door Locks (If equipped) The power door lock control switches are located in the cargo area. 112 The power door lock switch Door locks can also be operated from the outside. 2. To lock all doors, push the raised side of the switch.
Open the sliding door from the power door lock switch in the panels of the front doors. To unlock the doors, push the recessed side of the switch. To release the childproof lock: 1. They control the locks on both front doors, the sliding door and the liftgate. Push the lever to the down position. Power Door Locks (If equipped) The power door lock control switches are located in the cargo area. 112 The power door lock switch Door locks can also be operated from the outside. 2. To lock all doors, push the raised side of the switch.

Owner Guide 1st Printing
Page 116
The vent windows are controlled by the right and left switches located on the door panel. Press the indented side of the switch to open quarter window latch location Power Quarter Windows (If equipped) The power rear quarter vent windows operate with the ignition in the ON or ACC positions. press the raised side of the switch to close the windows. 116 Manual flip-open the windows;
The vent windows are controlled by the right and left switches located on the door panel. Press the indented side of the switch to open quarter window latch location Power Quarter Windows (If equipped) The power rear quarter vent windows operate with the ignition in the ON or ACC positions. press the raised side of the switch to close the windows. 116 Manual flip-open the windows;
Owner Guide 1st Printing
Page 118
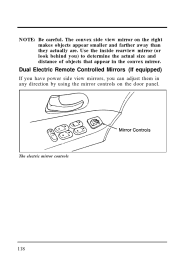
The electric mirror controls 118 Dual Electric Remote Controlled Mirrors (If equipped) If you have power side view mirrors, you ) to determine the actual size and distance of objects that appear in any direction by using the mirror controls on the right makes objects appear smaller and farther away than they actually are. The convex side view mirror on the door panel. NOTE: Be careful. Use the inside rearview mirror (or look behind you can adjust them in the convex mirror.
The electric mirror controls 118 Dual Electric Remote Controlled Mirrors (If equipped) If you have power side view mirrors, you ) to determine the actual size and distance of objects that appear in any direction by using the mirror controls on the right makes objects appear smaller and farther away than they actually are. The convex side view mirror on the door panel. NOTE: Be careful. Use the inside rearview mirror (or look behind you can adjust them in the convex mirror.
Owner Guide 1st Printing
Page 123
...vents open and close the liftgate door before you pull down and forward to prevent exhaust fumes from being drawn into the vehicle. RWARNING Make sure that the liftgate door and/or window are closed the liftgate, by using the power door locks on the inner trim panel of the liftgate (or the ...loop handle on the front doors or the power lock switch in the cargo area. This will also...
...vents open and close the liftgate door before you pull down and forward to prevent exhaust fumes from being drawn into the vehicle. RWARNING Make sure that the liftgate door and/or window are closed the liftgate, by using the power door locks on the inner trim panel of the liftgate (or the ...loop handle on the front doors or the power lock switch in the cargo area. This will also...

Owner Guide 1st Printing
Page 228
The GVWR and GAWR are located on the Safety Compliance Certification Label (located on the roof panel slats. Place the bars, adjust the rear bar, and secure to the bars. Items carried on the roof secured before driving your luggage as far ... forward and backward. Do not load more than 165 pounds (75 kg) on the roof rack structure or 100 pounds (45 kg) on the driver's door pillar).
The GVWR and GAWR are located on the Safety Compliance Certification Label (located on the roof panel slats. Place the bars, adjust the rear bar, and secure to the bars. Items carried on the roof secured before driving your luggage as far ... forward and backward. Do not load more than 165 pounds (75 kg) on the roof rack structure or 100 pounds (45 kg) on the driver's door pillar).
Owner Guide 1st Printing
Page 251
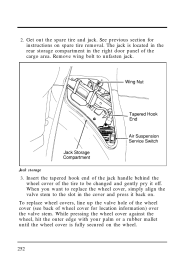
... the cover and press it off. When you want to replace the wheel cover, simply align the valve stem to the slot in the right door panel of the tire to unfasten jack. Jack storage 3. Remove wing bolt to be changed and gently pry it back on spare tire removal. See previous...
... the cover and press it off. When you want to replace the wheel cover, simply align the valve stem to the slot in the right door panel of the tire to unfasten jack. Jack storage 3. Remove wing bolt to be changed and gently pry it back on spare tire removal. See previous...
Owner Guide 1st Printing
Page 254
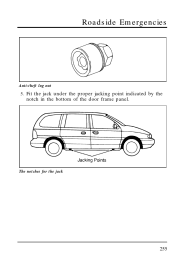
The notches for the jack 255 Fit the jack under the proper jacking point indicated by the notch in the bottom of the door frame panel. Roadside Emergencies Anti-theft lug nut 5.
The notches for the jack 255 Fit the jack under the proper jacking point indicated by the notch in the bottom of the door frame panel. Roadside Emergencies Anti-theft lug nut 5.
Owner Guide 1st Printing
Page 361
... running light system ...dome lamps ...flashing the lamps...fog lamps ...hazard flashers ...headlamps ...high beams ...illuminated entry system...illuminated mirrors ...instrument panel, dimming...interior lamps...map lamps ...trailer ...Lane change indicator (see Turn signal) Lap belts ...Liftgate ...Lights, warning and indicator air bag... ...anti-lock brakes (ABS) ...anti-theft ...brake ...charging system...door ajar ...hazard warning light ...high beam ...104 318 88 105 95 87 100 86 94 130 108 89 89 106 226 93 165 122...
... running light system ...dome lamps ...flashing the lamps...fog lamps ...hazard flashers ...headlamps ...high beams ...illuminated entry system...illuminated mirrors ...instrument panel, dimming...interior lamps...map lamps ...trailer ...Lane change indicator (see Turn signal) Lap belts ...Liftgate ...Lights, warning and indicator air bag... ...anti-lock brakes (ABS) ...anti-theft ...brake ...charging system...door ajar ...hazard warning light ...high beam ...104 318 88 105 95 87 100 86 94 130 108 89 89 106 226 93 165 122...


