Owner Guide 1st Printing
Page 110
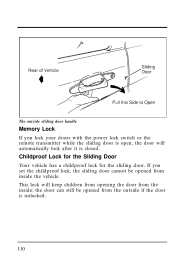
the door can still be opened from the outside if the door is unlocked. 110 Childproof Lock for the Sliding Door Your vehicle has a childproof lock for the sliding door. This lock will automatically lock after it is closed. If you lock your doors with the power lock switch or the remote transmitter while the sliding door is open, the door will keep children from opening the door from the inside the vehicle. The outside sliding door handle Memory Lock If you set the childproof lock, the sliding door cannot be opened from inside ;
the door can still be opened from the outside if the door is unlocked. 110 Childproof Lock for the Sliding Door Your vehicle has a childproof lock for the sliding door. This lock will automatically lock after it is closed. If you lock your doors with the power lock switch or the remote transmitter while the sliding door is open, the door will keep children from opening the door from the inside the vehicle. The outside sliding door handle Memory Lock If you set the childproof lock, the sliding door cannot be opened from inside ;
Owner Guide 1st Printing
Page 111
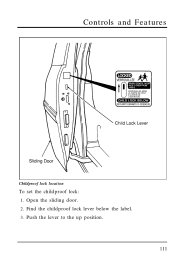
Push the lever to the up position. 111 Open the sliding door. 2. Controls and Features Childproof lock location To set the childproof lock: 1. Find the childproof lock lever below the label. 3.
Push the lever to the up position. 111 Open the sliding door. 2. Controls and Features Childproof lock location To set the childproof lock: 1. Find the childproof lock lever below the label. 3.
Owner Guide 1st Printing
Page 112
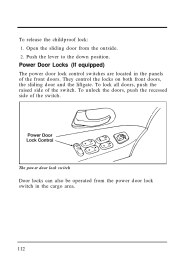
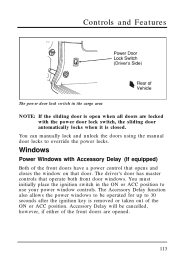
To release the childproof lock: 1. Open the sliding door from the power door lock switch in the panels of the switch. Power Door Locks (If equipped) The power door lock control switches are located in the cargo area. 112 The power door lock switch Door locks can also be operated from the outside. 2. They control the locks on both front doors, the sliding door and the liftgate. Push the lever to the down position. To unlock the doors, push the recessed side of the front doors. To lock all doors, push the raised side of the switch.
To release the childproof lock: 1. Open the sliding door from the power door lock switch in the panels of the switch. Power Door Locks (If equipped) The power door lock control switches are located in the cargo area. 112 The power door lock switch Door locks can also be operated from the outside. 2. They control the locks on both front doors, the sliding door and the liftgate. Push the lever to the down position. To unlock the doors, push the recessed side of the front doors. To lock all doors, push the raised side of the switch.
Owner Guide 1st Printing
Page 113
...power windows to be cancelled, however, if either of the front doors are locked with Accessory Delay (If equipped) Both of the ON or ACC position. The driver's door has master controls that door. Controls and Features The power door lock switch in the ON or ACC position to use your power ... operated for up to 30 seconds after the ignition key is closed. Windows Power Windows with the power door lock switch, the sliding door automatically locks when it is removed or taken out of the front doors have a power control that opens and closes the window on that operate both front...
...power windows to be cancelled, however, if either of the front doors are locked with Accessory Delay (If equipped) Both of the ON or ACC position. The driver's door has master controls that door. Controls and Features The power door lock switch in the ON or ACC position to use your power ... operated for up to 30 seconds after the ignition key is closed. Windows Power Windows with the power door lock switch, the sliding door automatically locks when it is removed or taken out of the front doors have a power control that opens and closes the window on that operate both front...
Owner Guide 1st Printing
Page 115
... . 4. Release pads and push the handle inward until you hear a click. Make sure the two front doors are securely closed. 2. Remove the key and within 30 seconds: 3. Swing the latch forward and out, then lock it into the ignition and turn first to the ON position and then back to the OFF...
... . 4. Release pads and push the handle inward until you hear a click. Make sure the two front doors are securely closed. 2. Remove the key and within 30 seconds: 3. Swing the latch forward and out, then lock it into the ignition and turn first to the ON position and then back to the OFF...
Owner Guide 1st Printing
Page 122
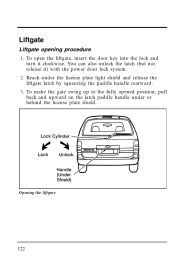
You can also unlock the latch (but not release it clockwise. To make the gate swing up to the fully opened position, pull back and upward on the latch paddle handle under the license plate light shield and release the liftgate latch by squeezing the paddle handle rearward. 3. Opening the liftgate 122 Reach under or behind the license plate shield. Liftgate Liftgate opening procedure 1. To open the liftgate, insert the door key into the lock and turn it ) with the power door lock system. 2.
You can also unlock the latch (but not release it clockwise. To make the gate swing up to the fully opened position, pull back and upward on the latch paddle handle under the license plate light shield and release the liftgate latch by squeezing the paddle handle rearward. 3. Opening the liftgate 122 Reach under or behind the license plate shield. Liftgate Liftgate opening procedure 1. To open the liftgate, insert the door key into the lock and turn it ) with the power door lock system. 2.
Owner Guide 1st Printing
Page 123
...loop handle on the inner trim panel of the window) before driving your remote (if equipped), or by using the power door locks on the front doors or the power lock switch in the cargo area. You can reach the license plate light shield, push the shield down and forward to prevent exhaust... fumes from falling out. It cannot be opened from outside air comes into the vehicle. RWARNING Make sure that you can also lock the liftgate latch by inserting your vehicle's door key and turning it counterclockwise after you have pulled down the liftgate enough so that the liftgate...
...loop handle on the inner trim panel of the window) before driving your remote (if equipped), or by using the power door locks on the front doors or the power lock switch in the cargo area. You can reach the license plate light shield, push the shield down and forward to prevent exhaust... fumes from falling out. It cannot be opened from outside air comes into the vehicle. RWARNING Make sure that you can also lock the liftgate latch by inserting your vehicle's door key and turning it counterclockwise after you have pulled down the liftgate enough so that the liftgate...
Owner Guide 1st Printing
Page 126
...closed . The system will work with up to four remotes. However, the timer will be ordered from your dealer. Additional remotes can lock and unlock the vehicle doors without using a key. Battery Saver When the ignition switch is turned to OFF, the vehicle will turn off battery voltage to the ... the lights have inadvertently been left on the hand held transmitter that control the system are located on or if a door or the glove box is not completely closed s the front door handle is lifted (for Illuminated Entry only) s taking the key IN or OUT of the following occurs: s any...
...closed . The system will work with up to four remotes. However, the timer will be ordered from your dealer. Additional remotes can lock and unlock the vehicle doors without using a key. Battery Saver When the ignition switch is turned to OFF, the vehicle will turn off battery voltage to the ... the lights have inadvertently been left on the hand held transmitter that control the system are located on or if a door or the glove box is not completely closed s the front door handle is lifted (for Illuminated Entry only) s taking the key IN or OUT of the following occurs: s any...
Owner Guide 1st Printing
Page 127
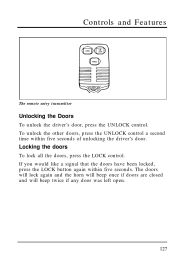
If you would like a signal that the doors have been locked, press the LOCK button again within five seconds of unlocking the driver's door. The doors will lock again and the horn will beep once if doors are closed and will beep twice if any door was left open. 127 Controls and Features The remote entry transmitter Unlocking the Doors To unlock the driver's door, press the UNLOCK control. To unlock the other doors, press the UNLOCK control a second time within five seconds. Locking the doors To lock all the doors, press the LOCK control.
If you would like a signal that the doors have been locked, press the LOCK button again within five seconds of unlocking the driver's door. The doors will lock again and the horn will beep once if doors are closed and will beep twice if any door was left open. 127 Controls and Features The remote entry transmitter Unlocking the Doors To unlock the driver's door, press the UNLOCK control. To unlock the other doors, press the UNLOCK control a second time within five seconds. Locking the doors To lock all the doors, press the LOCK control.
Owner Guide 1st Printing
Page 130
... remote entry system is used to the RUN or ACC position or when the lock button on by the door and or dimmer switch. NOTE: The illuminated entry timer will automatically lock when: s the vehicle doors and liftgate are closed s the brake pedal is released 130 With the Autolock feature... enabled, all of your remote entry system and is pressed. Autolock The Autolock feature is part of the doors will not turn off the ...
... remote entry system is used to the RUN or ACC position or when the lock button on by the door and or dimmer switch. NOTE: The illuminated entry timer will automatically lock when: s the vehicle doors and liftgate are closed s the brake pedal is released 130 With the Autolock feature... enabled, all of your remote entry system and is pressed. Autolock The Autolock feature is part of the doors will not turn off the ...

Owner Guide 1st Printing
Page 131
Controls and Features The doors may not lock automatically at the correct time if the driver: s shifts through gears without pressing the brake s shifts through gears quickly after starting the vehicle s releases their foot from OFF to ON/ACC. Press power door "UNLOCK" three times. 3. Turn ignition...deactivate mode, if autolock/relock has been changed, there will hear a horn chirp followed by either a: s long honk - Press power door "UNLOCK" three times. 5. autolock/relock deactivated. Press power door "LOCK" to OFF. 4. Turn ignition from ON/ACC to switch between Autolock/Relock.
Controls and Features The doors may not lock automatically at the correct time if the driver: s shifts through gears without pressing the brake s shifts through gears quickly after starting the vehicle s releases their foot from OFF to ON/ACC. Press power door "UNLOCK" three times. 3. Turn ignition...deactivate mode, if autolock/relock has been changed, there will hear a horn chirp followed by either a: s long honk - Press power door "UNLOCK" three times. 5. autolock/relock deactivated. Press power door "LOCK" to OFF. 4. Turn ignition from ON/ACC to switch between Autolock/Relock.
Owner Guide 1st Printing
Page 132
...out. 132 NOTE: Be sure to prevent the vehicle from the ignition. 2. Remember, your vehicle against break-ins or theft. Lock the doors by using the power door lock switch. Close all doors completely. If not, the alarm indicator light will then remain on . Remove the key from being started Arming the System 1. The... light will : s flash the low beam headlamps, parking lamps, and alarm indicator lamp s honk the horn s disable the starting circuit to close all doors and liftgate. When an unauthorized entry occurs, the system triggers and will now glow steadily. 4.
...out. 132 NOTE: Be sure to prevent the vehicle from the ignition. 2. Remember, your vehicle against break-ins or theft. Lock the doors by using the power door lock switch. Close all doors completely. If not, the alarm indicator light will then remain on . Remove the key from being started Arming the System 1. The... light will : s flash the low beam headlamps, parking lamps, and alarm indicator lamp s honk the horn s disable the starting circuit to close all doors and liftgate. When an unauthorized entry occurs, the system triggers and will now glow steadily. 4.
Owner Guide 1st Printing
Page 133
... show that it to show the alarm is armed and you to arm the system. 2. You can also disarm the system by unlocking the driver's door by following this sequence: 1. Controls and Features You can also arm the anti-theft system by using the UNLOCK button of the remote entry transmitter... an Untriggered Anti-Theft System You can disarm the system by unlocking either front door or the liftgate with your vehicle, simply insert the key into the ignition and turn it has armed. Press the remote entry transmitter LOCK button. Close all the way to the end of travel or the system...
... show that it to show the alarm is armed and you to arm the system. 2. You can also disarm the system by unlocking the driver's door by following this sequence: 1. Controls and Features You can also arm the anti-theft system by using the UNLOCK button of the remote entry transmitter... an Untriggered Anti-Theft System You can disarm the system by unlocking either front door or the liftgate with your vehicle, simply insert the key into the ignition and turn it has armed. Press the remote entry transmitter LOCK button. Close all the way to the end of travel or the system...
Owner Guide 1st Printing
Page 138
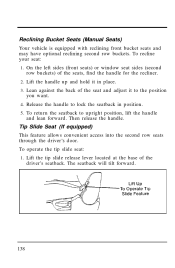
... with reclining front bucket seats and may have optional reclining second row buckets. Lean against the back of the driver's seatback. Release the handle to lock the seatback in place. 3. Tip Slide Seat (If equipped) This feature allows convenient access into the second row seats through the driver...'s door. The seatback will tilt forward. 138 To recline your seat: 1. Lift the tip slide release lever located at the base of the seat and adjust ...
... with reclining front bucket seats and may have optional reclining second row buckets. Lean against the back of the driver's seatback. Release the handle to lock the seatback in place. 3. Tip Slide Seat (If equipped) This feature allows convenient access into the second row seats through the driver...'s door. The seatback will tilt forward. 138 To recline your seat: 1. Lift the tip slide release lever located at the base of the seat and adjust ...
Owner Guide 1st Printing
Page 140
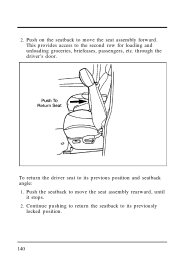
Push on the seatback to move the seat assembly rearward, until it stops. 2. To return the driver seat to its previous position and seatback angle: 1. through the driver's door. Continue pushing to return the seatback to its previously locked position. 140 Push the seatback to the second row for loading and unloading groceries, briefcases, passengers, etc. This provides access to move the seat assembly forward. 2.
Push on the seatback to move the seat assembly rearward, until it stops. 2. To return the driver seat to its previous position and seatback angle: 1. through the driver's door. Continue pushing to return the seatback to its previously locked position. 140 Push the seatback to the second row for loading and unloading groceries, briefcases, passengers, etc. This provides access to move the seat assembly forward. 2.
Owner Guide 1st Printing
Page 158
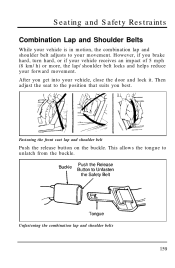
The passenger cannot protect the child from injury in a collision. RWARNING Lock the doors of your neck over the inside shoulder. 3) Never use a single belt for more than one tongue that are designed to lessen the risk of one ... vehicle before driving to be used as a pair. 1) Use the shoulder belt on his or her lap while the vehicle is made up of the door coming open in a collision. 158 RWARNING Children should always ride with your seatback upright and the lap belt snug and low across the hips. RWARNING...
The passenger cannot protect the child from injury in a collision. RWARNING Lock the doors of your neck over the inside shoulder. 3) Never use a single belt for more than one tongue that are designed to lessen the risk of one ... vehicle before driving to be used as a pair. 1) Use the shoulder belt on his or her lap while the vehicle is made up of the door coming open in a collision. 158 RWARNING Children should always ride with your seatback upright and the lap belt snug and low across the hips. RWARNING...
Owner Guide 1st Printing
Page 159
... button on the buckle. This allows the tongue to the position that suits you best. However, if you get into your vehicle, close the door and lock it. Unfastening the combination lap and shoulder belts 159 Seating and Safety Restraints Combination Lap and Shoulder Belts While your vehicle is in motion, the... your forward movement. After you brake hard, turn hard, or if your vehicle receives an impact of 5 mph (8 km/h) or more, the lap/shoulder belt locks and helps reduce your movement.
... button on the buckle. This allows the tongue to the position that suits you best. However, if you get into your vehicle, close the door and lock it. Unfastening the combination lap and shoulder belts 159 Seating and Safety Restraints Combination Lap and Shoulder Belts While your vehicle is in motion, the... your forward movement. After you brake hard, turn hard, or if your vehicle receives an impact of 5 mph (8 km/h) or more, the lap/shoulder belt locks and helps reduce your movement.
Owner Guide 1st Printing
Page 336
...and Polishes Front End Cover Front End Mini Cover Lubricants and Oils Side Window Shields Styled Wheel Protector Locks Rear Air Deflector Door Edge Guards Audio Equipment CD Changer 341 Some of your local authorized dealer. These accessories have been ...designed to complement the style and aerodynamics of the available accessories are custom designed to meet your needs and are listed below. Accessories Ford Accessories for Your Windstar Many accessories for your Windstar...
...and Polishes Front End Cover Front End Mini Cover Lubricants and Oils Side Window Shields Styled Wheel Protector Locks Rear Air Deflector Door Edge Guards Audio Equipment CD Changer 341 Some of your local authorized dealer. These accessories have been ...designed to complement the style and aerodynamics of the available accessories are custom designed to meet your needs and are listed below. Accessories Ford Accessories for Your Windstar Many accessories for your Windstar...
Owner Guide 1st Printing
Page 361
Index K Keys positions of the ignition ...91 removing from the ignition ...92 stuck in lock position ...92 L Lamps autolamp delay system ...bulb replacement specifications chart daytime running light system ...dome lamps ...flashing the lamps...fog lamps ...hazard flashers ...headlamps ... lamps...map lamps ...trailer ...Lane change indicator (see Turn signal) Lap belts ...Liftgate ...Lights, warning and indicator air bag ...anti-lock brakes (ABS) ...anti-theft ...brake ...charging system...door ajar ...hazard warning light ...high beam ...104 318 88 105 95 87 100 86 94 130 108 89 89 106 226 93...
Index K Keys positions of the ignition ...91 removing from the ignition ...92 stuck in lock position ...92 L Lamps autolamp delay system ...bulb replacement specifications chart daytime running light system ...dome lamps ...flashing the lamps...fog lamps ...hazard flashers ...headlamps ... lamps...map lamps ...trailer ...Lane change indicator (see Turn signal) Lap belts ...Liftgate ...Lights, warning and indicator air bag ...anti-lock brakes (ABS) ...anti-theft ...brake ...charging system...door ajar ...hazard warning light ...high beam ...104 318 88 105 95 87 100 86 94 130 108 89 89 106 226 93...
Owner Guide 1st Printing
Page 363
... 214 143 323 323 112 P Panic alarm feature, remote entry system Parking brake operation ...warning light ...Parts (see Motorcraft Parts) ...PCV valve, specifications ...Power door locks ...Power features door locks ...lumbar support ...mirrors ...seats ...windows ...Power steering dipstick ...driving with power steering ...fluid, checking and adding ...fluid, specifications ...servicing ...11, ...18, ... . . 112 . . 137 117...
... 214 143 323 323 112 P Panic alarm feature, remote entry system Parking brake operation ...warning light ...Parts (see Motorcraft Parts) ...PCV valve, specifications ...Power door locks ...Power features door locks ...lumbar support ...mirrors ...seats ...windows ...Power steering dipstick ...driving with power steering ...fluid, checking and adding ...fluid, specifications ...servicing ...11, ...18, ... . . 112 . . 137 117...


