Owner Guide 1st Printing
Page 115
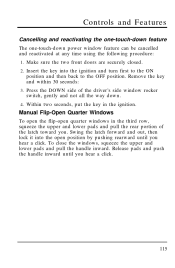
... switch, gently and not all the way down power window feature can be cancelled and reactivated at any time using the following procedure: 1. Swing the latch forward and out, then lock it into the ignition and turn first to the ON position and then back to the OFF position. Manual Flip...-open position by pushing rearward until you hear a click. 115 Release pads and push the handle inward until you . Press the DOWN side of the latch toward you hear a click. To close the windows, squeeze the upper and lower pads and pull the handle inward. Insert the key into the open...
... switch, gently and not all the way down power window feature can be cancelled and reactivated at any time using the following procedure: 1. Swing the latch forward and out, then lock it into the ignition and turn first to the ON position and then back to the OFF position. Manual Flip...-open position by pushing rearward until you hear a click. 115 Release pads and push the handle inward until you . Press the DOWN side of the latch toward you hear a click. To close the windows, squeeze the upper and lower pads and pull the handle inward. Insert the key into the open...

Owner Guide 1st Printing
Page 116
The vent windows are controlled by the right and left switches located on the door panel. press the raised side of the switch to close the windows. 116 Press the indented side of the switch to open quarter window latch location Power Quarter Windows (If equipped) The power rear quarter vent windows operate with the ignition in the ON or ACC positions. Manual flip-open the windows;
The vent windows are controlled by the right and left switches located on the door panel. press the raised side of the switch to close the windows. 116 Press the indented side of the switch to open quarter window latch location Power Quarter Windows (If equipped) The power rear quarter vent windows operate with the ignition in the ON or ACC positions. Manual flip-open the windows;
Owner Guide 1st Printing
Page 122
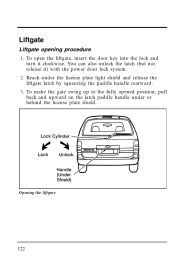
You can also unlock the latch (but not release it clockwise. Reach under or behind the license plate shield. To make the gate swing up to the fully opened position, pull back and upward on the latch paddle handle under the license plate light shield and release the liftgate latch by squeezing the paddle handle rearward. 3. Opening the liftgate 122 To open the liftgate, insert the door key into the lock and turn it ) with the power door lock system. 2. Liftgate Liftgate opening procedure 1.
You can also unlock the latch (but not release it clockwise. Reach under or behind the license plate shield. To make the gate swing up to the fully opened position, pull back and upward on the latch paddle handle under the license plate light shield and release the liftgate latch by squeezing the paddle handle rearward. 3. Opening the liftgate 122 To open the liftgate, insert the door key into the lock and turn it ) with the power door lock system. 2. Liftgate Liftgate opening procedure 1.
Owner Guide 1st Printing
Page 123
... for cargo, not passengers. Liftgate closing procedure 1. You can open so outside the vehicle. You can also lock the liftgate latch by using the power door locks on your vehicle. This will also prevent passengers and cargo from being drawn into the vehicle. At this option) and pull...counterclockwise after you have pulled down and forward to close the latch and liftgate. The liftgate area is not locked. 3. Possible damage may occur to the liftgate door lift cylinders and attaching hardware if the liftgate door is not closed to driving. You can reach the license plate...
... for cargo, not passengers. Liftgate closing procedure 1. You can open so outside the vehicle. You can also lock the liftgate latch by using the power door locks on your vehicle. This will also prevent passengers and cargo from being drawn into the vehicle. At this option) and pull...counterclockwise after you have pulled down and forward to close the latch and liftgate. The liftgate area is not locked. 3. Possible damage may occur to the liftgate door lift cylinders and attaching hardware if the liftgate door is not closed to driving. You can reach the license plate...

Owner Guide 1st Printing
Page 149
Ensure that the latch handles are latched securely in the down position. Keep floor area free of objects that the seat and seatback are fully seated in position. Never attempt to adjust ... bucket seats: 1. Lift the seat assemblies into the slot provided on to remove/reinstall both the second and third row bench seats through the sliding door. Locate front hooks on front pins and drop rear hooks over rear pins with enough force to cause the hooks at the rear to engage...
Ensure that the latch handles are latched securely in the down position. Keep floor area free of objects that the seat and seatback are fully seated in position. Never attempt to adjust ... bucket seats: 1. Lift the seat assemblies into the slot provided on to remove/reinstall both the second and third row bench seats through the sliding door. Locate front hooks on front pins and drop rear hooks over rear pins with enough force to cause the hooks at the rear to engage...

Owner Guide 1st Printing
Page 154
... seat only) will prevent correct use of the safety belts and could increase the risk of the safety belt into the detachable anchor until the latch re-engages. Rotate the seatback upward until you engage the safety belt, be placed in the vehicle and no one is not twisted. Refer to... a rear seat in your vehicle it must be sure it is using the outboard seating position (nearest the sliding door), the lap/shoulder safety belt must be properly stowed. 154 Ensure that the latch handles are fully seated in the down position. 5. (Second row bench seat only) Before you hear a "snap" and...
... seat only) will prevent correct use of the safety belts and could increase the risk of the safety belt into the detachable anchor until the latch re-engages. Rotate the seatback upward until you engage the safety belt, be placed in the vehicle and no one is not twisted. Refer to... a rear seat in your vehicle it must be sure it is using the outboard seating position (nearest the sliding door), the lap/shoulder safety belt must be properly stowed. 154 Ensure that the latch handles are fully seated in the down position. 5. (Second row bench seat only) Before you hear a "snap" and...
Owner Guide 1st Printing
Page 219
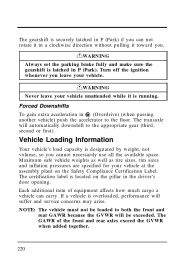
... acceleration in P (Park). NOTE: The vehicle must not be exceeded. RWARNING Always set the parking brake fully and make sure the gearshift is latched in j (Overdrive) (when passing another vehicle) push the accelerator to the appropriate gear (third, second or first). The transaxle will be loaded...exceed the GVWR when added together. 220 The GAWR of equipment affects how much cargo a vehicle can not rotate it in the driver's door opening. RWARNING Never leave your vehicle at the assembly plant on the pillar in a clockwise direction without pulling it toward you. Vehicle ...
... acceleration in P (Park). NOTE: The vehicle must not be exceeded. RWARNING Always set the parking brake fully and make sure the gearshift is latched in j (Overdrive) (when passing another vehicle) push the accelerator to the appropriate gear (third, second or first). The transaxle will be loaded...exceed the GVWR when added together. 220 The GAWR of equipment affects how much cargo a vehicle can not rotate it in the driver's door opening. RWARNING Never leave your vehicle at the assembly plant on the pillar in a clockwise direction without pulling it toward you. Vehicle ...
Owner Guide 1st Printing
Page 324
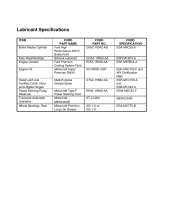
...-M1C93-A ESW-M2C33-F MERCON® ESA-M1C75-B Hood Latch and Auxiliary Catch, Door and Liftgate Hinges Power Steering Pump Reservoir Transaxle Automatic Overdrive Wheel Bearings, Rear D7AZ-19584-AA E6AZ-19582-AA XT-2-QDX XG-1-C or XG-1-K Lubricant Specifications ITEM Brake Master Cylinder FORD PART NAME Ford High Performance DOT3 Brake Fluid Silicone Lubricant...
...-M1C93-A ESW-M2C33-F MERCON® ESA-M1C75-B Hood Latch and Auxiliary Catch, Door and Liftgate Hinges Power Steering Pump Reservoir Transaxle Automatic Overdrive Wheel Bearings, Rear D7AZ-19584-AA E6AZ-19582-AA XT-2-QDX XG-1-C or XG-1-K Lubricant Specifications ITEM Brake Master Cylinder FORD PART NAME Ford High Performance DOT3 Brake Fluid Silicone Lubricant...
Scheduled Maintenance Guide 2nd Printing
Page 33
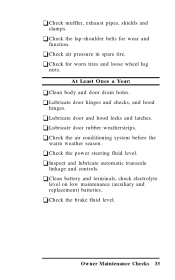
... tires and loose wheel lug nuts. At Least Once a Year: u Clean body and door drain holes. u Lubricate door rubber weatherstrips. Owner Maintenance Checks 33 u Check for wear and function. u Check the brake fluid level. u Lubricate door and hood locks and latches. u Inspect and lubricate automatic transaxle linkage and controls. u Clean battery and terminals, check...
... tires and loose wheel lug nuts. At Least Once a Year: u Clean body and door drain holes. u Lubricate door rubber weatherstrips. Owner Maintenance Checks 33 u Check for wear and function. u Check the brake fluid level. u Lubricate door and hood locks and latches. u Inspect and lubricate automatic transaxle linkage and controls. u Clean battery and terminals, check...


