Four Wheeling Supplement 1st Printing
Page 16
... the tire. Check for highway driving because they are neither underinflated nor overloaded. Tires can adversely affect the way your tires. Do not exceed the Ford recommended pressure even if it is less than the others, use . Each day before you drive, check your vehicle handles. Check tire pressure with a tire... tread grooves. You should not be used for holes or cuts that may be damaged during off-road use a tire gauge to the left front door lock facing or door latch post pillar.
... the tire. Check for highway driving because they are neither underinflated nor overloaded. Tires can adversely affect the way your tires. Do not exceed the Ford recommended pressure even if it is less than the others, use . Each day before you drive, check your vehicle handles. Check tire pressure with a tire... tread grooves. You should not be used for holes or cuts that may be damaged during off-road use a tire gauge to the left front door lock facing or door latch post pillar.

Customer Assistance Guide 1st Printing
Page 13
... OWNER'S LITERATURE To order the publications in this portfolio: Make checks payable to: HELM, INCORPORATED P.O. Ordering additional owner's literature vehicle. (Citizens band [CB] transceivers, garage door openers and other transmitters with outputs of five watts or less will not ordinarily affect your vehicle's operation.) •...
... OWNER'S LITERATURE To order the publications in this portfolio: Make checks payable to: HELM, INCORPORATED P.O. Ordering additional owner's literature vehicle. (Citizens band [CB] transceivers, garage door openers and other transmitters with outputs of five watts or less will not ordinarily affect your vehicle's operation.) •...
Owner Guide 1st Printing
Page 6
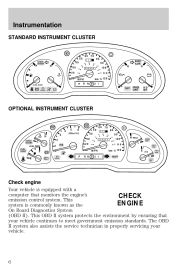
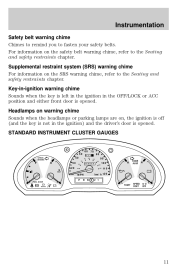
Instrumentation STANDARD INSTRUMENT CLUSTER 50 CHECK ENGINE 60 70 0 0 0 80 100 120 140 80 90 160 40 F DOOR AJAR H 60 30 20 10 40 000000 100 1 10 H H 20 180 MPH P R km/h 120 N D 2 1 E
Instrumentation STANDARD INSTRUMENT CLUSTER 50 CHECK ENGINE 60 70 0 0 0 80 100 120 140 80 90 160 40 F DOOR AJAR H 60 30 20 10 40 000000 100 1 10 H H 20 180 MPH P R km/h 120 N D 2 1 E
Owner Guide 1st Printing
Page 10
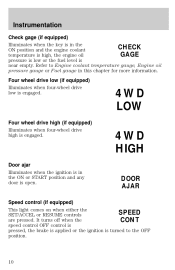
... when the ignition is in the ON or START position and any door is turned to Engine coolant temperature gauge, Engine oil pressure gauge or Fuel gauge in the CHECK ON position and the engine coolant temperature is ... is in this chapter for more information. Four wheel drive low (if equipped) Illuminates when four-wheel drive low is engaged. 4WD LOW 4WD HIGH DOOR AJAR Four wheel drive high (if equipped) Illuminates when four-wheel drive high is near empty. Refer to the OFF position. 10 Speed control (if...
... when the ignition is in the ON or START position and any door is turned to Engine coolant temperature gauge, Engine oil pressure gauge or Fuel gauge in the CHECK ON position and the engine coolant temperature is ... is in this chapter for more information. Four wheel drive low (if equipped) Illuminates when four-wheel drive low is engaged. 4WD LOW 4WD HIGH DOOR AJAR Four wheel drive high (if equipped) Illuminates when four-wheel drive high is near empty. Refer to the OFF position. 10 Speed control (if...
Owner Guide 1st Printing
Page 11
STANDARD INSTRUMENT CLUSTER GAUGES 50 CHECK ENGINE 60 70 0 0 0 80 100 120 140 80 90 160 40 60 F H 30 20 10 40 000000 100 1 10 H DOOR AJAR H 20 180 MPH P R km/h 120 N D 2 1 E For information on the safety belt warning chime, refer to fasten your safety belts. Key-in-ignition warning chime... Sounds when the key is left in the ignition in the ignition) and the driver's door is opened . Headlamps on warning chime Sounds when the headlamps or parking lamps are on the SRS warning chime, refer to the Seating and safety...
STANDARD INSTRUMENT CLUSTER GAUGES 50 CHECK ENGINE 60 70 0 0 0 80 100 120 140 80 90 160 40 60 F H 30 20 10 40 000000 100 1 10 H DOOR AJAR H 20 180 MPH P R km/h 120 N D 2 1 E For information on the safety belt warning chime, refer to fasten your safety belts. Key-in-ignition warning chime... Sounds when the key is left in the ignition in the ignition) and the driver's door is opened . Headlamps on warning chime Sounds when the headlamps or parking lamps are on the SRS warning chime, refer to the Seating and safety...
Owner Guide 1st Printing
Page 12
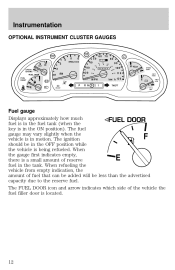
Instrumentation OPTIONAL INSTRUMENT CLUSTER GAUGES CHECK GAGE DOOR AJAR 4 H CHECK ENGINE 5 6 40 30 20 10 50 60 60 70 0 0 0 80 100 120 140 80 90 160 3 2 1 RPMx1000 C 40 000000 100 1 10 H L H SPEED CONT ... be less than the advertised capacity due to the reserve fuel. F E 12 The fuel gauge may vary slightly when the vehicle is located. The FUEL DOOR icon and arrow indicates which side of the vehicle the fuel filler...
Instrumentation OPTIONAL INSTRUMENT CLUSTER GAUGES CHECK GAGE DOOR AJAR 4 H CHECK ENGINE 5 6 40 30 20 10 50 60 60 70 0 0 0 80 100 120 140 80 90 160 3 2 1 RPMx1000 C 40 000000 100 1 10 H L H SPEED CONT ... be less than the advertised capacity due to the reserve fuel. F E 12 The fuel gauge may vary slightly when the vehicle is located. The FUEL DOOR icon and arrow indicates which side of the vehicle the fuel filler...

Owner Guide 1st Printing
Page 31
... of console features. UNLOCK LOCK POWER SIDE VIEW MIRRORS (IF EQUIPPED) To adjust your mirrors: 1. Select to adjust the left mirror or to lock all doors. Move the control in place. Return to the center position to lock mirrors in the direction you wish to tilt the mirror. 3. CENTER CONSOLE (IF...; cupholders • coin holder slots • ashtray • flip up armrest 31 These include: • utility compartment with a variety of the control to unlock all doors and the bottom to adjust the right mirror. 2.
... of console features. UNLOCK LOCK POWER SIDE VIEW MIRRORS (IF EQUIPPED) To adjust your mirrors: 1. Select to adjust the left mirror or to lock all doors. Move the control in place. Return to the center position to lock mirrors in the direction you wish to tilt the mirror. 3. CENTER CONSOLE (IF...; cupholders • coin holder slots • ashtray • flip up armrest 31 These include: • utility compartment with a variety of the control to unlock all doors and the bottom to adjust the right mirror. 2.

Owner Guide 1st Printing
Page 32
... lock again, the horn will chirp and the lamps will illuminate. If any of the doors are closed and locked, press the control a second time within five seconds to unlock the driver door. Press the control a second time within five seconds. The interior lamps will flash. REMOTE ENTRY SYSTEM... (IF EQUIPPED) The remote entry system allows you to properly close all doors are ajar, the horn will make two quick chirps, reminding you to lock all doors. Locking the doors Press this control to unlock all doors. Controls and features Use only soft cups in the OFF position. Hard...
... lock again, the horn will chirp and the lamps will illuminate. If any of the doors are closed and locked, press the control a second time within five seconds to unlock the driver door. Press the control a second time within five seconds. The interior lamps will flash. REMOTE ENTRY SYSTEM... (IF EQUIPPED) The remote entry system allows you to properly close all doors are ajar, the horn will make two quick chirps, reminding you to lock all doors. Locking the doors Press this control to unlock all doors. Controls and features Use only soft cups in the OFF position. Hard...
Owner Guide 1st Printing
Page 34
...interior lamps illuminate when the remote entry system is lost or • you want to purchase additional transmitters (up to four). After doors lock/unlock, press any door is turned to the START or ACC position. The dome lamp switch (if equipped) must be set to the OFF position for... reprogramming if: • a transmitter is used to unlock the door(s) or sound the personal alarm. The system automatically turns off if: • they have been turned on with the dimmer control or • any ...
...interior lamps illuminate when the remote entry system is lost or • you want to purchase additional transmitters (up to four). After doors lock/unlock, press any door is turned to the START or ACC position. The dome lamp switch (if equipped) must be set to the OFF position for... reprogramming if: • a transmitter is used to unlock the door(s) or sound the personal alarm. The system automatically turns off if: • they have been turned on with the dimmer control or • any ...
Owner Guide 1st Printing
Page 35
... will prearm the alarm system: • Press the remote entry lock control • Open a door and press the power door lock control to lock the doors If a door is open, the system is prearmed and is waiting for the door to arm whenever the ignition is armed. When you press the lock control twice within... to let you know that the system is prearmed. When unauthorized entry occurs, the system will help protect your vehicle from unauthorized entry. Once the doors are locked, the horn will chirp once to warn you press the remote entry transmitter twice to confirm the...
... will prearm the alarm system: • Press the remote entry lock control • Open a door and press the power door lock control to lock the doors If a door is open, the system is prearmed and is waiting for the door to arm whenever the ignition is armed. When you press the lock control twice within... to let you know that the system is prearmed. When unauthorized entry occurs, the system will help protect your vehicle from unauthorized entry. Once the doors are locked, the horn will chirp once to warn you press the remote entry transmitter twice to confirm the...
Owner Guide 1st Printing
Page 36
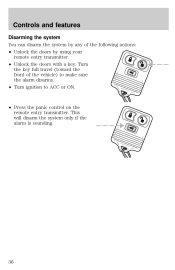
Turn the key full travel (toward the front of the following actions: • Unlock the doors by using your remote entry transmitter. • Unlock the doors with a key. This will disarm the system only if the alarm is sounding. 36 Controls and features Disarming the system You can disarm the system by any of the vehicle) to make sure the alarm disarms. • Turn ignition to ACC or ON. • Press the panic control on the remote entry transmitter.
Turn the key full travel (toward the front of the following actions: • Unlock the doors by using your remote entry transmitter. • Unlock the doors with a key. This will disarm the system only if the alarm is sounding. 36 Controls and features Disarming the system You can disarm the system by any of the vehicle) to make sure the alarm disarms. • Turn ignition to ACC or ON. • Press the panic control on the remote entry transmitter.

Owner Guide 1st Printing
Page 38
REAR SEATS Center facing jump seat (2 door SuperCab) (if equipped) To open, pull inboard and down on the seat handle. To stow the seat, pull seat bottom back to increase softness. Do not install a child seat in a center facing jump seat. 38 Turn the lumbar support control counterclockwise to the fully upright position. Seating and safety restraints Pull lever up to increase firmness. Using the manual lumbar support Turn the lumbar support control clockwise to adjust seatback.
REAR SEATS Center facing jump seat (2 door SuperCab) (if equipped) To open, pull inboard and down on the seat handle. To stow the seat, pull seat bottom back to increase softness. Do not install a child seat in a center facing jump seat. 38 Turn the lumbar support control counterclockwise to the fully upright position. Seating and safety restraints Pull lever up to increase firmness. Using the manual lumbar support Turn the lumbar support control clockwise to adjust seatback.

Owner Guide 1st Printing
Page 39
... dangerous to ride in a collision. In a collision, people riding in a seat and using a safety belt properly. 39 Seating and safety restraints Center facing jump seat (4 door SuperCab)(if equipped) To open, lift handle and pull seat assembly down and raise seat assembly to the fully upright position. Be sure everyone in...
... dangerous to ride in a collision. In a collision, people riding in a seat and using a safety belt properly. 39 Seating and safety restraints Center facing jump seat (4 door SuperCab)(if equipped) To open, lift handle and pull seat assembly down and raise seat assembly to the fully upright position. Be sure everyone in...
Owner Guide 1st Printing
Page 40
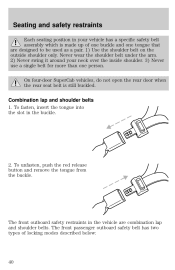
... on the outside shoulder only. To unfasten, push the red release button and remove the tongue from the buckle. On four-door SuperCab vehicles, do not open the rear door when the rear seat belt is made up of locking modes described below: 40 Seating and safety restraints Each seating position in...
... on the outside shoulder only. To unfasten, push the red release button and remove the tongue from the buckle. On four-door SuperCab vehicles, do not open the rear door when the rear seat belt is made up of locking modes described below: 40 Seating and safety restraints Each seating position in...
Owner Guide 1st Printing
Page 43
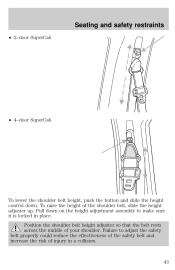
Failure to make sure it is locked in a collision. 43 Seating and safety restraints • 2-door SuperCab • 4-door SuperCab To lower the shoulder belt height, push the button and slide the height control down on the height adjustment assembly to adjust the safety belt properly could reduce the effectiveness of the safety belt and increase the risk of the shoulder belt, slide the height adjuster up. To raise the height of injury in place. Pull down . Position the shoulder belt height adjuster so that the belt rests across the middle of your shoulder.
Failure to make sure it is locked in a collision. 43 Seating and safety restraints • 2-door SuperCab • 4-door SuperCab To lower the shoulder belt height, push the button and slide the height control down on the height adjustment assembly to adjust the safety belt properly could reduce the effectiveness of the safety belt and increase the risk of the shoulder belt, slide the height adjuster up. To raise the height of injury in place. Pull down . Position the shoulder belt height adjuster so that the belt rests across the middle of your shoulder.
Owner Guide 1st Printing
Page 45
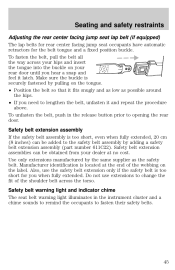
To unfasten the belt, push in the instrument cluster and a chime sounds to remind the occupants to opening the rear door. Also, use extensions to change the fit of the webbing on your hips and insert the tongue into the buckle on the label. Manufacturer identification... extension assembly (part number 611C22). Safety belt extension assemblies can be obtained from your dealer at the end of the shoulder belt across your rear door until you hear a snap and feel it and repeat the procedure above. Use only extensions manufactured by the same supplier as possible around the hips...
To unfasten the belt, push in the instrument cluster and a chime sounds to remind the occupants to opening the rear door. Also, use extensions to change the fit of the webbing on your hips and insert the tongue into the buckle on the label. Manufacturer identification... extension assembly (part number 611C22). Safety belt extension assemblies can be obtained from your dealer at the end of the shoulder belt across your rear door until you hear a snap and feel it and repeat the procedure above. Use only extensions manufactured by the same supplier as possible around the hips...

Owner Guide 1st Printing
Page 59
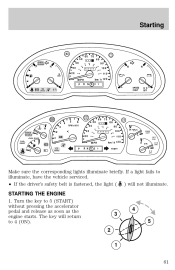
... the vehicle, refer to the Seating and safety restraints chapter. 59 Starting PREPARING TO START YOUR VEHICLE Engine starting the engine. Always open the garage door before or during starting. See Guarding against exhaust fumes in dry grass or other damage. Important safety precautions A computer system controls the engine's idle revolutions...
... the vehicle, refer to the Seating and safety restraints chapter. 59 Starting PREPARING TO START YOUR VEHICLE Engine starting the engine. Always open the garage door before or during starting. See Guarding against exhaust fumes in dry grass or other damage. Important safety precautions A computer system controls the engine's idle revolutions...
Owner Guide 1st Printing
Page 61
Starting 50 CHECK ENGINE 60 70 0 0 0 80 100 120 140 80 90 160 40 F H 60 30 20 10 40 000000 100 1 10 H H 20 180 MPH P R km/h 120 N D 2 1 E ABS L ! BRAKE L SPEED CONT O/D OFF L CHECK GAGE DOOR AJAR 4 H CHECK ENGINE 5 6 40 30 20 10 50 60 60 70 0 0 0 80 100 120 140 80 90 160 3 2 1 RPMx1000 C 40 000000 100 1 10 H L H SPEED CONT 4WD HIGH 4WD LOW 20 180
Starting 50 CHECK ENGINE 60 70 0 0 0 80 100 120 140 80 90 160 40 F H 60 30 20 10 40 000000 100 1 10 H H 20 180 MPH P R km/h 120 N D 2 1 E ABS L ! BRAKE L SPEED CONT O/D OFF L CHECK GAGE DOOR AJAR 4 H CHECK ENGINE 5 6 40 30 20 10 50 60 60 70 0 0 0 80 100 120 140 80 90 160 3 2 1 RPMx1000 C 40 000000 100 1 10 H L H SPEED CONT 4WD HIGH 4WD LOW 20 180

Owner Guide 1st Printing
Page 80
...the tongue load of cargo, passengers and optional equipment. Remember to tow. Do not exceed the GVWR or the GAWR specified on the driver's door pillar. • GAWR (Gross Axle Weight Rating) : Carrying capacity for trailer towing and the weight of the driver from zero to tow.... to tow. • Maximum Trailer Weight Rating : Maximum weight of a trailer the vehicle is listed on the Safety Compliance Label on the driver's door pillar. • GCWR (Gross Combined Weight Rating) : Maximum combined weight of the base vehicle, passengers, optional equipment and cargo. The GAWR is ...
...the tongue load of cargo, passengers and optional equipment. Remember to tow. Do not exceed the GVWR or the GAWR specified on the driver's door pillar. • GAWR (Gross Axle Weight Rating) : Carrying capacity for trailer towing and the weight of the driver from zero to tow.... to tow. • Maximum Trailer Weight Rating : Maximum weight of a trailer the vehicle is listed on the Safety Compliance Label on the driver's door pillar. • GCWR (Gross Combined Weight Rating) : Maximum combined weight of the base vehicle, passengers, optional equipment and cargo. The GAWR is ...
Owner Guide 1st Printing
Page 95
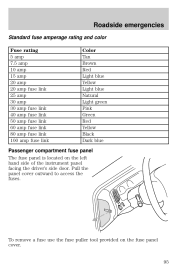
To remove a fuse use the fuse puller tool provided on the left hand side of the instrument panel facing the driver's side door. Roadside emergencies Standard fuse amperage rating and color Fuse rating 5 amp 7.5 amp 10 amp 15 amp 20 amp 20 amp fuse link 25 amp 30 ...
To remove a fuse use the fuse puller tool provided on the left hand side of the instrument panel facing the driver's side door. Roadside emergencies Standard fuse amperage rating and color Fuse rating 5 amp 7.5 amp 10 amp 15 amp 20 amp 20 amp fuse link 25 amp 30 ...

