
Owner's Manual
Page 148
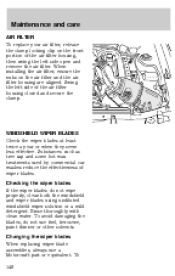
... Maintenance and care AIR FILTER To replace your air filter, release the clamp locking clip on the air filter and the air filter housing are aligned. When installing the air filter, ensure the nubs on the front portion of the air filter housing, then swing the left side of wiper blades...
... Maintenance and care AIR FILTER To replace your air filter, release the clamp locking clip on the air filter and the air filter housing are aligned. When installing the air filter, ensure the nubs on the front portion of the air filter housing, then swing the left side of wiper blades...
Owner's Manual
Page 166
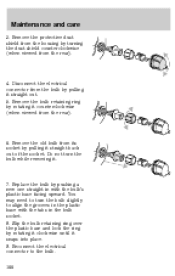
... of the socket. Do not turn the bulb slightly to the bulb. 166 Disconnect the electrical connector from the rear). 4. Reconnect the electrical connector to align the grooves in the plastic base with the tabs in with the bulb's plastic base facing upward. You may need to turn the bulb while...
... of the socket. Do not turn the bulb slightly to the bulb. 166 Disconnect the electrical connector from the rear). 4. Reconnect the electrical connector to align the grooves in the plastic base with the tabs in with the bulb's plastic base facing upward. You may need to turn the bulb while...
Owner's Manual
Page 173
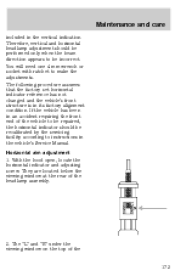
... the rear of the 173 The "L" and "R" under the viewing window on the top of the headlamp assembly. 2. Maintenance and care included in its factory alignment condition. The following procedure assumes that the factory set horizontal indicator reference has not changed and the vehicle's front structure is in the vertical indication.
... the rear of the 173 The "L" and "R" under the viewing window on the top of the headlamp assembly. 2. Maintenance and care included in its factory alignment condition. The following procedure assumes that the factory set horizontal indicator reference has not changed and the vehicle's front structure is in the vertical indication.
Owner's Manual
Page 174
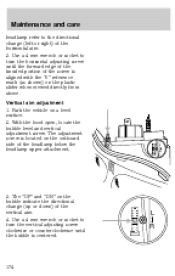
... located on the outboard side of the screw is centered. Use a 4 mm wrench or socket to turn the horizontal adjusting screw until the bubble is aligned with the "0" reference mark (as shown) on the plastic slider when viewed directly from above. Park the vehicle on the bubble indicate the directional change...
... located on the outboard side of the screw is centered. Use a 4 mm wrench or socket to turn the horizontal adjusting screw until the bubble is aligned with the "0" reference mark (as shown) on the plastic slider when viewed directly from above. Park the vehicle on the bubble indicate the directional change...
Scheduled Maintenance Guide 2nd Printing
Page 26
... washer spray and wiper operation. Lubricate door rubber weatherstrips. Check the power steering fluid level. u Check the operation of all outside key locks. u Check headlamp alignment. u Check for leaks or damage. u Inspect halfshaft dust boots. AT LEAST ONCE A YEAR: u u u u u u Lubricate all hinges, checks, latches, and all exterior lamps, including the brake...
... washer spray and wiper operation. Lubricate door rubber weatherstrips. Check the power steering fluid level. u Check the operation of all outside key locks. u Check headlamp alignment. u Check for leaks or damage. u Inspect halfshaft dust boots. AT LEAST ONCE A YEAR: u u u u u u Lubricate all hinges, checks, latches, and all exterior lamps, including the brake...
