Owner Guide 1st Printing
Page 233
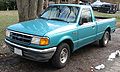
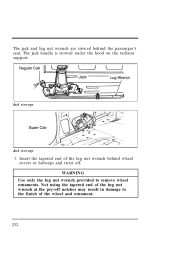
Jack stowage Jack stowage 3. The jack handle is stowed under the hood on the radiator support. WARNING Use only the lug nut wrench provided to the finish of the wheel and ornament. 232 Insert the tapered end of the lug nut wrench at the pry-off . Not using the tapered end of the lug nut wrench behind the passenger's seat. The jack and lug nut wrench are stowed behind wheel covers or hubcaps and twist off notches may result in damage to remove wheel ornaments.
Jack stowage Jack stowage 3. The jack handle is stowed under the hood on the radiator support. WARNING Use only the lug nut wrench provided to the finish of the wheel and ornament. 232 Insert the tapered end of the lug nut wrench at the pry-off . Not using the tapered end of the lug nut wrench behind the passenger's seat. The jack and lug nut wrench are stowed behind wheel covers or hubcaps and twist off notches may result in damage to remove wheel ornaments.
Owner Guide 1st Printing
Page 240
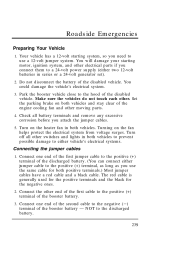
... the disabled vehicle. Connect one end of the second cable to the positive (+) terminal of the disabled vehicle. Park the booster vehicle close to the hood of the discharged battery. (You can connect either jumper cable to the positive (+) terminal, as long as you connect them to the discharged battery. 239...
... the disabled vehicle. Connect one end of the second cable to the positive (+) terminal of the disabled vehicle. Park the booster vehicle close to the hood of the discharged battery. (You can connect either jumper cable to the positive (+) terminal, as long as you connect them to the discharged battery. 239...
Owner Guide 1st Printing
Page 251
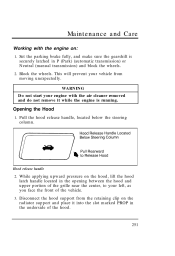
... your vehicle from the retaining clip on the hood, lift the hood latch handle located in the opening between the hood and upper portion of the grille near the center, to your left, as you face the front of the hood. 251 Opening the Hood 1. This will prevent your engine with the ...engine on: 1. Pull the hood release handle, located below the steering column. While applying upward pressure on the radiator support and place...
... your vehicle from the retaining clip on the hood, lift the hood latch handle located in the opening between the hood and upper portion of the grille near the center, to your left, as you face the front of the hood. 251 Opening the Hood 1. This will prevent your engine with the ...engine on: 1. Pull the hood release handle, located below the steering column. While applying upward pressure on the radiator support and place...

Owner Guide 1st Printing
Page 252
Always attempt to lift the hood after closing to maintain smooth operation. To close the hood, raise it so that the support rod comes away from the slotted hole in its retaining clip and close the hood with enough force to make it is securely latched. 252 Place the support rod in the hood. Be sure to oil the hood latch every six months to be sure it latch. Hood and support NOTE: Read and understand Precautions When Servicing Your Vehicle at the beginning of this chapter before opening the hood.
Always attempt to lift the hood after closing to maintain smooth operation. To close the hood, raise it so that the support rod comes away from the slotted hole in its retaining clip and close the hood with enough force to make it is securely latched. 252 Place the support rod in the hood. Be sure to oil the hood latch every six months to be sure it latch. Hood and support NOTE: Read and understand Precautions When Servicing Your Vehicle at the beginning of this chapter before opening the hood.
Owner Guide 1st Printing
Page 258
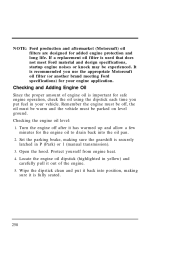
... (Park) or 1 (manual transmission). 3. Locate the engine oil dipstick (highlighted in your engine application. Checking the engine oil level: 1. Open the hood. Protect yourself from engine heat. 4. Set the parking brake, making sure it has warmed up and allow a few minutes for safe engine operation, check ... (Motorcraft) oil filters are designed for your vehicle. Remember the engine must be off after it is used that does not meet Ford material and design specifications, startup engine noises or knock may be parked on level ground. Turn the engine off , the oil must...
... (Park) or 1 (manual transmission). 3. Locate the engine oil dipstick (highlighted in your engine application. Checking the engine oil level: 1. Open the hood. Protect yourself from engine heat. 4. Set the parking brake, making sure it has warmed up and allow a few minutes for safe engine operation, check ... (Motorcraft) oil filters are designed for your vehicle. Remember the engine must be off after it is used that does not meet Ford material and design specifications, startup engine noises or knock may be parked on level ground. Turn the engine off , the oil must...
Owner Guide 1st Printing
Page 300
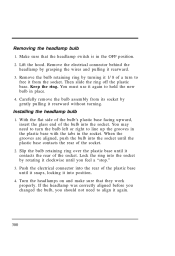
... a turn the bulb left or right to hold the new bulb in place. 4. Keep the ring. Push the electrical connector into the socket. Lift the hood. Make sure that they work properly. You must use it rearward. 3. Removing the headlamp bulb 1.
... a turn the bulb left or right to hold the new bulb in place. 4. Keep the ring. Push the electrical connector into the socket. Lift the hood. Make sure that they work properly. You must use it rearward. 3. Removing the headlamp bulb 1.

Owner Guide 1st Printing
Page 308
...Follow the instructions on the brake, shift through all the gears while the engine is washed. s With your foot on the label. Ford Gas Stabilizer should then be added whenever actual or expected storage periods exceed 60 days. s Periodically wash vehicles stored in the fuel system...running. s Lubricate all rubber parts free from exterior surfaces, rear wheel housing and underside of the fuel pump nozzle. s Keep all hood, door and trunk lid hinges and latches with high-quality unleaded fuel until it reaches normal operating temperature. The vehicle should be operated...
...Follow the instructions on the brake, shift through all the gears while the engine is washed. s With your foot on the label. Ford Gas Stabilizer should then be added whenever actual or expected storage periods exceed 60 days. s Periodically wash vehicles stored in the fuel system...running. s Lubricate all rubber parts free from exterior surfaces, rear wheel housing and underside of the fuel pump nozzle. s Keep all hood, door and trunk lid hinges and latches with high-quality unleaded fuel until it reaches normal operating temperature. The vehicle should be operated...

Owner Guide 1st Printing
Page 350
Hoses, checking ...251 313 251 250 267 318 I Identification Number, Vehicle (VIN) . Index Hood latch location ...lubrication specifications . release lever ...working under the hood . Idle relearning ...speed ...Ignition chime ...positions of the ignition ...Indicator lights and chimes (see Lights) Infant seats (see Safety seats) ...Instrument cluster, mechanical ...Instrument panel ...
Hoses, checking ...251 313 251 250 267 318 I Identification Number, Vehicle (VIN) . Index Hood latch location ...lubrication specifications . release lever ...working under the hood . Idle relearning ...speed ...Ignition chime ...positions of the ignition ...Indicator lights and chimes (see Lights) Infant seats (see Safety seats) ...Instrument cluster, mechanical ...Instrument panel ...
Owner Guide 1st Printing
Page 353
... door locks ...Power features door locks ...mirrors...seats ...windows ...Power steering dipstick ...driving with power steering ...fluid, checking and adding...fluid, specifications ...servicing ...Prop rod, hood ...94 . 160 . . 10 . 311 . 311 . 223 . . 84 . . 84 . . 86 . 109 . . 84 ...268 162 268 313 162 251 R Radio (see Electronic sound systems) ...Rear anti-lock...
... door locks ...Power features door locks ...mirrors...seats ...windows ...Power steering dipstick ...driving with power steering ...fluid, checking and adding...fluid, specifications ...servicing ...Prop rod, hood ...94 . 160 . . 10 . 311 . 311 . 223 . . 84 . . 84 . . 86 . 109 . . 84 ...268 162 268 313 162 251 R Radio (see Electronic sound systems) ...Rear anti-lock...
Scheduled Maintenance Guide 1st Printing
Page 56
...u Lubricate door rubber weatherstrips. u Inspect seatback latches for wear and function. u Check air pressure in spare tire. u Lubricate door and hood locks and latches. If any of these conditions are noted, bring them to the attention of your dealer or qualified service technician as soon as... possible. 56 Owner Maintenance Checks u Check headlamp alignment. At least once a year: u Lubricate door hinges and checks, and hood hinges. u Clean battery and terminals, check electrolyte level on low maintenance (auxiliary and replacement) batteries. u Check parking brake system.
...u Lubricate door rubber weatherstrips. u Inspect seatback latches for wear and function. u Check air pressure in spare tire. u Lubricate door and hood locks and latches. If any of these conditions are noted, bring them to the attention of your dealer or qualified service technician as soon as... possible. 56 Owner Maintenance Checks u Check headlamp alignment. At least once a year: u Lubricate door hinges and checks, and hood hinges. u Clean battery and terminals, check electrolyte level on low maintenance (auxiliary and replacement) batteries. u Check parking brake system.