Four Wheeling Supplement 1st Printing
Page 9
..., make sure that the gearshift is engaged in the N (Neutral) position, the engine and transmission are disconnected from the outside. Parking Before leaving the driver's seat, you should make sure you grip the steering wheel from the rest of the anti-lock brake system. Do not leave the vehicle unattended with...
..., make sure that the gearshift is engaged in the N (Neutral) position, the engine and transmission are disconnected from the outside. Parking Before leaving the driver's seat, you should make sure you grip the steering wheel from the rest of the anti-lock brake system. Do not leave the vehicle unattended with...
Owner Guide 1st Printing
Page 16
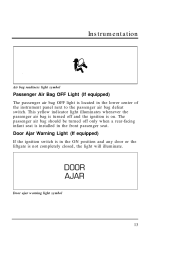
This yellow indicator light illuminates whenever the passenger air bag is turned off only when a rear-facing infant seat is installed in the ON position and any door or the liftgate is in the front passenger seat. Door ajar warning light symbol 13 Door Ajar Warning Light (If equipped) If the ignition switch...
This yellow indicator light illuminates whenever the passenger air bag is turned off only when a rear-facing infant seat is installed in the ON position and any door or the liftgate is in the front passenger seat. Door ajar warning light symbol 13 Door Ajar Warning Light (If equipped) If the ignition switch...
Owner Guide 1st Printing
Page 38
...display for approximately 5 seconds once the "CLK" button is mounted behind the driver's seat. NOTE: The clock displays 12-hour time with buttons on the Audio System. Ford 6-CD Changer (If equipped) The Ford Ranger (Regular Cab) 6-CD Changer is depressed and released. Both changers are controlled with... no AM/PM indications. Press the right (a) side of the "SEEK" button to increase minutes. The Ford Ranger (SuperCab) 6-CD Changer is mounted on . 2. Press and hold the "CLK" button, press the right (a) side of the "TUNE" button...
...display for approximately 5 seconds once the "CLK" button is mounted behind the driver's seat. NOTE: The clock displays 12-hour time with buttons on the Audio System. Ford 6-CD Changer (If equipped) The Ford Ranger (Regular Cab) 6-CD Changer is depressed and released. Both changers are controlled with... no AM/PM indications. Press the right (a) side of the "SEEK" button to increase minutes. The Ford Ranger (SuperCab) 6-CD Changer is mounted on . 2. Press and hold the "CLK" button, press the right (a) side of the "TUNE" button...
Owner Guide 1st Printing
Page 71
After a few minutes of air to the back seat area. s Do not put objects under the front seats that could block the air intake. Heater Controls (Heater-Only Vehicles) The control for your vehicle, always drive with the flow of operation, you to ...
After a few minutes of air to the back seat area. s Do not put objects under the front seats that could block the air intake. Heater Controls (Heater-Only Vehicles) The control for your vehicle, always drive with the flow of operation, you to ...
Owner Guide 1st Printing
Page 74
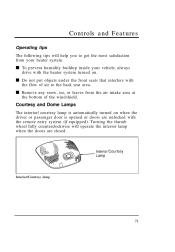
...operate the interior lamp when the doors are unlocked with the remote entry system (if equipped). s Do not put objects under the front seats that interfere with the heater system turned on when the driver or passenger door is automatically turned on . Turning the thumb wheel fully ...counterclockwise will help you to the back seat area. Courtesy and Dome Lamps The interior/courtesy lamp is opened or doors are closed. Interior/Courtesy lamp 71 s To prevent humidity buildup...
...operate the interior lamp when the doors are unlocked with the remote entry system (if equipped). s Do not put objects under the front seats that interfere with the heater system turned on when the driver or passenger door is automatically turned on . Turning the thumb wheel fully ...counterclockwise will help you to the back seat area. Courtesy and Dome Lamps The interior/courtesy lamp is opened or doors are closed. Interior/Courtesy lamp 71 s To prevent humidity buildup...
Owner Guide 1st Printing
Page 91
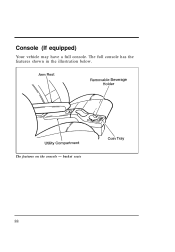
Console (If equipped) Your vehicle may have a full console. bucket seats 88 The full console has the features shown in the illustration below. The features on the console -
Console (If equipped) Your vehicle may have a full console. bucket seats 88 The full console has the features shown in the illustration below. The features on the console -
Owner Guide 1st Printing
Page 92
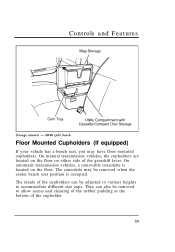
... transmission vehicles, a removable consolette is occupied. Controls and Features Storage armrest - 60/40 split bench Floor Mounted Cupholders (If equipped) If your vehicle has a bench seat, you may be removed when the center bench seat position is located on either side of the gearshift lever.
... transmission vehicles, a removable consolette is occupied. Controls and Features Storage armrest - 60/40 split bench Floor Mounted Cupholders (If equipped) If your vehicle has a bench seat, you may be removed when the center bench seat position is located on either side of the gearshift lever.
Owner Guide 1st Printing
Page 103
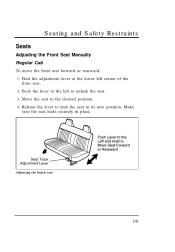
Seating and Safety Restraints Seats Adjusting the Front Seat Manually Regular Cab To move the front seat forward or rearward: 1. Adjusting the bench seat 101 Push the lever to the left corner of the front seat. 2. Find the adjustment lever at the lower left to the desired position. 4. Move the seat to unlock the seat. 3. Make sure the seat locks securely in its new position. Release the lever to lock the seat in place.
Seating and Safety Restraints Seats Adjusting the Front Seat Manually Regular Cab To move the front seat forward or rearward: 1. Adjusting the bench seat 101 Push the lever to the left corner of the front seat. 2. Find the adjustment lever at the lower left to the desired position. 4. Move the seat to unlock the seat. 3. Make sure the seat locks securely in its new position. Release the lever to lock the seat in place.
Owner Guide 1st Printing
Page 104
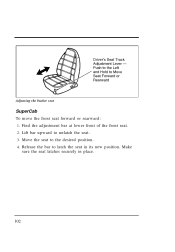
Find the adjustment bar at lower front of the front seat. 2. Lift bar upward to the desired position. 4. Move the seat to unlatch the seat. 3. Adjusting the bucket seat SuperCab To move the front seat forward or rearward: 1. Make sure the seat latches securely in its new position. Release the bar to latch the seat in place. 102
Find the adjustment bar at lower front of the front seat. 2. Lift bar upward to the desired position. 4. Move the seat to unlatch the seat. 3. Adjusting the bucket seat SuperCab To move the front seat forward or rearward: 1. Make sure the seat latches securely in its new position. Release the bar to latch the seat in place. 102
Owner Guide 1st Printing
Page 105
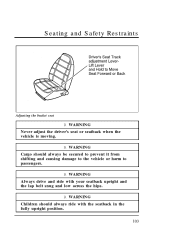
R WARNING Cargo should always ride with your seatback upright and the lap belt snug and low across the hips. R WARNING Always drive and ride with the seatback in the fully upright position. 103 R WARNING Children should always be secured to prevent it from shifting and causing damage to the vehicle or harm to passengers. Seating and Safety Restraints Adjusting the bucket seat R WARNING Never adjust the driver's seat or seatback when the vehicle is moving.
R WARNING Cargo should always ride with your seatback upright and the lap belt snug and low across the hips. R WARNING Always drive and ride with the seatback in the fully upright position. 103 R WARNING Children should always be secured to prevent it from shifting and causing damage to the vehicle or harm to passengers. Seating and Safety Restraints Adjusting the bucket seat R WARNING Never adjust the driver's seat or seatback when the vehicle is moving.
Owner Guide 1st Printing
Page 106
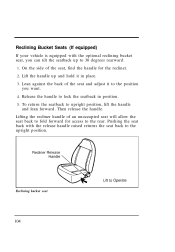
... the handle for access to the rear. On the side of an unoccupied seat will allow the seat back to fold forward for the recliner. 2. To return the seatback to upright position, lift the handle and lean forward. Then release the handle. Release ... position you can tilt the seatback up to 30 degrees rearward. 1. Pushing the seat back with the optional reclining bucket seat, you want. 4. Lean against the back of the seat and adjust it in position. 5. Reclining bucket seat 104 Reclining Bucket Seats (If equipped) If your vehicle is equipped with the release handle raised returns...
... the handle for access to the rear. On the side of an unoccupied seat will allow the seat back to fold forward for the recliner. 2. To return the seatback to upright position, lift the handle and lean forward. Then release the handle. Release ... position you can tilt the seatback up to 30 degrees rearward. 1. Pushing the seat back with the optional reclining bucket seat, you want. 4. Lean against the back of the seat and adjust it in position. 5. Reclining bucket seat 104 Reclining Bucket Seats (If equipped) If your vehicle is equipped with the release handle raised returns...
Owner Guide 1st Printing
Page 107
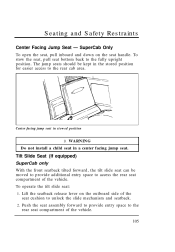
... for easier access to unlock the slide mechanism and seatback. 2. Seating and Safety Restraints Center Facing Jump Seat - To stow the seat, pull seat bottom back to the rear seat compartment of the seat cushion to the rear cab area. SuperCab Only To open the seat, pull inboard and down on the outboard side of the vehicle...
... for easier access to unlock the slide mechanism and seatback. 2. Seating and Safety Restraints Center Facing Jump Seat - To stow the seat, pull seat bottom back to the rear seat compartment of the seat cushion to the rear cab area. SuperCab Only To open the seat, pull inboard and down on the outboard side of the vehicle...
Owner Guide 1st Printing
Page 108
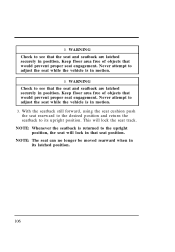
...free of objects that would prevent proper seat engagement. Never attempt to the upright position, the seat will lock the seat track. NOTE: The seat can no longer be moved rearward when in its upright position. R WARNING Check to see that the seat and seatback are latched securely in position.... Never attempt to its latched position. 106 With the seatback still forward, using the seat cushion push the seat rearward to the desired position and return the seatback to ...
...free of objects that would prevent proper seat engagement. Never attempt to the upright position, the seat will lock the seat track. NOTE: The seat can no longer be moved rearward when in its upright position. R WARNING Check to see that the seat and seatback are latched securely in position.... Never attempt to its latched position. 106 With the seatback still forward, using the seat cushion push the seat rearward to the desired position and return the seatback to ...
Owner Guide 1st Printing
Page 109
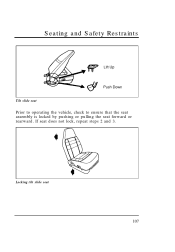
Locking tilt slide seat 107 If seat does not lock, repeat steps 2 and 3. Seating and Safety Restraints Tilt slide seat Prior to operating the vehicle, check to ensure that the seat assembly is locked by pushing or pulling the seat forward or rearward.
Locking tilt slide seat 107 If seat does not lock, repeat steps 2 and 3. Seating and Safety Restraints Tilt slide seat Prior to operating the vehicle, check to ensure that the seat assembly is locked by pushing or pulling the seat forward or rearward.
Owner Guide 1st Printing
Page 110
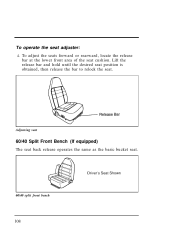
Lift the release bar and hold until the desired seat position is obtained, then release the bar to relock the seat. Adjusting seat 60/40 Split Front Bench (If equipped) The seat back release operates the same as the basic bucket seat. 60/40 split front bench 108 To operate the seat adjuster: 4. To adjust the seats forward or rearward, locate the release bar at the lower front area of the seat cushion.
Lift the release bar and hold until the desired seat position is obtained, then release the bar to relock the seat. Adjusting seat 60/40 Split Front Bench (If equipped) The seat back release operates the same as the basic bucket seat. 60/40 split front bench 108 To operate the seat adjuster: 4. To adjust the seats forward or rearward, locate the release bar at the lower front area of the seat cushion.
Owner Guide 1st Printing
Page 111
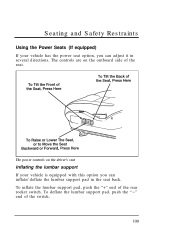
The controls are on the driver's seat Inflating the lumbar support If your vehicle has the power seat option, you can adjust it in the seat back. The power controls on the outboard side of the seat. To deflate the lumbar support pad, push the "Ҁ" end of the rear rocker switch. Seating and Safety Restraints Using the Power Seats (If equipped) If your vehicle is equipped with this option you can inflate/deflate the lumbar support pad in several directions. To inflate the lumbar support pad, push the "+" end of the switch. 109
The controls are on the driver's seat Inflating the lumbar support If your vehicle has the power seat option, you can adjust it in the seat back. The power controls on the outboard side of the seat. To deflate the lumbar support pad, push the "Ҁ" end of the rear rocker switch. Seating and Safety Restraints Using the Power Seats (If equipped) If your vehicle is equipped with this option you can inflate/deflate the lumbar support pad in several directions. To inflate the lumbar support pad, push the "+" end of the switch. 109
Owner Guide 1st Printing
Page 112
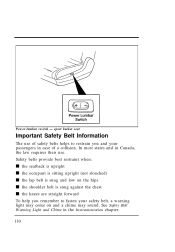
... Warning Light and Chime in Canada, the law requires their use of safety belts helps to fasten your passengers in case of a collision. sport bucket seat Important Safety Belt Information The use . In most states and in the Instrumentation chapter. 110 Power lumbar switch -
... Warning Light and Chime in Canada, the law requires their use of safety belts helps to fasten your passengers in case of a collision. sport bucket seat Important Safety Belt Information The use . In most states and in the Instrumentation chapter. 110 Power lumbar switch -
Owner Guide 1st Printing
Page 113
... in the fully upright position. 111 R WARNING Always drive and ride with the seatback in this chapter for children. R WARNING Ford recommends that all safety belt assemblies and attaching hardware should also be inspected by a qualified technician after any collision. R WARNING Children ...should always ride with your seatback upright and the lap belt snug and low across the hips. Seating and Safety Restraints See the following sections in a collision. R WARNING Never let a passenger hold a child on how to properly use ...
... in the fully upright position. 111 R WARNING Always drive and ride with the seatback in this chapter for children. R WARNING Ford recommends that all safety belt assemblies and attaching hardware should also be inspected by a qualified technician after any collision. R WARNING Children ...should always ride with your seatback upright and the lap belt snug and low across the hips. Seating and Safety Restraints See the following sections in a collision. R WARNING Never let a passenger hold a child on how to properly use ...
Owner Guide 1st Printing
Page 114
...a cargo area, inside shoulder. 3) Never use a single belt for more , the lap/shoulder belt locks and helps reduce your vehicle is not equipped with seats and safety belts. Never wear the shoulder belt under the arm. 2) Never swing it . Be sure everyone in your forward movement. Combination Lap and Shoulder... suits you brake hard, turn hard, or if your vehicle receives an impact of your movement. However, if you best. Then adjust the seat to lessen the risk of one buckle and one person. Pull the combination lap/shoulder belt from the retractor so that the shoulder portion of...
...a cargo area, inside shoulder. 3) Never use a single belt for more , the lap/shoulder belt locks and helps reduce your vehicle is not equipped with seats and safety belts. Never wear the shoulder belt under the arm. 2) Never swing it . Be sure everyone in your forward movement. Combination Lap and Shoulder... suits you brake hard, turn hard, or if your vehicle receives an impact of your movement. However, if you best. Then adjust the seat to lessen the risk of one buckle and one person. Pull the combination lap/shoulder belt from the retractor so that the shoulder portion of...
Owner Guide 1st Printing
Page 115
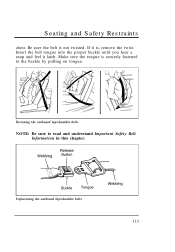
Fastening the outboard lap/shoulder belts NOTE: Be sure to the buckle by pulling on tongue. Insert the belt tongue into the proper buckle until you hear a snap and feel it is, remove the twist. Make sure the tongue is not twisted. Unfastening the outboard lap/shoulder belts 113 Be sure the belt is securely fastened to read and understand Important Safety Belt Information in this chapter. If it latch. Seating and Safety Restraints chest.
Fastening the outboard lap/shoulder belts NOTE: Be sure to the buckle by pulling on tongue. Insert the belt tongue into the proper buckle until you hear a snap and feel it is, remove the twist. Make sure the tongue is not twisted. Unfastening the outboard lap/shoulder belts 113 Be sure the belt is securely fastened to read and understand Important Safety Belt Information in this chapter. If it latch. Seating and Safety Restraints chest.


