
Customer Assistance Guide 1st Printing
Page 11
... luggage cover Trunk mount luggage rack Protection and appearance equipment Carpet floor mats Chemicals and paints Cleaners, waxes, and polishes Flat splash guards Full front end covers Lubricants and oils Mini-mask Molded splash guards Molded vinyl floor mats Rear decklid spoiler Side window air deflectors 11
... luggage cover Trunk mount luggage rack Protection and appearance equipment Carpet floor mats Chemicals and paints Cleaners, waxes, and polishes Flat splash guards Full front end covers Lubricants and oils Mini-mask Molded splash guards Molded vinyl floor mats Rear decklid spoiler Side window air deflectors 11
Warranty Guide 1st Printing
Page 5
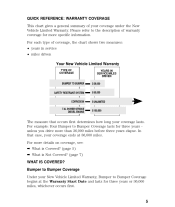
.... For example: Your Bumper to Bumper Coverage Under your coverage under the New Vehicle Limited Warranty. In that occurs first determines how long your coverage ends at the Warranty Start Date and lasts for three years or 36,000 miles, whichever occurs first. 5 QUICK REFERENCE: WARRANTY COVERAGE This chart gives a general...
.... For example: Your Bumper to Bumper Coverage Under your coverage under the New Vehicle Limited Warranty. In that occurs first determines how long your coverage ends at the Warranty Start Date and lasts for three years or 36,000 miles, whichever occurs first. 5 QUICK REFERENCE: WARRANTY COVERAGE This chart gives a general...
Warranty Guide 1st Printing
Page 7
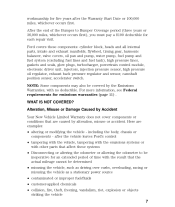
...NOT COVERED? including the body, chassis or components - after the Warranty Start Date or 100,000 miles, whichever occurs first. After the end of time with other parts that are examples: • altering or modifying the vehicle - Alteration, Misuse or Damage Caused by Accident Your... position sensor, accelerator switch. workmanship for an extended period of the Bumper to be inoperative for five years after the vehicle leaves Ford's control • tampering with the vehicle, tampering with the emissions systems or with the result that the actual mileage cannot be ...
...NOT COVERED? including the body, chassis or components - after the Warranty Start Date or 100,000 miles, whichever occurs first. After the end of time with other parts that are examples: • altering or modifying the vehicle - Alteration, Misuse or Damage Caused by Accident Your... position sensor, accelerator switch. workmanship for an extended period of the Bumper to be inoperative for five years after the vehicle leaves Ford's control • tampering with the vehicle, tampering with the emissions systems or with the result that the actual mileage cannot be ...
Warranty Guide 1st Printing
Page 10
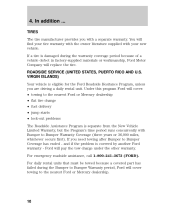
... manufacturer provides you with your new vehicle. If a tire is damaged during the Bumper to Bumper Coverage has ended - Under this program Ford will replace the tire. Ford will cover towing to Bumper Warranty Coverage (three years or 36,000 miles, whichever occurs first). For daily ...covered part has failed during the warranty coverage period because of a vehicle defect in factory-supplied materials or workmanship, Ford Motor Company will cover: • towing to the nearest Ford or Mercury dealership • flat tire change • fuel delivery • jump starts • lock-out ...
... manufacturer provides you with your new vehicle. If a tire is damaged during the Bumper to Bumper Coverage has ended - Under this program Ford will replace the tire. Ford will cover towing to Bumper Warranty Coverage (three years or 36,000 miles, whichever occurs first). For daily ...covered part has failed during the warranty coverage period because of a vehicle defect in factory-supplied materials or workmanship, Ford Motor Company will cover: • towing to the nearest Ford or Mercury dealership • flat tire change • fuel delivery • jump starts • lock-out ...

Audio Guide 1st Printing
Page 10
... stop the scan mode. SEEK SCAN TUNE SEEK SCAN AUTOSET Scan function in radio mode Press the SCAN control to the first track at the end of all listenable stations on the tape. (The tape scans in radio, tape or CD mode (if equipped). Press the control again to the opposite... side of all selections on the frequency band. At the end of the tape's first side, direction automatically reverses to stop on a particular selection, press the control again.
... stop the scan mode. SEEK SCAN TUNE SEEK SCAN AUTOSET Scan function in radio mode Press the SCAN control to the first track at the end of all listenable stations on the tape. (The tape scans in radio, tape or CD mode (if equipped). Press the control again to the opposite... side of all selections on the frequency band. At the end of the tape's first side, direction automatically reverses to stop on a particular selection, press the control again.

Audio Guide 1st Printing
Page 16
... Tape direction select Press SIDE 1-2 to play select control or the fast forward control) or the end of the tape is stopped (with the tape play the alternate side of the tape plays. At the end of the first side of the tape, direction automatically reverses and the opposite side of a tape...
... Tape direction select Press SIDE 1-2 to play select control or the fast forward control) or the end of the tape is stopped (with the tape play the alternate side of the tape plays. At the end of the first side of the tape, direction automatically reverses and the opposite side of a tape...
Owner Guide 1st Printing
Page 7
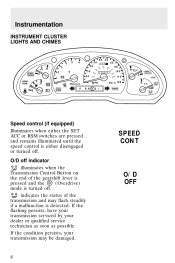
... THEFT 4WD LOW P R N D 2 1 L O/D OFF Speed control (if equipped) Illuminates when either disengaged or turned off indicator O/D OFF illuminates when the Transmission Control Button on the end of the transmission and may be damaged. If the condition persists, your dealer or qualified service technician as soon as possible. O/D off .
... THEFT 4WD LOW P R N D 2 1 L O/D OFF Speed control (if equipped) Illuminates when either disengaged or turned off indicator O/D OFF illuminates when the Transmission Control Button on the end of the transmission and may be damaged. If the condition persists, your dealer or qualified service technician as soon as possible. O/D off .

Owner Guide 1st Printing
Page 45
... WASHER Wipers Rotate the windshield wiper control to the desired interval speed. Controls and features Deactivating overdrive To deactivate overdrive, press the control at the end of the gearshift lever.
... WASHER Wipers Rotate the windshield wiper control to the desired interval speed. Controls and features Deactivating overdrive To deactivate overdrive, press the control at the end of the gearshift lever.

Owner Guide 1st Printing
Page 63
To install the shade: 1. Pull the end of a sudden stop or collision. This is equipped with a cargo area shade that covers the luggage compartment of your vision or strike occupants of the ...
To install the shade: 1. Pull the end of a sudden stop or collision. This is equipped with a cargo area shade that covers the luggage compartment of your vision or strike occupants of the ...

Owner Guide 1st Printing
Page 64
... it operates properly. Unfold the vinyl and place it with each wrap. 3. Insert the shade into the side mounting brackets and check to hold the end cap in while turning the roller tube toward you . 2. Fold the edges of the tube. 4. ANTI-THEFT SYSTEM (IF EQUIPPED) When armed, the anti...-theft system prevents unauthorized entry into the end cap slots. 7. Remove the shade from losing its spring tension. 6. Tuck the edges of the right end cap. Let go of the vinyl inside the end cap with the smooth grain facing you 14 times. 5. Use tape or a...
... it operates properly. Unfold the vinyl and place it with each wrap. 3. Insert the shade into the side mounting brackets and check to hold the end cap in while turning the roller tube toward you . 2. Fold the edges of the tube. 4. ANTI-THEFT SYSTEM (IF EQUIPPED) When armed, the anti...-theft system prevents unauthorized entry into the end cap slots. 7. Remove the shade from losing its spring tension. 6. Tuck the edges of the right end cap. Let go of the vinyl inside the end cap with the smooth grain facing you 14 times. 5. Use tape or a...

Owner Guide 1st Printing
Page 86
Do not wear the lap belt around your waist. Safety belt indicator light and warning chime illuminates in the center of the belt until snug. To lengthen the belt: • Tip and pull the tongue. To shorten the belt: • Buckle the belt. • Pull the loose end of the rear seat. Seating and safety restraints Using lap belts Adjusting the lap belt A lap belt is located in the instrument cluster and a chime sounds to remind the occupants to fasten their safety belts: 87
Do not wear the lap belt around your waist. Safety belt indicator light and warning chime illuminates in the center of the belt until snug. To lengthen the belt: • Tip and pull the tongue. To shorten the belt: • Buckle the belt. • Pull the loose end of the rear seat. Seating and safety restraints Using lap belts Adjusting the lap belt A lap belt is located in the instrument cluster and a chime sounds to remind the occupants to fasten their safety belts: 87

Owner Guide 1st Printing
Page 88
Do not use extensions manufactured by the same supplier as the safety belt. Safety belt extensions are available at the end of the belt with the safety belt to protect the driver and right front passenger • reduce certain upper body injuries 89 Approximately 20 cm (8 ...
Do not use extensions manufactured by the same supplier as the safety belt. Safety belt extensions are available at the end of the belt with the safety belt to protect the driver and right front passenger • reduce certain upper body injuries 89 Approximately 20 cm (8 ...

Owner Guide 1st Printing
Page 145
... LUGGAGE RACK (IF EQUIPPED) Maximum load is not possible to distribute the load, position it as far rearward as possible. Loosen the thumbwheel at both ends of regular, scheduled maintenance • excessive speed • rapid acceleration 146 Tighten thumbwheel at both...
... LUGGAGE RACK (IF EQUIPPED) Maximum load is not possible to distribute the load, position it as far rearward as possible. Loosen the thumbwheel at both ends of regular, scheduled maintenance • excessive speed • rapid acceleration 146 Tighten thumbwheel at both...

Owner Guide 1st Printing
Page 157
Assemble the jack handle to raise the rear wheel. • Never use the differential as a jacking point. 14. Insert tapered end of the jack handle into the actuator hole and turn each. 13. Turn the jack handle clockwise until the cable is slack enough to allow ...
Assemble the jack handle to raise the rear wheel. • Never use the differential as a jacking point. 14. Insert tapered end of the jack handle into the actuator hole and turn each. 13. Turn the jack handle clockwise until the cable is slack enough to allow ...

Owner Guide 1st Printing
Page 160
... Do not push-start your vehicle. Switch off the engine. Make sure that they do not touch one end of the second lead to the negative (-) terminal of the booster battery (3) and the other end to a metal part of the engine to be started (4), not to the positive (+) terminal of the discharged...
... Do not push-start your vehicle. Switch off the engine. Make sure that they do not touch one end of the second lead to the negative (-) terminal of the booster battery (3) and the other end to a metal part of the engine to be started (4), not to the positive (+) terminal of the discharged...

Owner Guide 1st Printing
Page 161
... been started , run the engine at moderately increased speed. 2. Start the engine of the vehicle with the discharged battery. 3. Roadside emergencies Do not connect the end of the second cable to the negative ([-]) terminal of the battery to idle for a further three minutes before disconnecting the cable leads.
... been started , run the engine at moderately increased speed. 2. Start the engine of the vehicle with the discharged battery. 3. Roadside emergencies Do not connect the end of the second cable to the negative ([-]) terminal of the battery to idle for a further three minutes before disconnecting the cable leads.

Owner Guide 1st Printing
Page 188
... and adding water. Keep the electrolyte level up to spill. Batteries normally produce explosive gases which can cause personal injury. For more information on the ends when lifting a battery could cause acid to the level indicator. Maintenance and care replacement, it will have removable vent caps for your eyes and also...
... and adding water. Keep the electrolyte level up to spill. Batteries normally produce explosive gases which can cause personal injury. For more information on the ends when lifting a battery could cause acid to the level indicator. Maintenance and care replacement, it will have removable vent caps for your eyes and also...

Owner Guide 1st Printing
Page 192
... car washes can reduce the effectiveness of the assembly. 2. Close the assembly and secure the locking clamp. Swing the left side of the assembly open end of 4.0 L OHV and 5.0 L engines. Release the clamp locking clip on the front portion of wiper blades. 193 CHECKING AND REPLACING WIPER BLADES Checking wiper blades...
... car washes can reduce the effectiveness of the assembly. 2. Close the assembly and secure the locking clamp. Swing the left side of the assembly open end of 4.0 L OHV and 5.0 L engines. Release the clamp locking clip on the front portion of wiper blades. 193 CHECKING AND REPLACING WIPER BLADES Checking wiper blades...

Owner Guide 1st Printing
Page 210
... clockwise until you feel it counterclockwise. 2. Maintenance and care Replacing the headlamps 1. With the flat side of the bulb's base facing upward, insert the glass end of the socket. 2. Turn the headlamps on and ensure they work properly. Replace the bulb and insert the bulb assembly back into the socket. LIFT...
... clockwise until you feel it counterclockwise. 2. Maintenance and care Replacing the headlamps 1. With the flat side of the bulb's base facing upward, insert the glass end of the socket. 2. Turn the headlamps on and ensure they work properly. Replace the bulb and insert the bulb assembly back into the socket. LIFT...

Severe Duty Supplement 1st Printing
Page 15
... equipment should be checked monthly for proper routing, deterioration or chafing on other ends are firmly attached to the coil pack and that meets Ford specification ESR-M13P4-A to the terminal surfaces to tighten the clamp with a damp cloth. Ford recommends that the converter has cooled before attempting maintenance. Check the tightness of...
... equipment should be checked monthly for proper routing, deterioration or chafing on other ends are firmly attached to the coil pack and that meets Ford specification ESR-M13P4-A to the terminal surfaces to tighten the clamp with a damp cloth. Ford recommends that the converter has cooled before attempting maintenance. Check the tightness of...


