Owner's Manual
Page 21
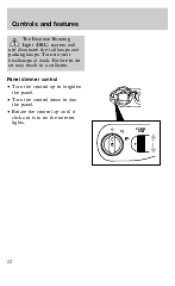
Panel dimmer control • Turn the control up to brighten the panel. • Turn the control down to dim the panel. • Rotate the control up until it clicks to do so may result in a collision. Turn on the interior lights. P PANEL DIM 22 Failure to turn on your headlamps at dusk. Controls and features The Daytime Running Light (DRL) system will not illuminate the tail lamps and parking lamps.
Panel dimmer control • Turn the control up to brighten the panel. • Turn the control down to dim the panel. • Rotate the control up until it clicks to do so may result in a collision. Turn on the interior lights. P PANEL DIM 22 Failure to turn on your headlamps at dusk. Controls and features The Daytime Running Light (DRL) system will not illuminate the tail lamps and parking lamps.
Owner's Manual
Page 53
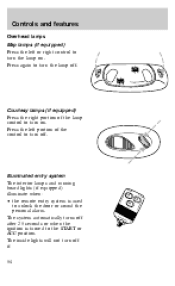
... the left or right control to turn on . The system automatically turns off if: 54 LO CK U LO N CK PA NIC Illuminated entry system The interior lamps and running board lights (if equipped) illuminate when: • the remote entry system is turned to the START or ACC position. The inside lights...
... the left or right control to turn on . The system automatically turns off if: 54 LO CK U LO N CK PA NIC Illuminated entry system The interior lamps and running board lights (if equipped) illuminate when: • the remote entry system is turned to the START or ACC position. The inside lights...

Owner's Manual
Page 68
.... To confirm that all doors. LO CK U LO N CK PA NIC Sounding a panic alarm Press the PANIC control to the Accesory or On position. The interior lamps will flash. LO CK U LO N CK PA NIC 69 The doors will lock again, the horn will chirp and the lights will illuminate. Controls...
.... To confirm that all doors. LO CK U LO N CK PA NIC Sounding a panic alarm Press the PANIC control to the Accesory or On position. The interior lamps will flash. LO CK U LO N CK PA NIC 69 The doors will lock again, the horn will chirp and the lights will illuminate. Controls...
Owner's Manual
Page 141
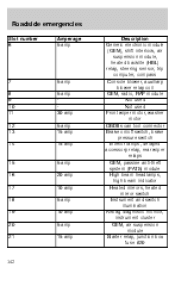
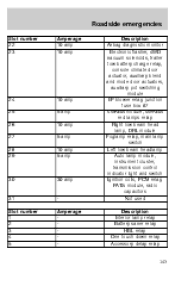
... coil GEM, radio, RAP module Not used Not used Front wiper motor, washer motor OBDII scan tool connector Brake on/off switch, brake pressure switch Interior lamps, delayed accessory relay, rear wiper relays GEM, passive anti-theft system (PATS) module High beam headlamps, high beam indicator Heated mirrors, heated mirror switch...
... coil GEM, radio, RAP module Not used Not used Front wiper motor, washer motor OBDII scan tool connector Brake on/off switch, brake pressure switch Interior lamps, delayed accessory relay, rear wiper relays GEM, passive anti-theft system (PATS) module High beam headlamps, high beam indicator Heated mirrors, heated mirror switch...
Owner's Manual
Page 142
... low beam headlamp Auto lamp module, instrument cluster, transmission control indicator light and switch Ignition coils, PCM relay, PATS module, radio capacitors Not used Description Interior lamp relay Battery saver relay HBL relay One touch down relay Accessory delay relay 24 25 26 27 28 29 10 amp 5 amp 10 amp...
... low beam headlamp Auto lamp module, instrument cluster, transmission control indicator light and switch Ignition coils, PCM relay, PATS module, radio capacitors Not used Description Interior lamp relay Battery saver relay HBL relay One touch down relay Accessory delay relay 24 25 26 27 28 29 10 amp 5 amp 10 amp...

Owner's Manual
Page 143
... nut wrench, instructions, work gloves Jack handle Location Under the vehicle, just in front of the road: • Park on the right rear quarter panel interior trim. Behind the access panel located on a level spot. • Turn off the ignition. • Set the parking brake. • Activate the hazard flashers. Spare...
... nut wrench, instructions, work gloves Jack handle Location Under the vehicle, just in front of the road: • Park on the right rear quarter panel interior trim. Behind the access panel located on a level spot. • Turn off the ignition. • Set the parking brake. • Activate the hazard flashers. Spare...

Owner's Manual
Page 144
... slightly slack. 145 Open the hood. 2. Lift and rotate the two panel retaining clips and remove panel. 2. Remove the jack by the clip on the interior trim. Removing the jack and tools 1. Insert the straight end of the radiator shroud. Un-snap the end of the windshield washer bottle. 3. Removing the...
... slightly slack. 145 Open the hood. 2. Lift and rotate the two panel retaining clips and remove panel. 2. Remove the jack by the clip on the interior trim. Removing the jack and tools 1. Insert the straight end of the radiator shroud. Un-snap the end of the windshield washer bottle. 3. Removing the...

Owner's Manual
Page 198
.... Grasp the bulb only by its plastic base and do not touch the glass. Open the hood. 199 Replacement bulbs For specifications for exterior and interior replacement bulbs for your hand could cause the bulb to Bulb specifications in the OFF position. 2. The oil from your vehicle, refer to break the...
.... Grasp the bulb only by its plastic base and do not touch the glass. Open the hood. 199 Replacement bulbs For specifications for exterior and interior replacement bulbs for your hand could cause the bulb to Bulb specifications in the OFF position. 2. The oil from your vehicle, refer to break the...
Owner's Manual
Page 204
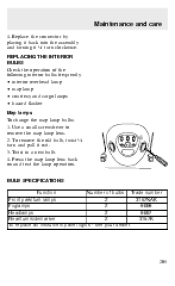
...in a new bulb. 4. Press the map lamp lens back on and test the lamp operation. BULB SPECIFICATIONS Function Number of the following interior bulbs frequently: • interior overhead lamp • map lamp • courtesy and cargo lamps • hazard flasher Map lamps To change the map lamp bulbs:... 1. see your dealer. 205 REPLACING THE INTERIOR BULBS Check the operation of bulbs Trade number Front park/turn lamps 2 3157NAK Foglamps 2 9006 Headlamps 2 9007 Rear/turn and pull it 1⁄...
...in a new bulb. 4. Press the map lamp lens back on and test the lamp operation. BULB SPECIFICATIONS Function Number of the following interior bulbs frequently: • interior overhead lamp • map lamp • courtesy and cargo lamps • hazard flasher Map lamps To change the map lamp bulbs:... 1. see your dealer. 205 REPLACING THE INTERIOR BULBS Check the operation of bulbs Trade number Front park/turn lamps 2 3157NAK Foglamps 2 9006 Headlamps 2 9007 Rear/turn and pull it 1⁄...
Owner's Manual
Page 210
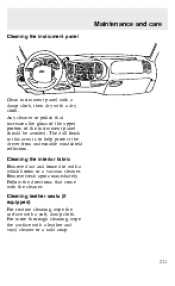
... cloth. Remove fresh spots immediately. Follow the directions that increases the gloss of the upper portion of the instrument panel should be avoided. Cleaning the interior fabric Remove dust and loose dirt with a dry cloth. Maintenance and care Cleaning the instrument panel Clean instrument panel with a damp cloth, then dry with...
... cloth. Remove fresh spots immediately. Follow the directions that increases the gloss of the upper portion of the instrument panel should be avoided. Cleaning the interior fabric Remove dust and loose dirt with a dry cloth. Maintenance and care Cleaning the instrument panel Clean instrument panel with a damp cloth, then dry with...
Owner's Manual
Page 222
Index Idle relearning ...178 Ignition ...68 Instrument panel ...20 Jack ...66 Jump-starting your vehicle 151,152 attaching cables ...152 disconnecting cables ...153 Lamps interior lamps ...54 parking lamps ...201 Lights, warning and indicator anti-lock brakes (ABS) ...12 brake ...10 charging system ...9 high beam ...12 safety belt ...10,86 ...
Index Idle relearning ...178 Ignition ...68 Instrument panel ...20 Jack ...66 Jump-starting your vehicle 151,152 attaching cables ...152 disconnecting cables ...153 Lamps interior lamps ...54 parking lamps ...201 Lights, warning and indicator anti-lock brakes (ABS) ...12 brake ...10 charging system ...9 high beam ...12 safety belt ...10,86 ...


